iPhone Not Charging? Try These Fixes!
If you connect your iPhone to a wall adapter or to a wireless charger and it does not charge right away, try the below fixes one by one. These are fairly some of the easiest fixes that you can try yourself to solve the issue without taking your device to a professional.
1. Clean The Lightning Port
Before we move on to the software side of things to fix the issue, it is important to start with the hardware side. So, if you plug in your iPhone and it does not charge, firstly, check the Lightning port of the device for dust and lint that may have collected inside it over time. This might be preventing the Lightning cable to make a strong and stable connection with the internal charging unit. You can use a wooden toothpick to poke the port and get the dirt and pocket lint out of it. However, make sure to poke the port gently and do not go too hard on it as you might damage the internal charging unit. After taking out the dirt and giving your iPhone a few shakes, reconnect your charging cable to check if the device is charging or not. Bonus Tip: If the iPhone does not charge after connecting it to an adapter via a Lightning cable, try charging your device with the reverse side of the Lightning connector that you are using. This sometimes does the trick, believe it or not!
2. Check Your iPhone Case and Charging Accessories
In case you rely on wireless charging to juice up your iPhone, a primary reason for your device not charging can be your fancy case. Not all iPhone cases are compatible with wireless charging and especially third-party cases are more likely to be not compatible than being compatible. So, be sure to check if you have the right case that supports wireless charging. Another reason for your iPhone not charging can be your charging accessories. Faulty Lightning cables and non-MFi (Made for iPhone) charging adapters might sometime prevent your iPhone from charging. In fact, they can damage your device’s battery and reduce its longevity. So be very aware of your charging accessories and always try to use official charging cables and adapters or MFi-certified accessories to charge your iPhone.
3. Check for Liquid Damage and High Temperature
Other than pocket lint, gunk, and dirt, water inside the Lightning port of your iPhone might also prevent it to charge when connected to an adapter. This might happen right after your iPhone has taken a splash of water. In this case, dry the iPhone with a clean and dry towel, and then run the “Water Eject” Siri shortcut on your device. This will play a high-frequency sound to physically eject the water out of the internals. Try charging your device 10-15 minutes after running the said Siri shortcut. The ambient temperature and the temperature of the iPhone might also prevent your device to charge. The ideal ambient temperature to charge an iPhone is 0 to 35-degree Celcius. So, make sure your surrounding temperature is in the said range and your iPhone is not too hot to handle before connecting it to the adapter.
4. Update Your Software
Apart from the above causes, very rare software bugs in the iOS system might prevent your iPhone to charge. I once faced an issue on my iOS device that halted the battery percentage whenever my device reached 86%. I tried many fixes to solve the issue but it did not go away. Later, I discovered that it was an iOS bug that affected a certain number of users. However, it is worth mentioning that my device was running a beta iOS version at the time, and hence, it was considerable. However, if you ever face this kind of unusual battery-not-charging issue on your iPhone and have already tried the above fixes, make sure your device is updated to the latest official iOS version. To update your iOS version:
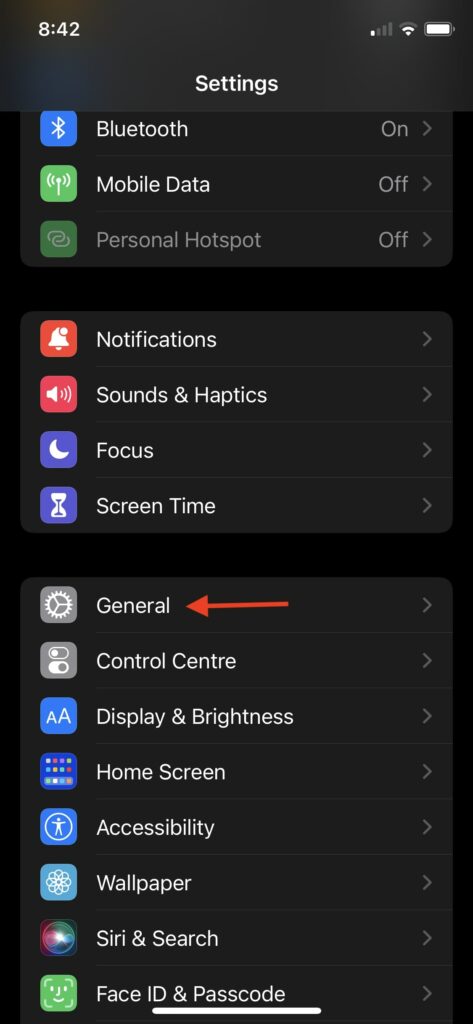
- Go to Settings.
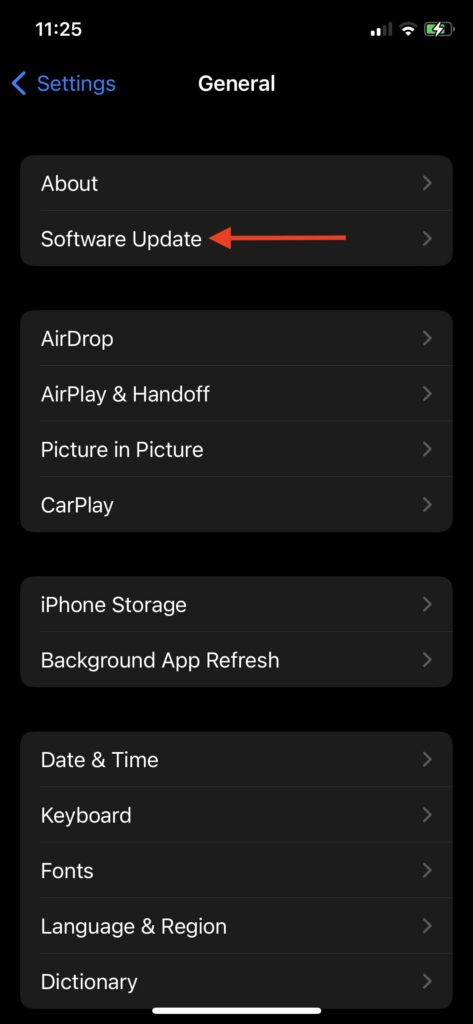
- Open General from the list.
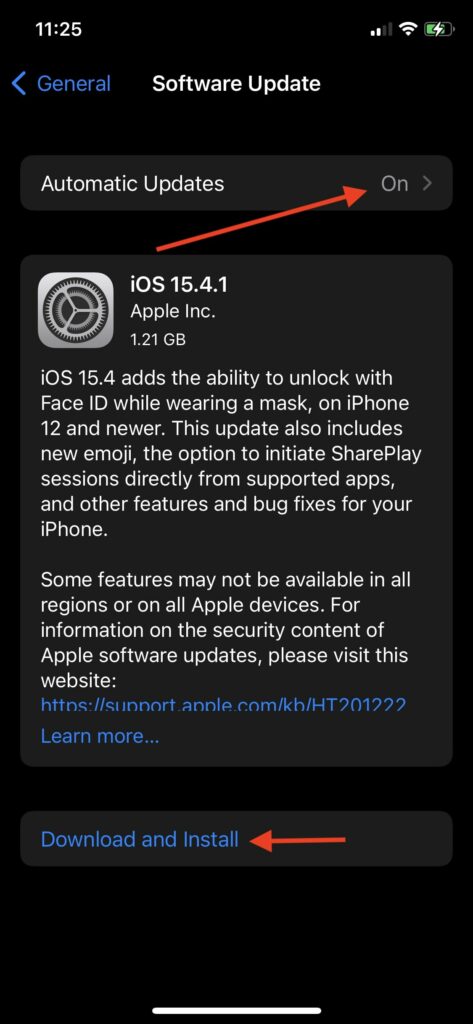
- Tap Software Update to open the update page. Here, you should get the latest iOS update. The current official iOS version, as of writing this article, is iOS 15.6.1.
5. Turn Off “Optimized Battery Charging”
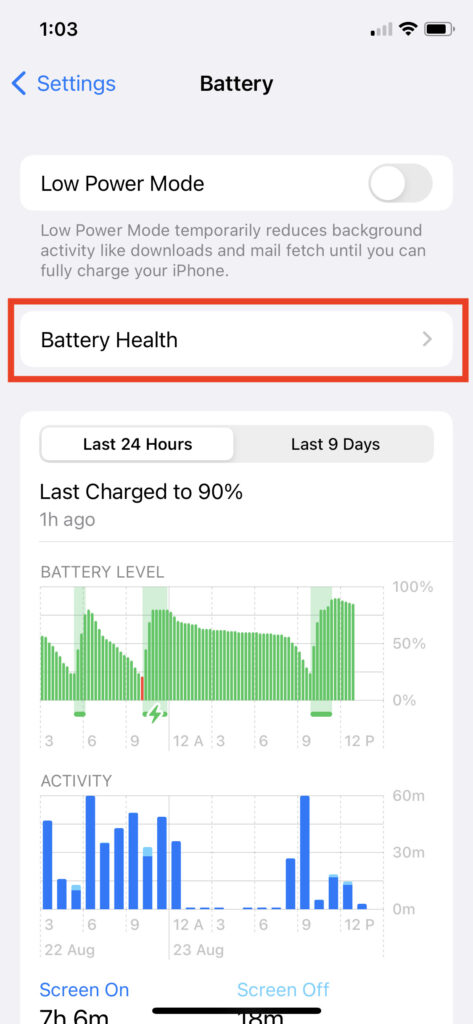
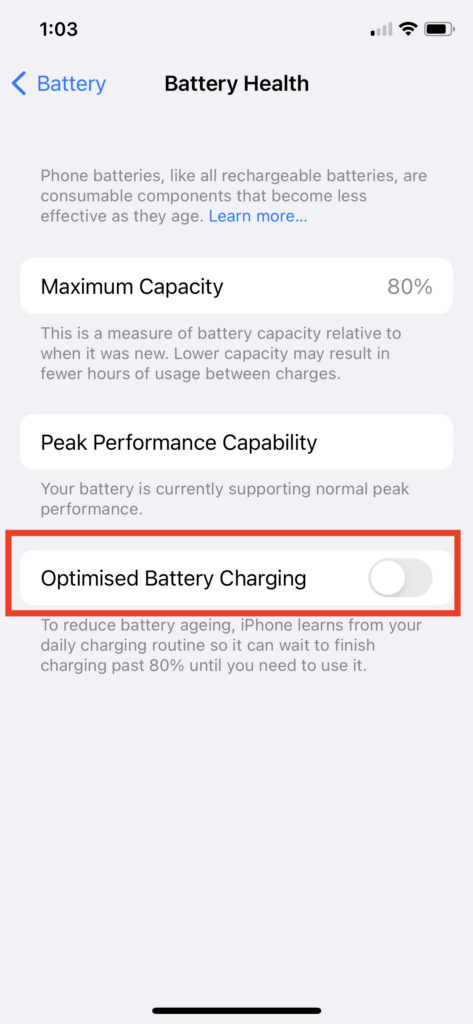
Now, if your iPhone is not going past the 80% mark no matter how much you charge it, then you have nothing to worry about. You see, after the whole battery-gate issue, in which Apple was accused of intentionally throttling older iPhone devices to preserve their battery, the Cupertino giant rolled out a new “Optimized Battery Charging” feature with iOS 13. The feature is turned on by default. It essentially learns your daily charging pattern and optimizes the process. This means that if you charge your iPhone overnight, every night, and unplug it at a specific time in the morning, say at 8 o’clock, your iPhone will be stuck at 80% battery all night until 2 hours before your daily unplugging time. This prevents the battery from degrading over time and increases the overall longevity of the battery unit. However, you have the option to turn it off from the Settings. You can find the “Optimized Battery Charging” toggle in the Battery Health section of your device.
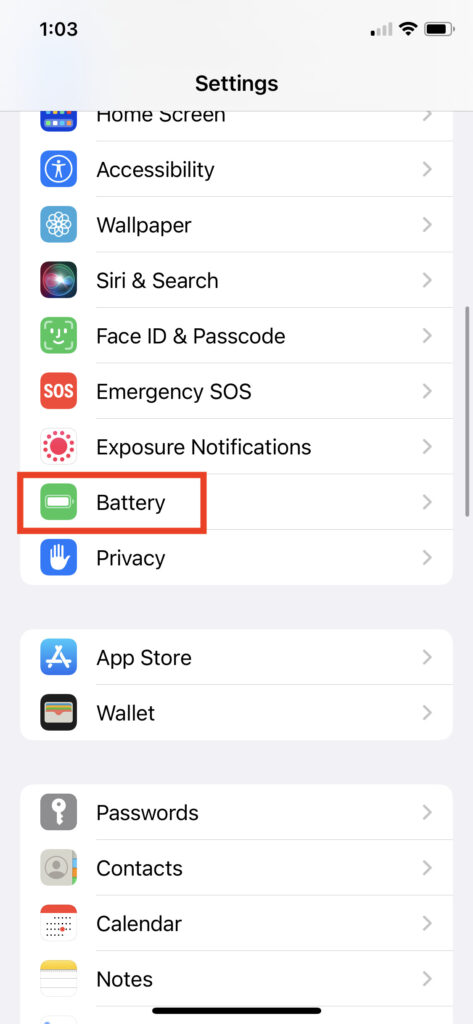
- Go to Settings.
- Open the Battery section.
- Tap the Battery Health option.
- Turn off the Optimized Battery Charging toggle at the bottom. Now, your iPhone will not be stuck at 80% battery at any time of the day. However, it is worth mentioning that it might degrade your battery much faster than with Optimized Battery Charging turned on.
6. Hard Reset Your iPhone
If the above fixes did not work for you and your iPhone is still not charging when connected to a wall charger or a wireless charger, a hard reset might just do the trick. Now, a hard reset is not what you think it is. It is not formatting the device. Instead, a hard reset is just another name for a forced restart that resets your internal system and also clears cache memory in the process. And sometimes, for issues like the battery not charging, a hard reset could solve the problem. Now, there are different ways to perform a hard reset that depends on the iPhone models. You can find the hard-reset processes of the relevant iPhone models right below.
For iPhones with Face ID (iPhone X and Newer Devices):
Press the Volume Up button and the Volume Down button one after the other. After that, quickly press and hold the Sleep/Wake button until the Apple logo pops up on the screen.
For iPhone 6s, 6s Plus, SE (1st Generation), and Earlier Devices:
Press and hold the Lock button and the Home button simultaneously until you see the Apple logo on your screen.
For iPhone 7 and 7 Plus:
Press and hold the Volume down button and the Lock button simultaneously until the Apple logo appears on the screen.
Why is my iPhone not charging?
There can be multiple reasons why your iPhone might not charge when you connect it to an adapter. Try the above fixes and see if they solve your issue.
How to force restart my iPhone?
There are different ways to force restart your iPhone. We have listed the ways for each iPhone models above. So, do check them out to know the process for different iPhone models.
Why is my iPhone not turning on even after connecting to a charger?
If you have already tried the above fixes and your iPhone is not turning on when connected to a charger, you might have a dead or damaged battery. In this case, we’d suggest contacting Apple Support or taking your device to the nearest Apple service center.
How can I check my iPhone’s Battery Health?
You can check your iPhone’s overall battery health from the Battery settings in your device.
Final Words
So, these are some of the basic fixes that you can try if you find out that your iPhone is not charging. I hope one of the above solutions works for you. However, if none of them work for your device, I’d suggest you take it to an Apple-authorized service center. Thank you for reading this guide.
Δ
