Best Ways to Take Screenshots on Windows 11 (July 2021)
In this article, we will take a look at all methods to take screenshots on your Windows 11 PC. That includes all the screenshot tools natively available in Windows 11, as well as the most efficient third-party software. So, without further ado, let’s check out all the ways you can use to capture screenshots on a Windows 11 computer. Note: This article details multiple ways to take screenshots in Windows 11. However, the methods described here, unless otherwise mentioned, work perfectly on Windows 10 as well. If you are yet to upgrade to Windows 11 from Windows 10, you can check out our in-depth guide on how to take screenshots in Windows 10 for more details.
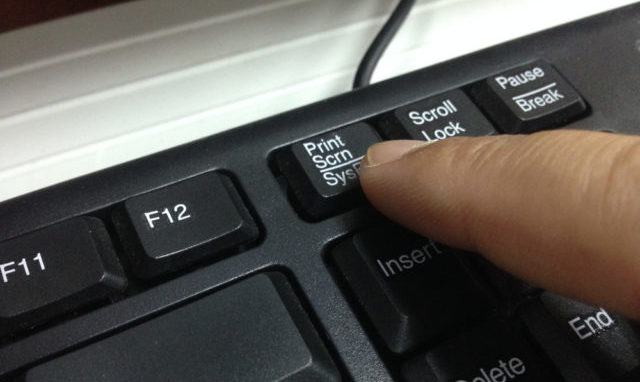
1. Print Screen Key: Copy Screenshot to Clipboard
The easiest way to take a screenshot on your Windows 11 PC is by pressing the “Print Screen” key (often labeled as PrtScr or PrtScn). You can find the Print Screen key at the top-right section of your keyboard (usually next to the F12 key). Now, pressing the Print Screen key will take a screenshot of the entire screen, and the image file will be saved to the Windows clipboard. You can then paste it in Paint, Paint 3D, or any other image editor of your choice before you can save it.
2. Windows + Print Screen Shortcut: Auto-save Screenshot
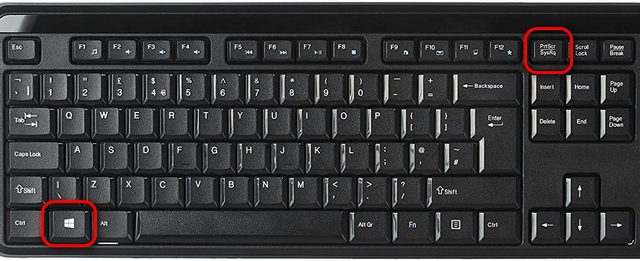
Another easy way to take screenshots on your Windows 11 computer is by using the Windows shortcut “Windows + Print Screen“. To do that, press the Windows key and Print Screen key on your keyboard at the same time. You will see the screen dim momentarily and brighten back up, which signifies a successful screen capture. This will automatically save the image in the “Screenshots” folder inside the “Pictures” folder on your computer.
Note: In some laptops, you can only activate the Print Screen button after pressing the Function key. If you have such a laptop, then you will have to use the “Windows key + Function (Fn) + Print Screen” shortcut to take a screenshot.
3. Alt + Print Screen Shortcut: Take a Screenshot of Active Windows
While the two previous methods see you take screenshots of the entire desktop, you can also capture just the active window instead of the entire desktop in Windows 11. To do that, you can make use of the “Alt + Print Screen” keyboard shortcut. Like the first method, this also copies the screenshot to the Windows clipboard. That means you need to then paste it into an image editor like Paint or Paint 3D before saving it in a format of your choice.
4. Snipping Tool: Built-in Tool to Edit and Annotate Screenshots in Windows 11
The Snipping Tool is another great way to capture screenshots on your Windows 11 PC. It’s the best option if you want a basic screen utility. It doesn’t offer as many features as some of the third-party utilities mentioned below, but it gets the work done with ease.
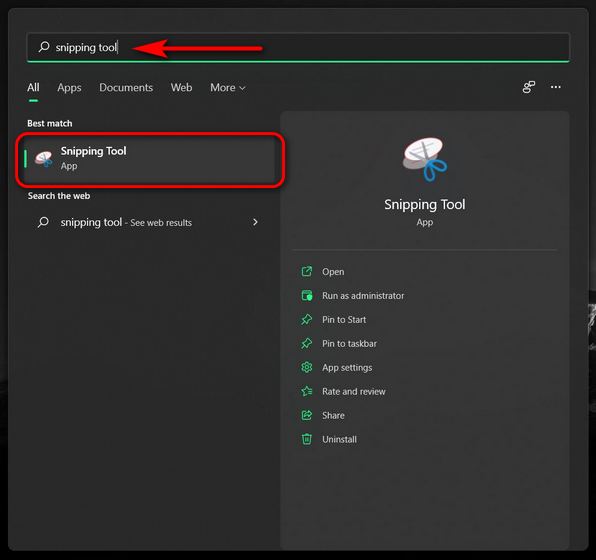
To use the Snipping Tool, first get to the screen you want to capture. Now, open the app from the new Windows 11 Start Menu or search for it using Windows Search.
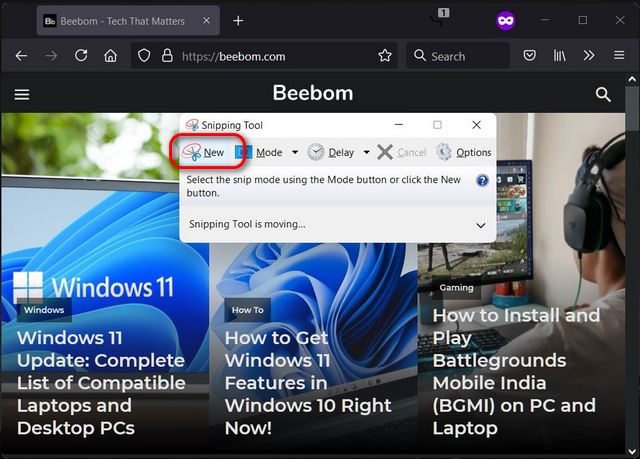
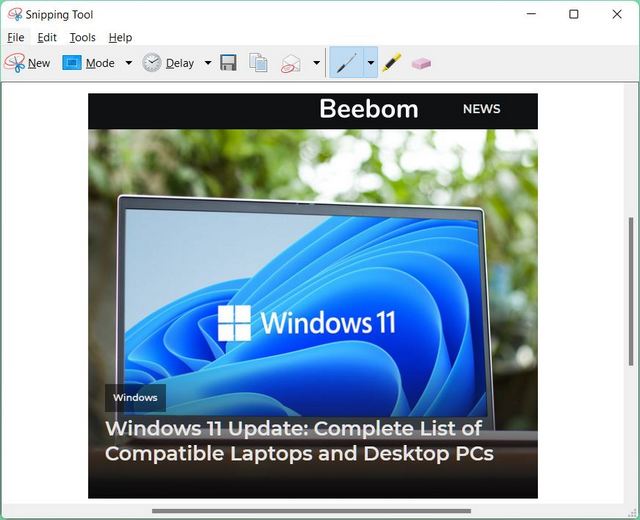
Once the tool is open, and you are on the screen you want to capture, click on “New” in the app’s toolbar.
Now left-click on your mouse/ trackpad and drag on your screen to select the area you want to capture.
Release the mouse button to take a screenshot of the selected area. The app will now open the screenshot within a window to let you edit the image, highlight content, and annotations, among other things. Once you are done with the edits, you can save the screenshot to a location of your choice by clicking on “File” at the top and choosing “Save as“.
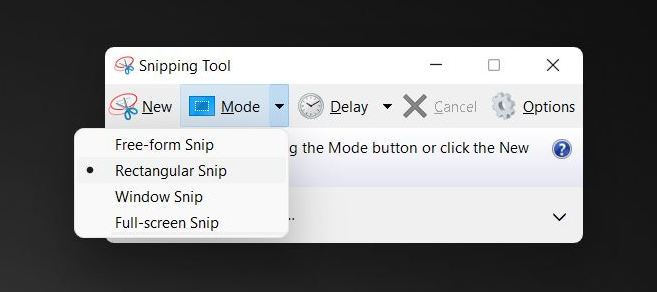
Moreover, the Snipping Tool offers four different screenshot modes, including Free-form, Rectangular, (Active) Window, and Full-screen. What’s more, you also get a “Delay” option that allows you to set a screenshot timer or countdown. This feature can come in handy when you are trying to capture a temporary window.
Note: Microsoft is deprecating Snipping Tool in favor of a more powerful and feature-rich utility called “Snip and Sketch”. It was originally released as part of the Windows 10 Anniversary Edition (Version 1809) update. Both apps are currently available in Windows 11 Preview, but it’s not clear whether the former will remain a part of the final Windows 11 build when it releases later this year.
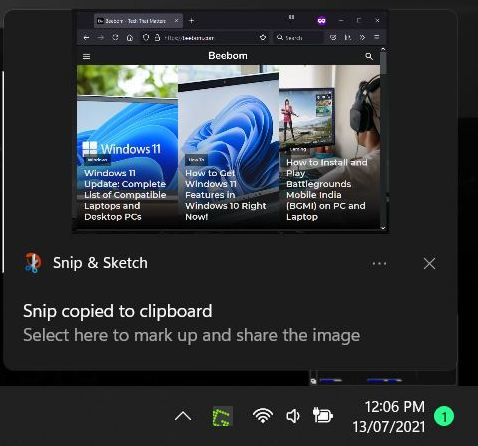
5. Snip and Sketch: Windows + Shift + S Shortcut
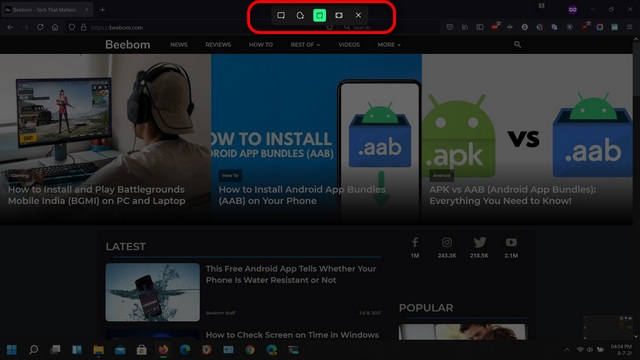
Microsoft is deprecating Snipping Tool in favor of Snip and Sketch, and it’s easy to see why. The latter is a more refined version of the Snipping Tool and comes with a feature-rich image editor. To take screenshots with Snip and Sketch, you need to use a three-key shortcut on your keyboard – “Windows + Shift + S“. We have explained the whole process in detail down below, so read on.
Once you use the said shortcut, the screen will immediately dim, and the Snip and Sketch ribbon with all the screenshot options will open up on your desktop. Using the ribbon at the top, you can now choose from four options – a full-screen screenshot, a rectangular snip, a free-form snip, or a screenshot of the active window.
Once you take a screenshot, it will immediately be copied to the clipboard. You can now paste it into an image editor and save it in any format at a location of your choice. You also have the option to directly edit and annotate the screenshot within the Snip and Sketch app. To do that, you can tap on the notification from Snip and Sketch in the Notification Center after capturing a screenshot.
You can now edit and annotate your screenshot using Snip and Sketch’s built-in image editor. Windows 11 offers a myriad of editing tools, including the option to flip or crop the screenshot, highlight content, add text, and more.
Note: Unlike the Action Center in Windows 10, the Notification Center in Windows 11 does not have a dedicated button. Instead, to access Notification Center in Windows 11, you will need to click on the Date & Time widget from the System Tray at the bottom-right corner.
6. Game Bar: Native Tool to Record Gameplay in Windows 11
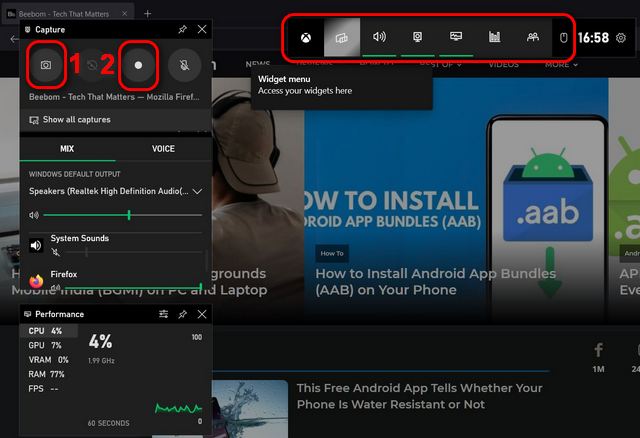
Originally rolled out with the Windows 10 Creators Update in 2017, the Game Bar is yet another effective way of taking screenshots in Windows 11. It lets you take control of all your gaming activities, such as music and chat, in one place. Moreover, it also allows you to capture the on-screen gameplay action on your PC.
To use Game Bar for screenshots or screen recording, open the target app and use the “Windows key + G” shortcut to see the Game Bar menu. By default, you will see three small windows stacked on top of one another. The one at the top left is for screenshots and screen recordings. On that window, click on the “camera” button [1] to quickly take screenshots on your Windows 11 PC while gaming. As for screen recording, you can use the circular “recorder” button [2].
On pressing the camera button in Game Bar, a screenshot of your active window will automatically be saved to Videos -> Captures. You can now edit or annotate it with the image editor of your choice.
Note: You can save your screenshots at a different location by moving the “Captures” folder anywhere you want on your PC. Windows will continue to save your game clips and screenshots in that folder, no matter wherever you move it.
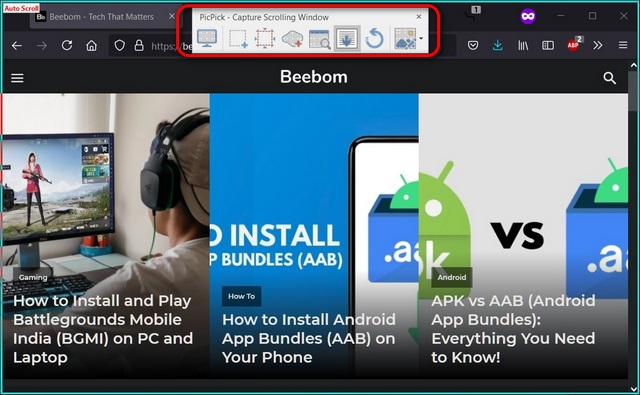
7. PicPick: Take Scrolling Screenshots in Windows 11
Like its predecessor, Windows 11 also does not include a native feature that allows you to take scrolling screenshots. Instead, you need to take recourse to third-party apps for this functionality. One of the best free third-party screenshot tools happens to be PicPick, which packs a ton of features for capturing both standard screenshots as well as scrolling screenshots. Check out our detailed guide on how to take scrolling screenshots in Windows to learn how to use the PicPick app. Though the article focuses on Windows 10, the process remains the same for Windows 11 as well. Download PicPick (Free)
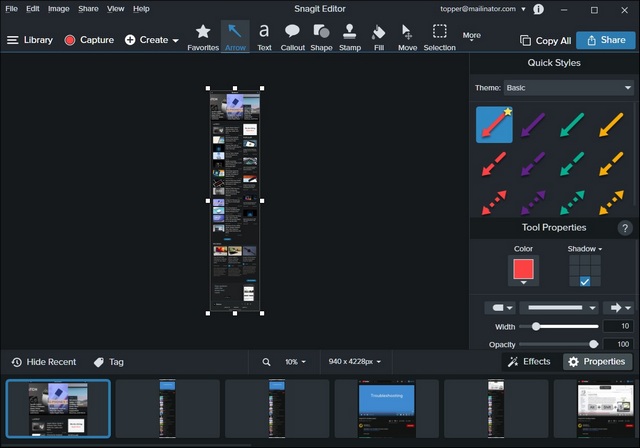
If you are willing to pay for the absolute best scrolling screenshot app on Windows 11, “Snagit” is the way to go. It is a pro-grade software that includes a ton of options and features for all use-cases. We covered the app in detail in our scrolling screenshot guide linked above. So check out how Snagit works, the pricing information, and a few other scrolling screenshot tools for Windows users. Download Snagit (15-day free trial, Rs. 4,396 in India, $49.99 in the US)
8. Awesome Screenshot & Screen Recorder: Browser Extension to Take Screenshots in Windows 11
Alongside standalone apps, there are also many free screenshot and screen recording extensions available for both Chrome and Firefox. Awesome Screenshot is likely the best Chrome extension to take screenshots in Windows 11. It offers full-page screen capture and screen recording, as well as sharing options. You can also switch between screen recording and screen capture using a two-tab pop-up menu. This extension even allows you to record your desktop, current tab, or camera. You can also include your voice recording with the “Microphone” option, which is a nice addition.
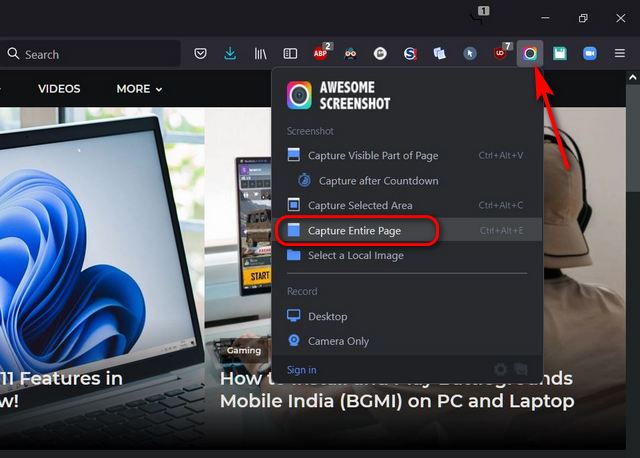
To get started, open the web page you want to take a screenshot of and click on the Awesome Screenshot icon in the toolbar. You will now see a drop-down menu on the target webpage. The app lets you capture the full page, a selected area, or only the visible part of a page. Select the option you want to use and follow on-screen instructions. You can also take a scrolling screenshot by selecting the “Capture Entire Page” option.
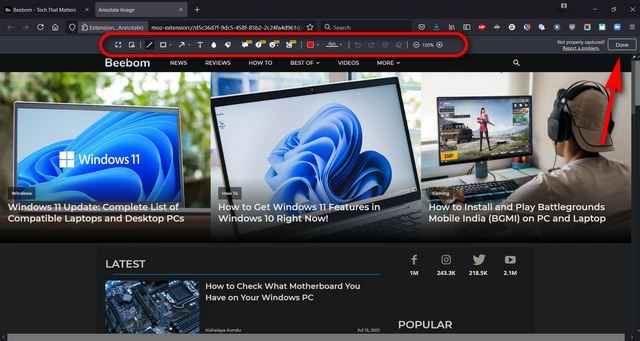
The extension will now automatically capture a scrolling screenshot of the entire page and offer you a number of saving and sharing options. You can also resize, crop, and annotate your screenshot with geometric patterns, arrows, and text using the built-in editor. Once you are done with the edits, click on “Done” at the top-right corner to see the saving options.
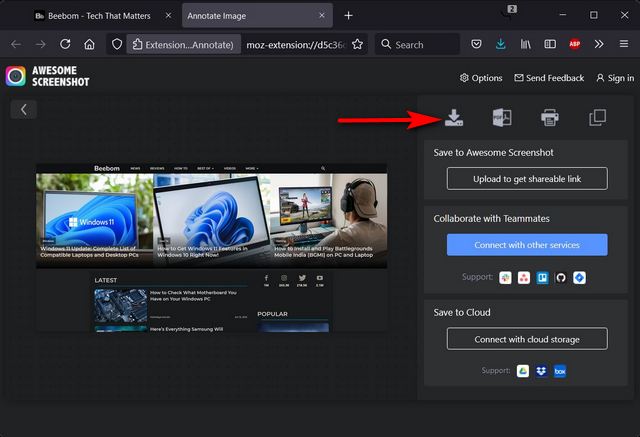
Awesome Screenshot and Screen Recorder lets you upload your screenshot to the cloud or save it locally. Upload options include Slack, Asana, Trello, Jira, and Github. So take your pick or select the “Download as Image” option to save the screenshot on your PC.
Awesome Screenshot and Screen Recorder is one of the oldest and well-known tools among Windows users in this category. I have been using it with Firefox for the better part of the last decade and can personally vouch for its efficacy and ease of use. Download Awesome Screenshot and Screen Recorder: Chrome Extension (Free); Firefox Add-on (Free)
Q. How Do You Take Screenshots on Windows 11? And Where Is It Saved?
The easiest way to take screenshots in Windows 11 is to simultaneously press the “Windows + Print Screen” keys on your keyboard. The screenshot is then saved in the Pictures -> Screenshots folder on your computer. In this article, we have also detailed various other methods to take screenshots in Windows 11.
Q. Can I Take a Screenshot on My Windows 11 Desktop?
Yes. of course! You can use the same methods mentioned above, including the Snip and Sketch tool or PicPick app, to take a screenshot on your Windows 11 desktop.
Q. How Do You Take a Screenshot on a Windows 11 PC in 2021?
In 2021, it is easy to take a screenshot on Windows PC. Just press the “Windows + Print Screen” keys on your keyboard at the same time. The screenshot will be saved in Pictures -> Screenshots on your Windows 11 computer.
Take Screenshots on Windows 11 Like a Pro
As you can see, the ways to take screenshots and scrolling screenshots in Windows 11 haven’t changed much from Windows 10. So go ahead and use the screenshot method that suits your needs the best. Once you do, let us know which method you prefer to capture a screenshot and why. Meanwhile, as a Windows 11 user, check out how you can switch back to a Windows 10-style Start Menu design on your Win 11 installation and how to change the default browser in Windows 11. You can also learn to customize the Windows 11 Start Menu and check the screen on time on your Windows 11 PC.