Setup and Use Magic Mouse on Windows 11/10
You can instantly set up Magic Mouse on Windows using Bluetooth. The steps are the same as connecting any other device with Bluetooth support. Once you connect the Magic Mouse, you can perform right and left click, but it will not support scrolling. For that, you will require the necessary drivers on your PC. Don’t worry; I have explained three ways to install those drivers below in this article. But let’s first start with connecting Magic Mouse to your PC.
Connect Magic Mouse Using Bluetooth On Windows 11/10
Before you start using Magic Mouse on Windows, you need to connect it using Bluetooth. Microsoft has released Windows 11, the successor of Windows 10. The steps to add a Bluetooth device differ slightly on Windows 10 and 11. I have made things simpler by adding steps to connect Magic Mouse using Bluetooth on Windows 10 and 11.
Connect Magic Mouse On Windows 10
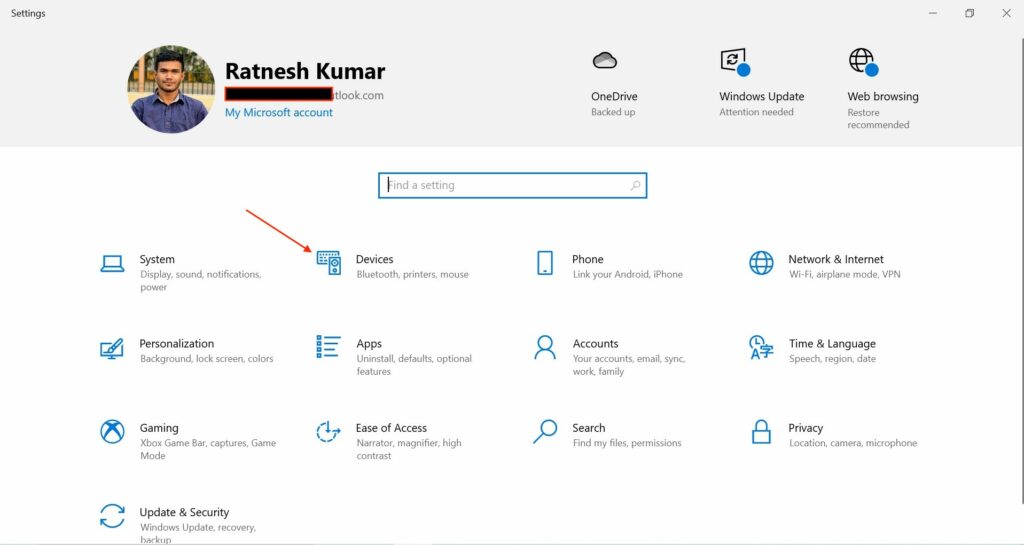
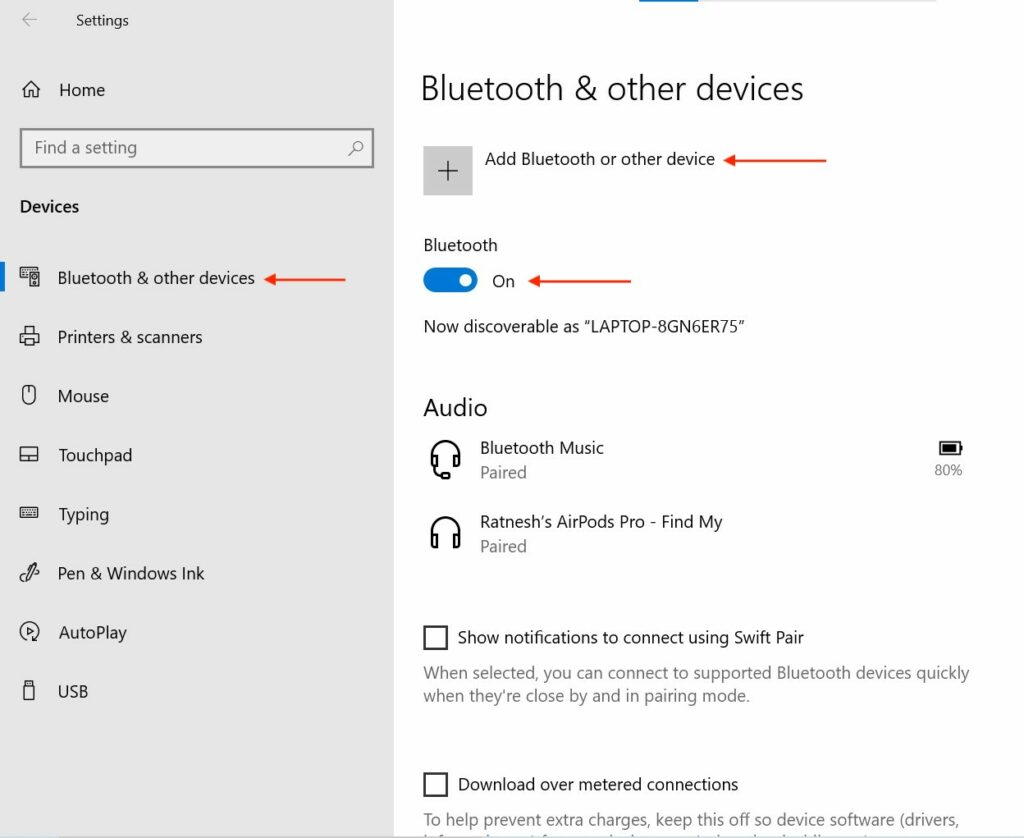
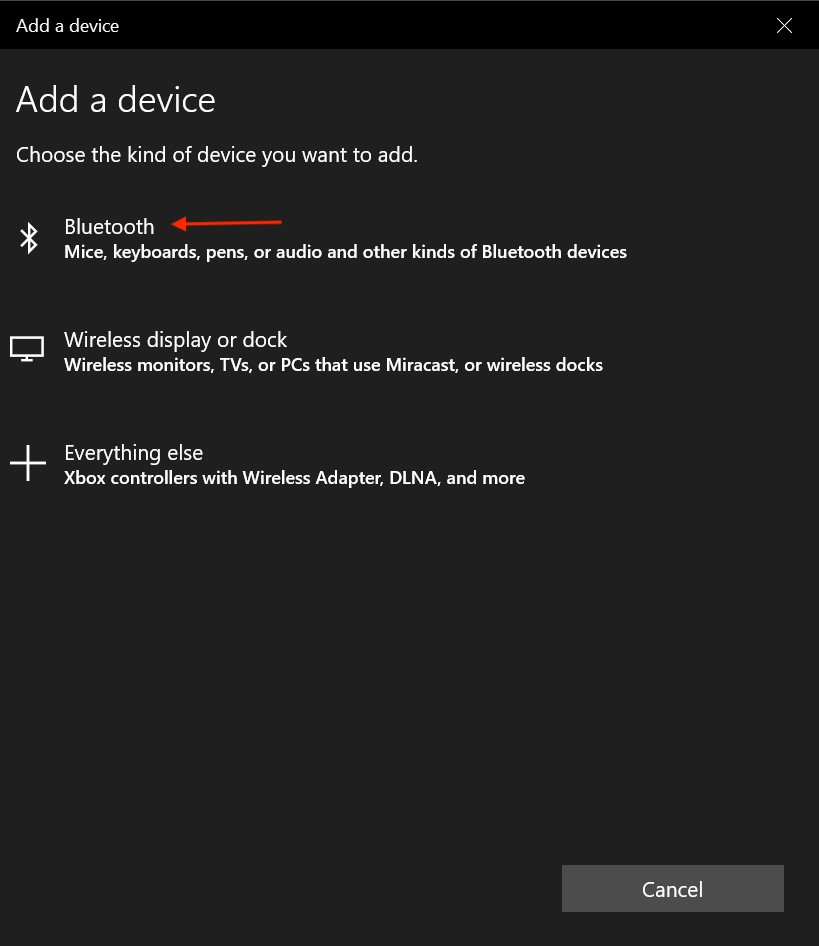
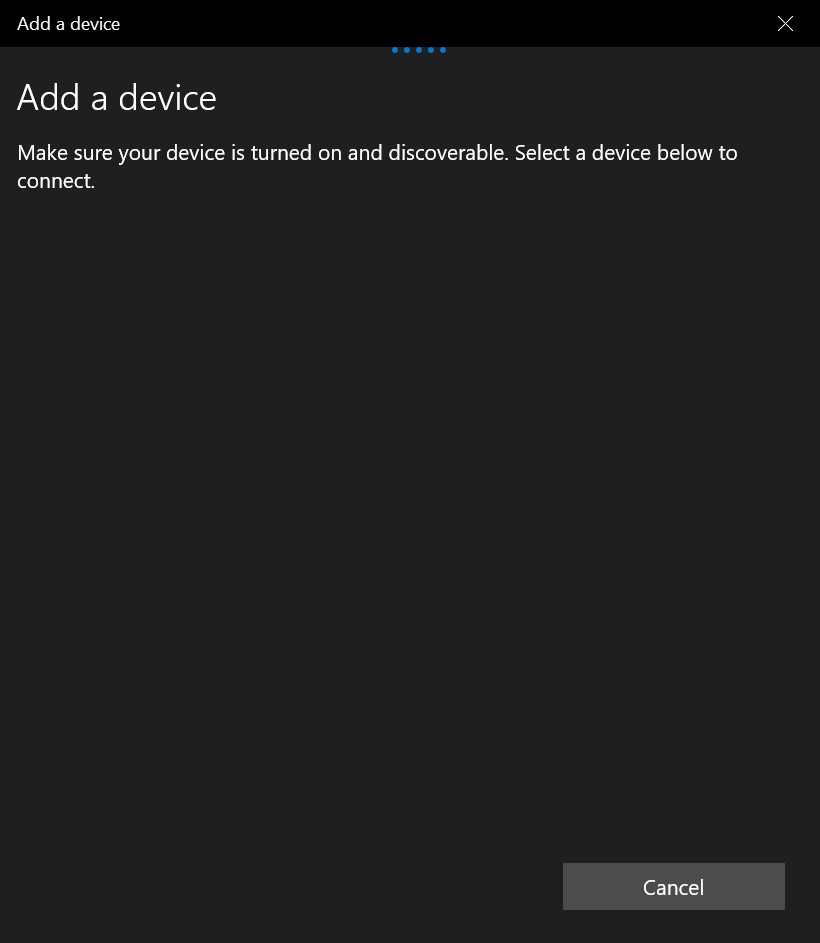
Most of you might be already familiar with adding a Bluetooth device on Windows 10. Still, if you need handing help, follow the below steps and connect your Magic Mouse using Bluetooth on your Windows 10 PC. Step 1: Press Windows + I key to open Settings on your Windows 10 PC. Step 2: In the Settings, tap on Devices. Step 3: You will land in the Bluetooth & other devices tab under Devices. If you are not there, tap on Bluetooth & other devices from the left sidebar. Step 4: On Bluetooth & other devices page, make sure the Bluetooth toggle is On. When Bluetooth is on, you will see a Now Discoverable as “Your Computer Name” message. Now tap on Add Bluetooth or other device. Step 5: On the next screen, choose the kind of device you want to add to your PC. Select the Bluetooth option as you wish to set up a magic mouse. Step 6: Now, your PC will search for Magic Mouse. Make sure the Magic Mouse is turned on and discoverable. If your PC cannot search for Magic Mouse, turn it off and turn it on again. It will help your Windows PC to recognize it. Your Magic Mouse will appear on the screen; select it and tap on Done. Once you follow the above steps, Magic Mouse will be connected to your Windows 10 PC using Bluetooth. You can click on the top left side of the Magic Mouse to perform a regular click and top right side to right-click. If you want to customize the Magic Mouse further, tap on the Mouse option on the Devices Settings page. You can select your Primary button as Right or Left. If you feel the default Cursor speed is slow, you can also adjust the cursor speed from there. The only issue you will face is Magic Mouse will not support scrolling. It is mainly due to the unavailability of required drivers on your PC. I have provided three ways to install the Magic Mouse driver on Windows 10 below in this article, but before, let’s quickly understand how to connect Magic Mouse using Bluetooth on Windows 11.
Connect Magic Mouse On Windows 11
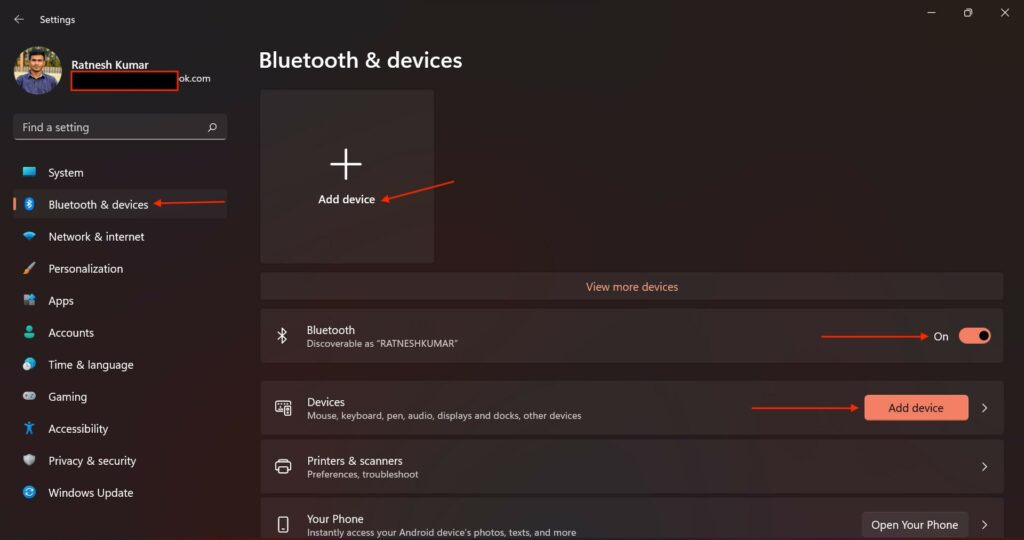
Microsoft has refreshed the Settings app on Windows 11. The placements of different settings options are changed. If you have recently upgraded to Windows 11, you might find it tough to connect your Magic Mouse using Bluetooth. No worries, follow the below steps and connect your Magic Mouse to Windows 11. Step 1: Press the Windows+I key to open the built-in Settings app on your Windows 11 PC. You can also read our detailed guide covering ten ways to open settings on Windows 11. Step 2: In the Settings app, tap on Bluetooth and devices from the left sidebar. Step 3: Under Bluetooth & devices settings, you will find the Bluetooth toggle. Make sure the Bluetooth toggle is On. When Bluetooth is On, you will see a message Discoverable as “Your Computer Name”. Step 4: Below the Bluetooth setting, you will see a Devices section with Add device button. You will also get the Add device on top of the Bluetooth & devices setting page. Tap on Add device. Step 5: On the next screen, choose the kind of device you wants to add to your Windows 11 PC. Select the Bluetooth option as you wish to connect a Magic Mouse. Step 6: Now, the Magic Mouse will appear on Add a device page, select it and tap on Done. That’s all you need to do to connect Magic Mouse to your Windows 11 PC. Once you connect it, you are ready to start using it. You will be able to perform a regular or right-click. Everything will work like a charm except scrolling. You will say what? a Mouse without scrolling. Don’t worry; follow one of the three ways mentioned below to install the required drivers so you can start scrolling on Magic Mouse.
Install Driver to Scroll Magic Mouse on Windows 11/10
As of now, you only have connected your Magic Mouse on your Windows 10 or 11 PC. It doesn’t have the required drivers to support scrolling. There are mainly three ways to install Apple Wireless Mouse driver on Windows. You can either do it from the official Bootcamp driver, use Brigadier or a third party driver app like Magic Mouse Utilities. I have explained all the options in detail; pick the one that seems easier to you.
Bootcamp Driver
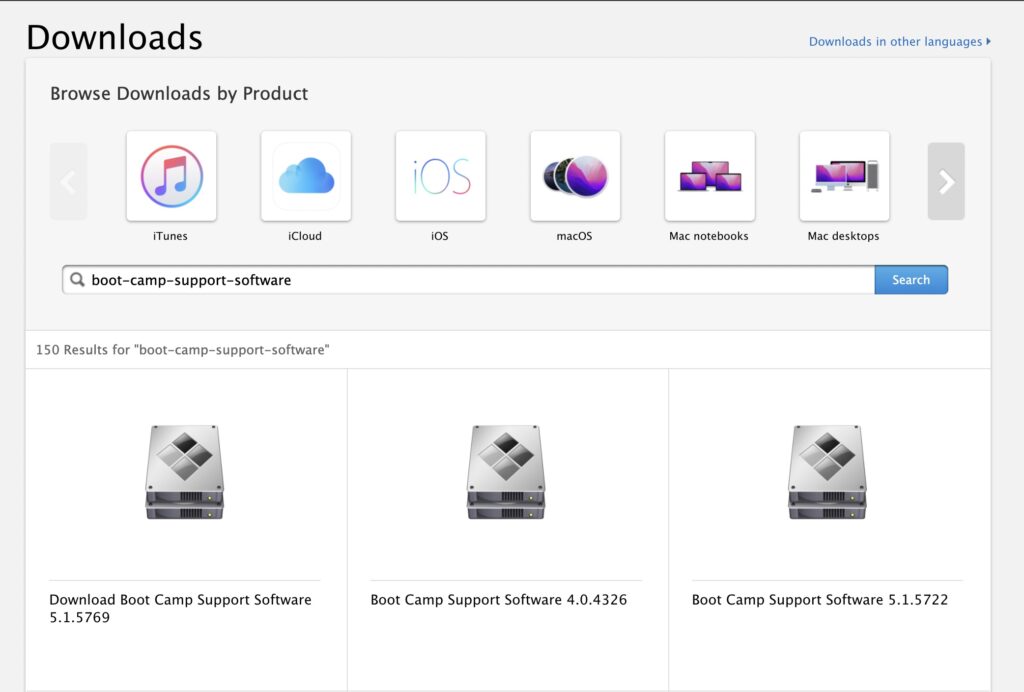
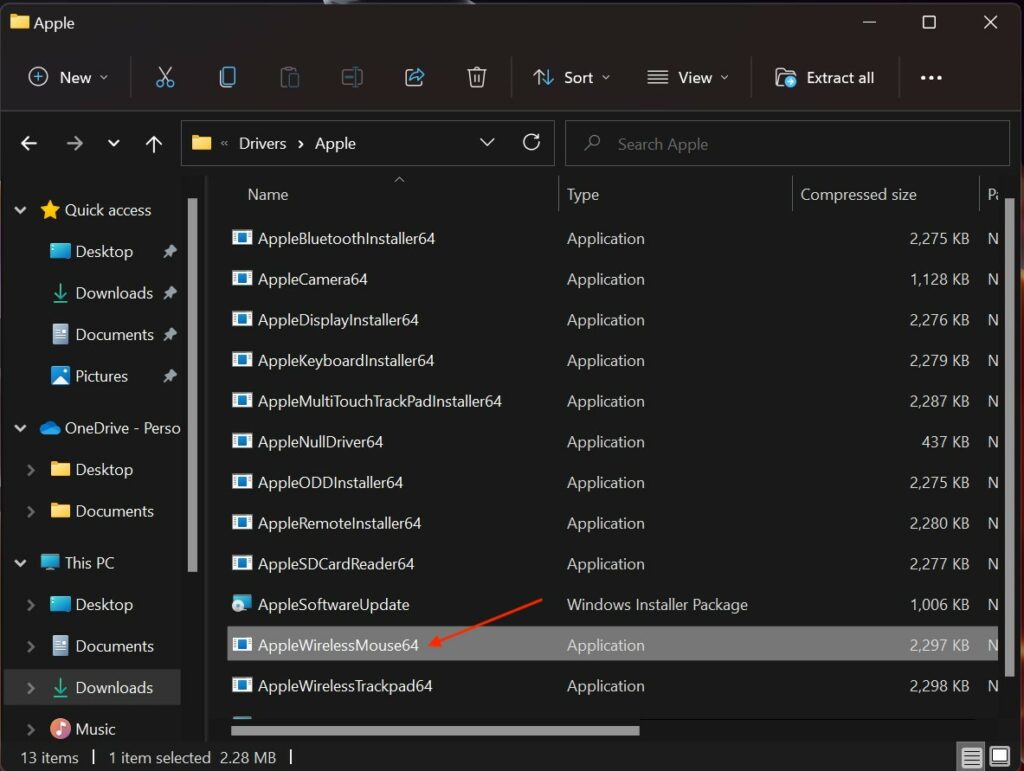
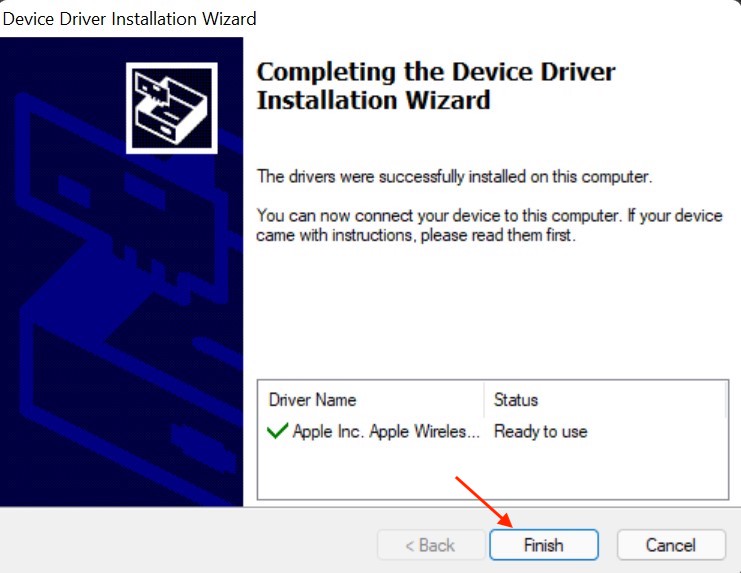
Apple offers a “Boot Camp Support Software package” for Windows users. The Boot Camp Support Software package includes Apple Wireless Mouse drivers required to add scrolling on Magic Mouse. Follow the below steps to download Boot Camp Support Software on your Windows PC and install the Wireless Mouse driver. Step 1: Visit the Apple Support Downloads Page. On the Downloads page, you will get a Search Downloads box type “Boot Camp Support Software” in it and hit enter. Step 2: Among the results, select the Download Boot Camp Support Software 5.1.5769 result. Alternatively, you can click here to directly go to the Download Boot Camp Support Software 5.1.5769 page. On the Download page, tap on the Download button. Step 3: Now, Boot Camp Support Software will start downloading on your PC. It will be a 517 MB download; depending on your Internet speed, it will take a few minutes to complete the download. Step 4: The download file be in a Zip file format. Extract the downloaded zip file. Step 5: After extracting the file, open the extracted folder and navigate to Bootcamp> Drivers > Apple. Step 6: In the Apple folder, you will get a file named AppleWirelessMouse64. Step 7: Double click on it and follow the on-screen instructions to install Apple Wireless Mouse drivers on your PC. Step 8: Once you have installed the Apple Wireless Mouse Driver, restart your PC, and you will be able to scroll on Magic Mouse. The above steps work well, and Magic Mouse start supporting scrolling. However, many users complain even after installing the Apple Wireless Mouse Driver, they are not able to scroll on Magic Mouse. It is because Apple is not regularly updating the Boot Camp Support Software. No worries, there are still two remaining ways to install Apple Wireless Mouse Driver on Windows.
Brigadier
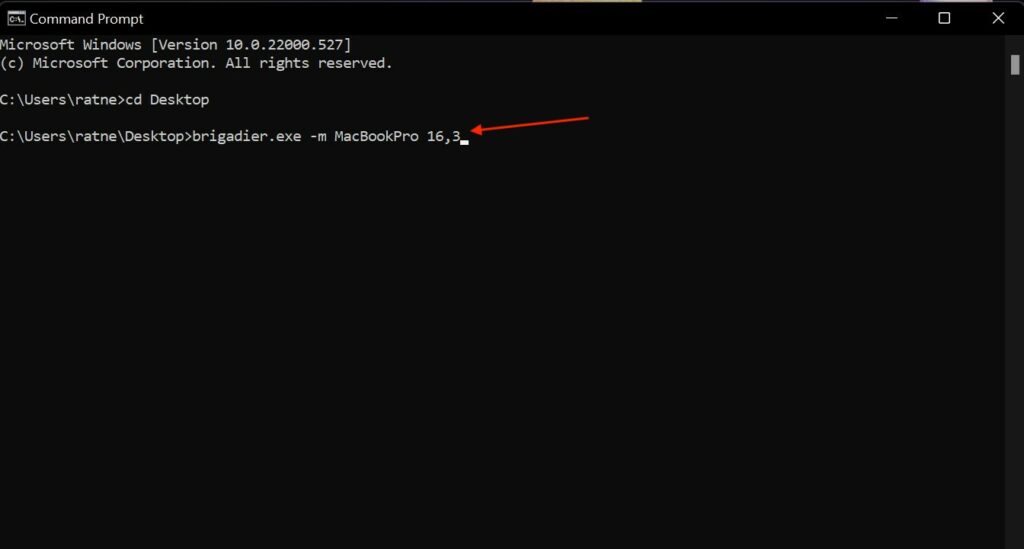
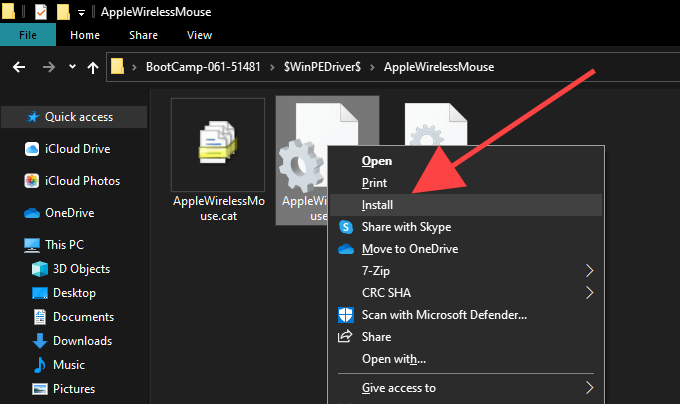
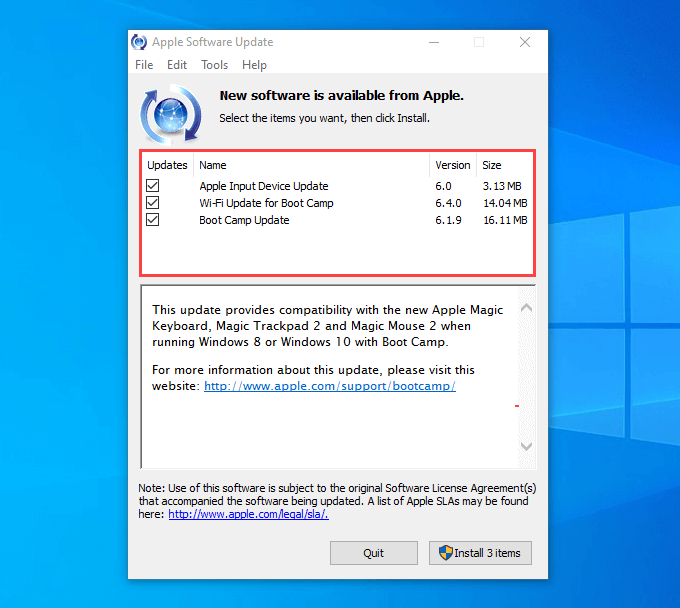
The drivers available in the latest available Boot Camp Support Software is outdated, so it is possible that scrolling might still not work. A few users using Magic Mouse on Windows have written in various online discussion forums that they tried installing drivers using a Brigadier program, and the problem got resolved. You can also install Bootcamp on Windows using Brigadier by following the below steps. Step 1: Download Brigadier from GitHub. When the download is complete, copy the brigadier.exe file to the Desktop. Step 2: Open Command Prompt on your PC. Tap on Start Menu, type cmd in the search box and select Open. Step 3: In the Command Prompt Console, enter the “cd Desktop” command. Step 4: After it, enter the command “brigadier.exe -m MacBookPro16,3“ Note: The brigadier.exe -m MacBookPro16,3 command includes an identifier to identify your PC as a 16-inch 2020 MacBook Pro. You can use a different Mac model as per your choice but make sure to use an identifier from the MacBooks launched recently and have support for Windows over Boot Camp. Step 5: Now, Brigadier will start downloading the drivers from Apple. When the download is complete, it will automatically extract the zip file to the Desktop. If Brigadier fails to download drivers on your PC or download an empty folder, install 7-Zip on your PC. Step 6: Once you see the BootCamp folder on your Desktop, navigate to the $WinPEDriver$>AppleWirelessMouse folder. Step 7: Under the AppleWirelessMouse folder, you will see an AppleWirelessMouse64.inf file, right-click on it and tap on Install. Step 8: On the next screen, Tap on Yes to Give Permission to install the Driver; after it, tap on OK to complete the installation process. Lastly, Restart your PC to make all the changes into effect. Now you will scroll horizontally and vertically using Magic Mouse on your Windows PC. Even after installing drivers using Brigadier, a few Windows users report they can still not scroll on Magic Mouse. It might be possible because of outdated drivers. The possible solution is to update pending drivers via Apple Software Update. Don’t worry. You don’t have to download it. It is part of the Apple Boot Camp for Windows package. Just follow the below steps to update pending drivers via Apple Software Update. Step 1: Open Start Menu on your PC and search for Apple Software Update. From the Results, select Apple Software Update and tap on Open. Step 2: Now, the Apple Software Update will open on your PC. It will take a few minutes to scan for available driver updates. Step 3: You will see a list of drivers that have updates pending. Check the box left to the drivers and tap on the Install option in the bottom right corner of the window. Step 4: Apple Software Update will start downloading the Driver updates and apply the updates. After downloading updates for all the Apple drivers, restart your PC. Hopefully, Magic Mouse should start working properly, and you should not face any issue in scrolling.
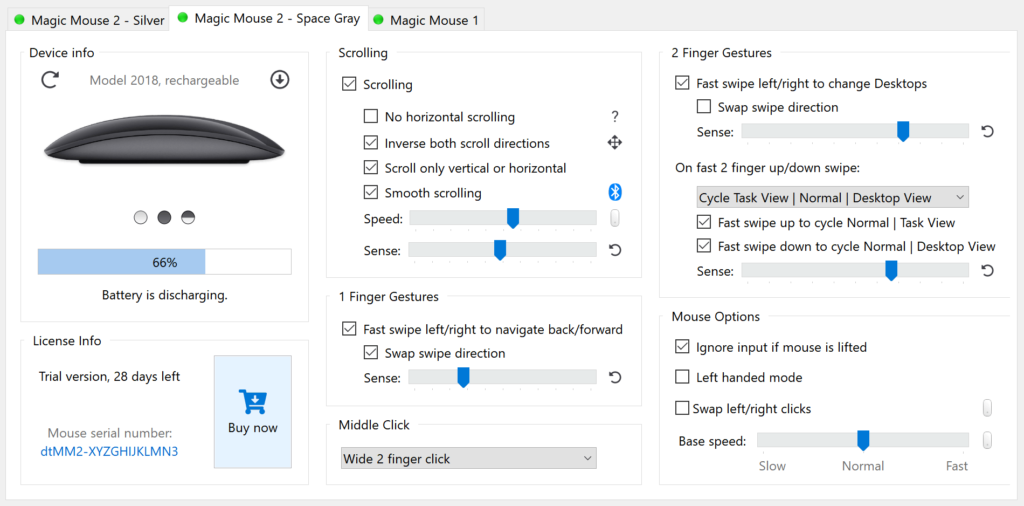
Magic Mouse Utilities
By now, Magic Mouse should start scrolling on your Windows 10 PC. But if you are still unable to scroll, the last option you can try is Magic Mouse Utilities. Magic Utilities provides a Magic Mouse Windows driver + app for scrolling on Windows PC. It supports both Magic Mouse 1 and Magic Mouse 2. Not just Magic Mouse, it also supports all the Windows desktop versions, be it Windows 7, 8, 10 or 11. It supports both 32bit and 64bit platforms. Talking about the features, First of all, it adds smooth scrolling on Magic Mouse on Windows. It adds a customizable middle mouse button in between the right-click and left-click. You can also Navigate back and forward using horizontal swipes. You can also see your Magic Mouse battery levels in the app to schedule the charge. Overall when I tried using the Magic Mouse on Windows with the help of Magic Mouse Utilities, It felt the same experience as using it on my Mac. If you plan to try Magic Mouse Utilities, it has a 28-trial. Sign for the trial, test how it works and then buy the license. The license will cost you $14.99/year. Does Apple Magic mouse work with windows? Yes, the Apple Magic Mouse work with Windows. You can connect Magic Mouse on Windows using Bluetooth. It will start working immediately, but you will miss out on scrolling. For that, you will need to install Apple Wireless Mouse drivers. I have provided three ways to install the required drivers to support scrolling. Can I use an Apple mouse with a Windows computer? Yes, You can use it. The process is very straightforward. Connect your Apple Magic Mouse using Bluetooth. After it, install the Apple Wireless Mouse drivers, and it will work just like you use an Apple mouse on Mac. How do I connect my Magic Mouse to Windows 10? You can connect your Magic Mouse to Windows 10 using Bluetooth. The process is the same as you adding a different Bluetooth device. After connecting the Magic Mouse install the Apple Wireless Mouse drivers to add the support for scrolling.
Final Words
Magic Mouse is one of the best mice available in the market for MacBooks. If you have a Magic Mouse, you would also like to use it with your Windows PC. Why purchase an additional mouse when you already have one. You don’t have to worry about Magic Mouse support on Windows. The Magic Mouse supports Windows PC, and you can use it as you usually do on your Mac. To use Magic Mouse on Windows, you will first need to connect using Bluetooth and then install the required drivers to add the support for scrolling. I have explained everything from connecting the Magic Mouse to installing drivers above in the article. Go ahead, follow the steps and start using your Magic Mouse on Windows. You can support my work by buying a Coffee for me: https://ko-fi.com/X8X775X8R Thanks again! You can support my work by buying a Coffee for me: https://ko-fi.com/X8X775X8R Thanks! C:\Users\ddww\Downloads\Programs>brigadier.exe -m MacBookPro16,2 Using Mac model: MacBookPro16,2. Model supported in package distribution file at http://swcdn.apple.com/content/downloads/31/36/061-51481/6jxbd689uscmpm1bhsu9kv05kpthc2rdui/061-51481.English.dist. Distribution 061-51481 supports the following models: MacBookPro16,3, MacBookPro16,2. Making directory C:\Users\ddww\Downloads\Programs\BootCamp-061-51481.. Fetching Boot Camp product at URL http://swcdn.apple.com/content/downloads/31/36/061-51481/6jxbd689uscmpm1bhsu9kv05kpthc2rdui/BootCampESD.pkg. 100.0% 512434176 / 512430389 bytes Traceback (most recent call last): File “”, line 358, in File “”, line 296, in main File “”, line 64, in downloadFile File “c:\jenkins\workspace\brigadier\build\brigadier\out00-PYZ.pyz\urllib”, line 93, in urlretrieve File “c:\jenkins\workspace\brigadier\build\brigadier\out00-PYZ.pyz\urllib”, line 239, in retrieve File “c:\jenkins\workspace\brigadier\build\brigadier\out00-PYZ.pyz\urllib”, line 207, in open File “c:\jenkins\workspace\brigadier\build\brigadier\out00-PYZ.pyz\urllib”, line 358, in open_http File “c:\jenkins\workspace\brigadier\build\brigadier\out00-PYZ.pyz\urllib”, line 371, in http_error File “c:\jenkins\workspace\brigadier\build\brigadier\out00-PYZ.pyz\urllib”, line 664, in http_error_301 File “c:\jenkins\workspace\brigadier\build\brigadier\out00-PYZ.pyz\urllib”, line 634, in http_error_302 File “c:\jenkins\workspace\brigadier\build\brigadier\out00-PYZ.pyz\urllib”, line 660, in redirect_internal File “c:\jenkins\workspace\brigadier\build\brigadier\out00-PYZ.pyz\urllib”, line 207, in open File “c:\jenkins\workspace\brigadier\build\brigadier\out00-PYZ.pyz\urllib”, line 436, in open_https File “c:\jenkins\workspace\brigadier\build\brigadier\out00-PYZ.pyz\httplib”, line 954, in endheaders File “c:\jenkins\workspace\brigadier\build\brigadier\out00-PYZ.pyz\httplib”, line 814, in _send_output File “c:\jenkins\workspace\brigadier\build\brigadier\out00-PYZ.pyz\httplib”, line 776, in send File “c:\jenkins\workspace\brigadier\build\brigadier\out00-PYZ.pyz\httplib”, line 1161, in connect File “c:\jenkins\workspace\brigadier\build\brigadier\out00-PYZ.pyz\ssl”, line 381, in wrap_socket File “c:\jenkins\workspace\brigadier\build\brigadier\out00-PYZ.pyz\ssl”, line 143, in init File “c:\jenkins\workspace\brigadier\build\brigadier\out00-PYZ.pyz\ssl”, line 305, in do_handshake IOError: [Errno socket error] [Errno 8] _ssl.c:504: EOF occurred in violation of protocol Thanks!
Δ