How to Take a Screenshot on Mac
There are mainly three ways to screenshot on Mac. One can either take a screenshot of the entire screen, selected part of the screen, or a window, menu, or Dock. We occasionally need all these three types of screenshots, so it becomes necessary for a Mac user to know how to take them. I have provided steps for all these ways and a bonus way to take screenshots on MacBook Pro with Touch Bar.
Entire Screen
Although not very frequently, we take screenshots of the entire screen on Mac. We take screenshots of the selected portion most of the time, but we take full-screen screenshots. Below are simple steps to capture the entire screen on a Mac. Step 1: Press and hold Shift+Command+3 keys together on your Mac keyboard. Step 2: Once you press the above keys, the system will instantly capture the entire screen. If you want to capture the entire screen but want to copy it to Clipboard instead of saving it. Press Control+Shift+Command+3 keys on your keyboard. To share the screenshot in a mail or note press Command+V shortcut. Step 3: A small preview will appear in the bottom left corner of the screen. Tap on the Thumbnail if you want to edit the screenshot. If not, wait for the screenshot to appear in the Desktop folder within seconds. That’s how you can capture an entire screen screenshot on Mac. The steps are simple, and your Mac will save a screenshot of the whole screen within a click of three keys.
Selected Portion Of the Screen
Not every time do we want to screenshot the entire screen of our Mac. Instead, we want to screenshot a selected Portion of the screen. Apple has given users the option to capture the desired part of the screen. It comes in handy if you want to highlight a particular area of the screen, so instead of taking the screenshot of the entire screen and then cropping it, you can capture the required portion only. Below are the steps to screenshot the selected part of the screen on Mac. Step 1: Go to the webpage or app to take the screenshot. Step 2: Press Shift+Command+4 keys on your keyboard at the same time. Step 3: A crosshair will appear on the screen. Drag the crosshair to select the screen area you want to capture. Step 4: If you want to move the selected area, press and hold the Space bar while dragging the crosshair. When you are ready to take the screenshot, release the trackpad or Mouse button, and your Mac will capture the screenshot. If you want to capture the selected portion of the screen but want to copy it to Clipboard instead of saving it press Control+Shift+Command+4 keys on your keyboard. When you want to paste the screenshot on a Note, Email or a file press Command+V shorcut. A small preview of the screenshot will appear in the bottom corner of the screen. Tap on the Thumbnail if you want to edit the screenshot; otherwise, leave it, and the system will save it in the selected folder on your Mac. On some occasions, you might not be able to drag the crosshair correctly. In that situation, press the Esc key to cancel the screenshot.
Screenshot a Window, Menu, Or Dock
The third way to screenshot on Mac is to take screenshots of a Window, Menu, or Dock. Although you can use the above two ways to take screenshots of these sections, the screenshot will look completely different if taken using the third way. Follow the below steps to capture a screenshot of your Mac Windows, Menu, or Dock. Step 1: First of all, open the Window or Menu you want to take a screenshot of on your Mac. Step 2: After it, press the Shift+Command+4+Space bar keys. Step 3: When you press these keys, the Pointer will change to a small Camera icon. Now Click the Window or menu to capture the screenshot. Note: If you want to exclude the Window’s shadow from the screenshot, all you have to do is press and hold the Option key while you take the screenshot. Also If you want to take screenshot of the Window or Menu but want to copy it to Clipboard instead of saving it as a file press Control+Shift+Command+4 keys on your keyboard. To paste the screenshot on a Note or Email press Command+V shorcut. Once you follow the above steps, the screenshot will be captured, and a small thumbnail will appear in the bottom right corner of the screen. Tap on the Thumbnail if you want to edit the screenshot; otherwise, leave it as it is. It will disappear after a few seconds, and the screenshot will be saved to the selected folder.
Screenshot the Touch Bar on MacBook Pro
Above are the three ways you can screenshot on Mac. You can either capture the entire screen, selected portion, or a window, menu, or Dock. But do you know there is one more way to take a screenshot on Mac? It only applies to users who have a MacBook Pro with Touch Bar. Apple introduced Touch Bar with MacBook Pro 16-inch and later added on the 13-inch model. There were not many users except writers who liked the Touch bar. Sadly, Apple killed the Touch Bar last year, and now it’s not part of the latest MacBook Pro models. If you want to showcase something from the Touch Bar, you can take a screenshot of it. Step 1: Press Shift+Command+6 on your MacBook Pro with Touch Bar. It will capture a screenshot of the Touch Bar showing its contents. You can share the screenshots like other types of screenshots. Step 2: If you want to capture the Touch Bar screenshot but want to copy it to Clipboard instead of saving it. Press Control+Shift+Command+6 keys on your keyboard. To share the screenshot copied to clipboard paste it by pressing Command+V shortcut. Besides taking screenshots of the Touch Bar, you can also use it as a shortcut to open the screenshot app on your Mac. Apple allows users to Customize the Control Strip of the Touch Bar. You can add a screenshot shortcut anywhere in the Touch Bar by utilizing this feature. Below are the steps to add a Screenshot shortcut in Touch Bar. Step 1: Open System Preferences on your Mac. Step 2: In System Preferences, tap on Keyboard. Step 3: Under Keyboard Settings, tap on Customize Control Strip. The option will only appear on MacBooks with Touch Bar. Step 4: Drag Screenshots control (Camera icon) to the bottom of the screen on the next screen. The Control will appear in the Touch Bar. Once you have added the Screenshots shortcut in the Touch Bar of your MacBook Pro, next time you have to capture a screenshot, instead of pressing the keyboard shortcut, you need to touch Screenshot shortcut from Touch Bar and then tap on Capture to take the screenshot.
Where to find screenshots on Mac
By now, you already know how to take screenshots on Mac. Your next question might be where to find screenshots on Mac. If you don’t know about taking screenshots, how will you know where the captured screenshots are. By default, screenshots taken on Mac are saved to Desktop with the name” Screen Shot [date] at [time].png.” If you want to change the default location to keep the screenshots on Mac, you can do it from the screenshots app. I have explained the macOS Screenshot app below.
Open the macOS Screenshot App.
All the ways mentioned above to screenshot on Mac are based on keyboard shortcuts. But do you know Apple provides a dedicated Screenshot app on Mac? If not, you should know about it as you can take all the above types of screenshots and customize different screenshot settings from the screenshot app. Follow these steps to open and use the macOS screenshot app. Step 1: Press Shift+Command+5(%) key on your Mac. Step 2: The macOS screenshot app will appear when you press these keyboard shortcuts. Step 3: You will see different options on the screen. It will include three different screenshot types (Capture Entire Screen, Capture Selected Windows, Capture Selected Portion), two-screen recording options (Record Entire Screen, Record Selected Portion), Options, and Capture. You can select one of these screenshots types and tap on Capture to take the screenshot. Tapping on Options will offer you some more screenshot-related features like saving the screenshot and setting a timer. Disable the Show floating Thumbnail if you don’t want a small preview of the screenshot to appear on the screen. You can also choose to show or hide the mouse pointer in the screenshot. If you check the Remember last selection option, the screenshot will remember all the selections. The next time you want to screenshot on Mac, press Shift+Command+5 and press the enter key. It will capture the screen similar to the final selection.
Customize Keyboard Shortcuts for Screenshots on Mac
Until now, I have explained different keyboard shortcuts to screenshots on Mac. All the above keyboard shortcuts are default and come loaded with every Mac. But do you know you can customize keyboard shortcuts for screenshots on Mac? Instead of pressing Shift+Command+4 to take a screenshot of the selected portion, you can customize it to a different key combination like pressing Shift+Command+ 1. Sound’s good? Follow the below steps to customize keyboard shortcuts for screenshots on Mac. Step 1: Open System Preferences on your Mac. You can either tap on the Apple logo in the upper left corner and tap on System Preferences or open it from Launchpad. Step 2: In the System Preferences, tap on keyboard. Step 3: Under Keyboard settings, you will land in the Keyboard tab tap on the Shortcuts tab. Step 4: Once you are in the Shortcuts tab, select Screenshots from the option on the left side of the screen. Step 5: Now, you will see a list of all the screenshots on your Mac. To change a screenshot shortcut, select it and tap on the existing key combinations. It will bring the editing screen. Enter the new keys as per your choice. You can change keyboard shortcuts for all the screenshots types from the same screen. Remember the newly selected keys as you set these, and once you forget them, you might go through the above steps to see the shortcuts again. That’s how you can customize keyboard shortcuts for screenshots on Mac.
Change Screenshot Default to JPG on Mac
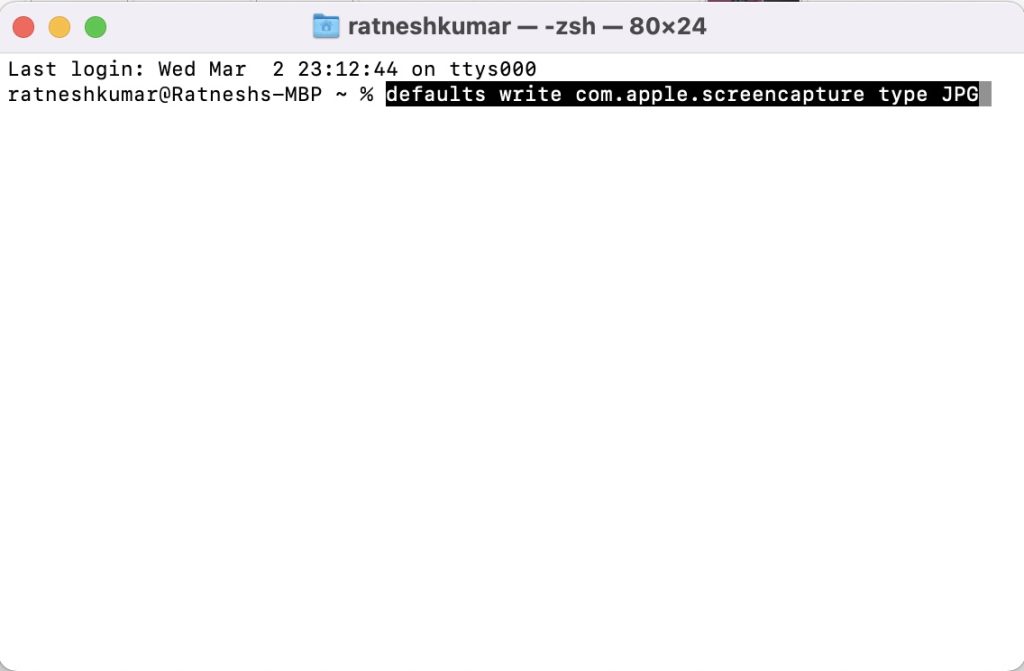
If you take a screenshot on Mac using any of the above ways, it will save the captured screenshot in a PNG file. PNG is a high-quality image format, and usually, images in this format tend to be larger. The large-sized screenshot will be challenging to share with others. Many professional writers like me write macOS tutorials and take screenshots to show the steps. They can’t directly upload the PNG images, increasing the page loading speed. The best possible option is to change the screenshot default to JPG on Mac. So every time you take a screenshot, your mac will save it in JPG format instead of saving it as a PNG file. Changing screenshot default by running a simple command using the Terminal app is doable. Follow the below steps to change the screenshot default to JPG on Mac. Step 1: Open Terminal on your Mac. You can find the Terminal app from Launchpad, Applications Folder, or search for it in the Spotlight search. Step 2: In the Terminal app, type or copy-paste this command “defaults write com.apple.screencapture type JPG” and press enter key. The Terminal app will run this command and change the screenshot default to JPG instead of PNG. You can now take a screenshot and see whether the captured screenshot is in the JPG folder. Hopefully, the screenshots will be in JPG format.
Final Words
Mac computers are an integral part of our personal and work life. In both personal and professional use cases, we often take screenshots. If you have recently switched to Mac from Windows or purchased a new Mac, taking screenshots might seem like a daunting task. I have made things easy for all of you by writing an in-depth guide about taking screenshots on Mac. Go ahead, follow the steps, and become a master of taking screenshots on Mac.
Δ