If your workflow is badly compromised because the JPG file preview is no longer available, you can employ the viable fixes put together in this guide to disable the file icons and enable the JPG file previews once again.
Why Windows 11 JPG Preview Not Working?
The absence of a JPG file preview from Windows 11 PC can happen due to one or many reasons mentioned below.
Corrupt System FilesRandom bugsCorrupt thumbnailsIncompatible applicationInaccurate Performance SettingsDisabled thumbnail preview
Fix Windows 11 JPG Thumbnails Not Showing Issue
Now let’s proceed to the potential methods that can successfully troubleshoot the underlying issues that force the JPG Preview to stop working on Windows 11.
1. Enable Thumbnail Preview in File Explorer
The most obvious reason why the JPG preview is not working in Windows 11 is that Windows Explorer is configured to show only icons and no JPG preview. The File Explorer allows you to choose whether you want to view icons instead of JPG thumbnails. When enabled, the JPG preview will no longer work visible, and you will only see the icons. You need to disable this option to fix the JPG Preview Not Working issue on Windows 11.
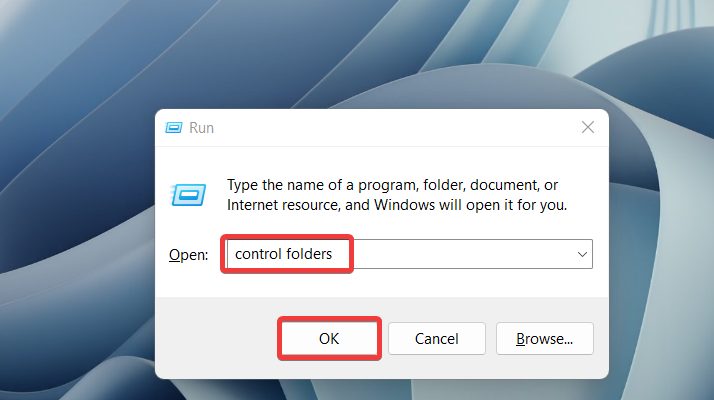
- Use the Win + R hotkey combination to bring up the Run command window.
- Type control folders in the command line and press the OK button to execute it.
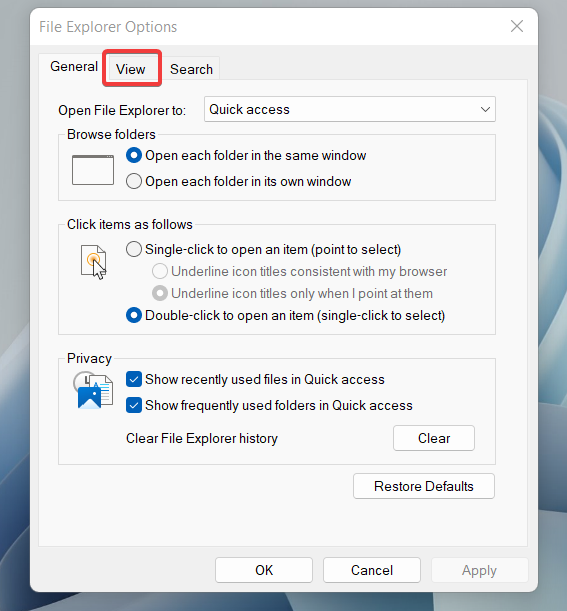
- Navigate to the View section of the File Explorer Options window.
- Now jump to the Files and Folders section and uncheck the box preceding the Always show icons, never thumbnails option. Hit the OK button to save the changes and close the dialog box. Now navigate to the JPG files, and most probably, the JPG preview will now start working.
2. Modify The Advanced System Settings
Microsoft has included the advanced system settings that control the JPG thumbnail preview on your PC running on Windows 11. It’s recommended to tweak the advanced settings of your Windows 11 PC and check whether it does any good in resolving the issue at hand.
- Bring up the Run dialog box by pressing the Windows + R keys together.
- Type sysdm.cpl in the text box of the Run window and press the enter key.
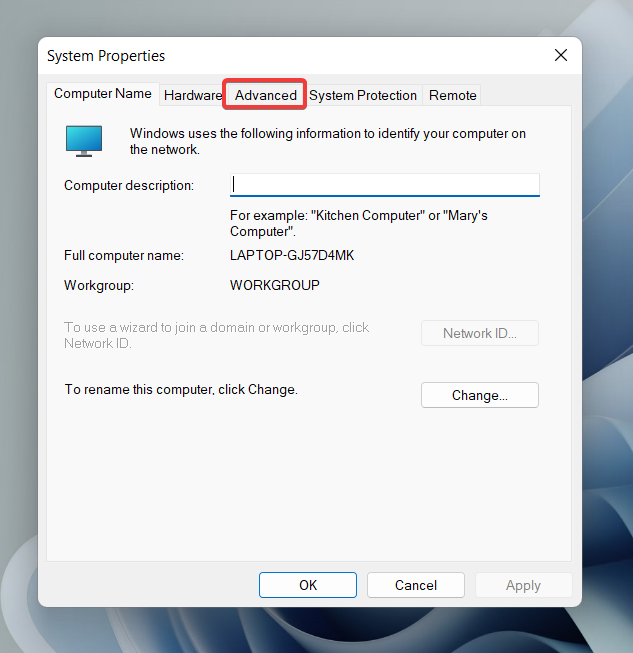
- When you access the System Properties window, switch to the Advanced tab.
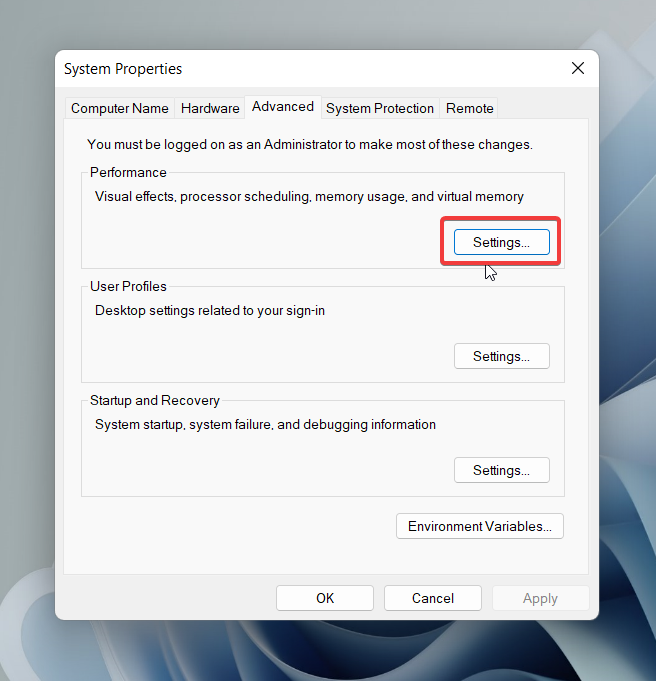
- Press the Settings button located in the Performance Section.
- On the Performance Options window, look for two settings, namely, Save taskbar thumbnail previews and Show thumbnails instead of icons and ensure that the checkbox for these options is ticked. Press the OK button to save the settings. After this, go ahead and see if the broken JPG preview is working as it should or not.
3. Update Windows
Since Windows 11 is relatively new, the JPG Preview on your PC might have been broken by a bug present in the current build of the operating system. Since Microsoft is identifying and resolving such glitches, the JPG Preview might work without any hassle on the next Windows 11 version. Nevertheless, keeping your PC up to date is a good practice to tackle such trivial bugs as with the JPG Preview. Updating Windows is a straightforward process; check out the steps to do it below.
- Launch the Settings app on Windows 11 by pressing the Windows and the I key simultaneously.
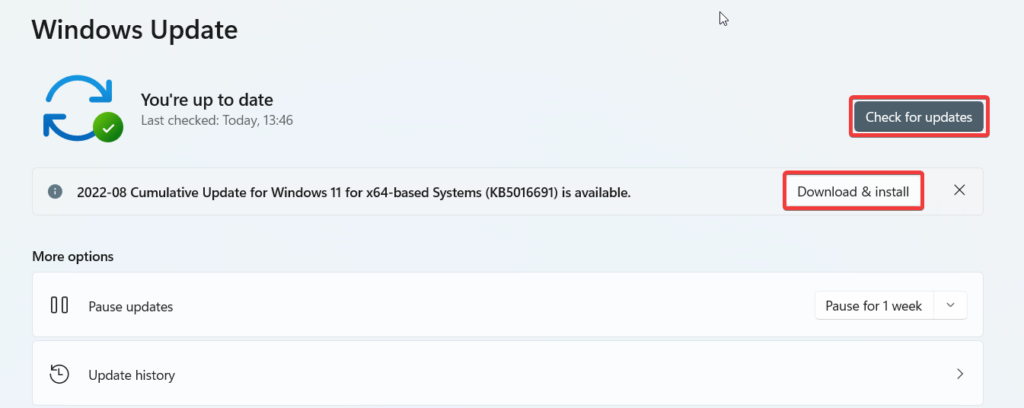
- Navigate to the Windows Update from the left pane of the Settings app.
- Press the Check for updates button on the top right corner to initiate the manual checking of the available updates.
- If any update is pending, download and install them on your Windows 11 PC. After updating the Windows, check if the JPG preview is now visible on your PC.
4. Scan for Corrupt System Files
Complications such as missing JPG thumbnails can emerge when some system files become corrupt or go completely missing. To ensure this is not the cause of the problem, you should initiate the system file checker, which will examine the integrity of the operating system files. You will then be notified whether you have to reinstall Windows to get the JPG preview working on your Windows 11 PC or not. Follow the step-by-step process to run the System File Checker or the SFC scan:
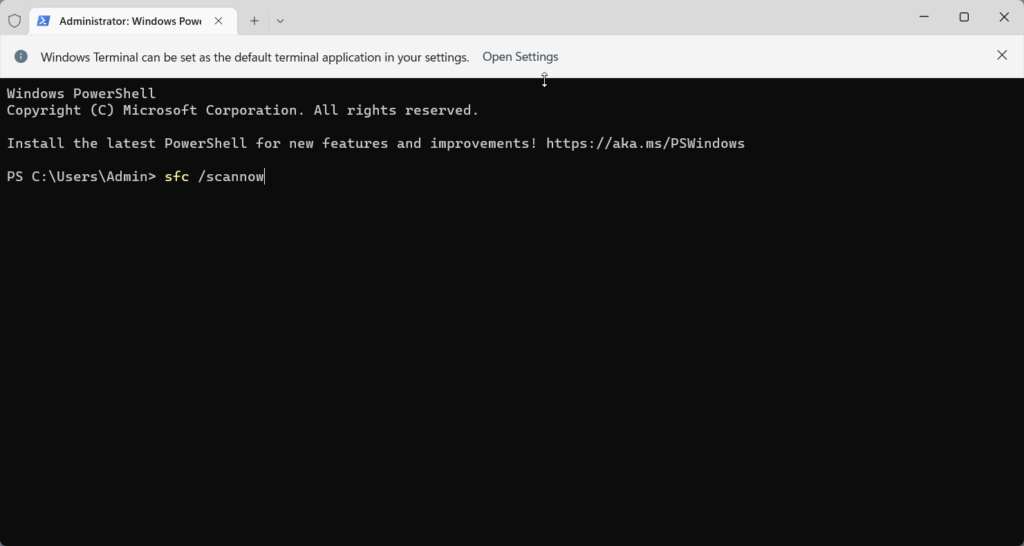
- Right-click on the Windows icon on the taskbar and choose the Windows Terminal (admin) option from the quick link menu.
- In the Windows terminal, type or copy-paste the following command and press the Enter key to execute it. Wait until the file checks and scans your system files, and be mindful that you do not interrupt the process.
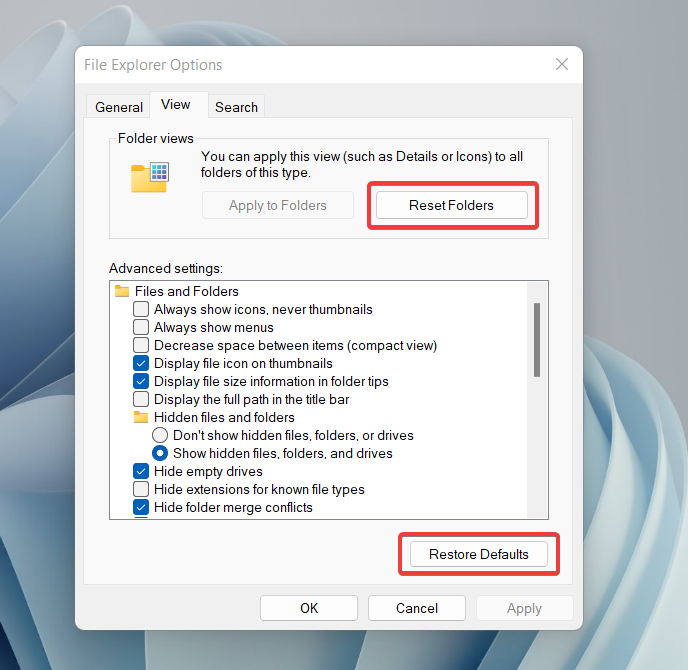
5. Restore the Default Settings
Any irrelevant modification of the File Explorer settings, whether knowingly or unknowingly, can trigger such a problem as you are facing right now. These settings may disturb the thumbnail for only JPG files or all the file formats on the PC. Fortunately, it is possible to revert these settings to default so that the JPG preview not working for your photos issue no longer exists. Here is how you can restore the settings to defaults.
- Use the Win + R hotkey combination to bring up the Run command window.
- Type control folders in the command line and press the OK button to execute it.
- Switch to the View tab of the File Explore Options window that opens.
- Now, press the Reset Folders button followed by the Restore Defaults located below the advanced settings.
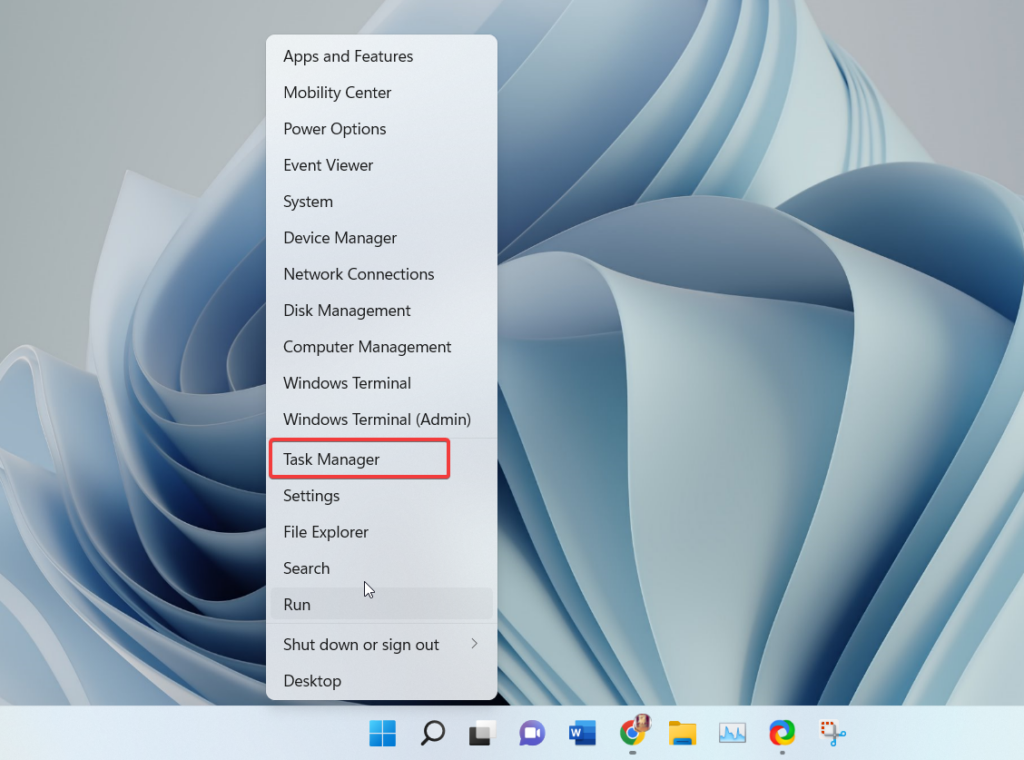
6. Restart Windows Explorer
Often Windows Explorer encounters a bug that causes the system to malfunction or triggers unexplained issues like no JPG thumbnails on your PC. However, you can easily resolve this issue by force restarting the File Explorer process. Following are the steps to perform the intended action.
- Use the Windows + X shortcut key to summon the quick links menu and choose the Task Manager option.
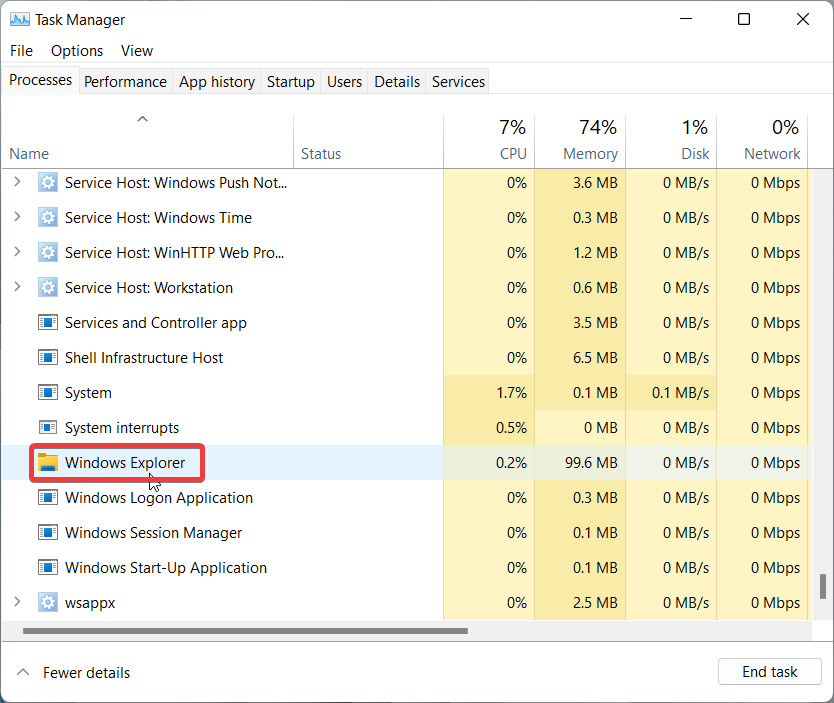
- When in the Task Manager window, make sure you are in the Processes tab and look for the Windows Explorer process. You will find it under Windows Processes.
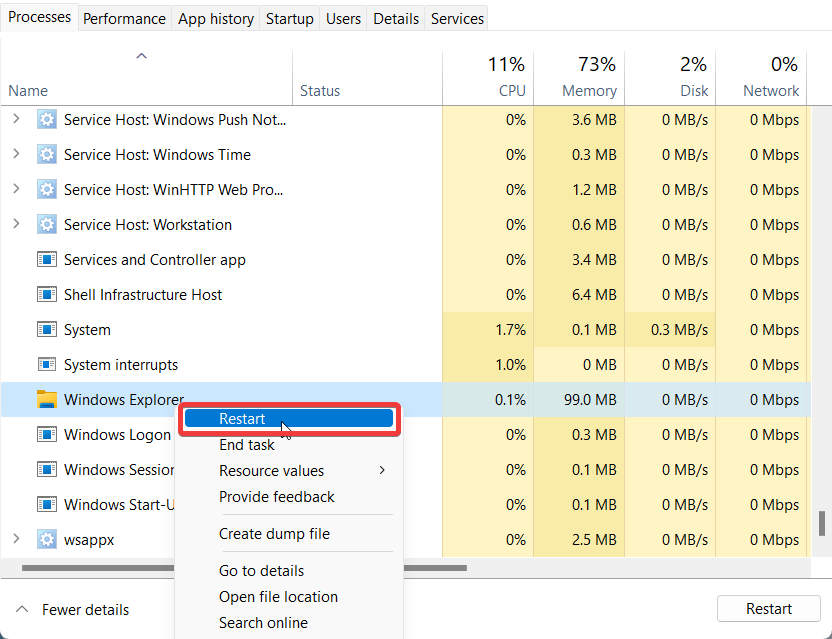
- Access its context menu and choose the Restart option. Wait for the process to restart successfully and see if the JPG Preview not working issue is resolved.
7. Reboot PC
Most often, your Windows 11 PC starts to act unexpectedly when it encounters minor glitches that affect the performance. Rebooting your PC in such a circumstance is a certain way of restoring the normal functionality of your Windows 11 machine. Hopefully, it will also resolve the JPG preview not working issue also.
- Press the Windows key to access the Start Menu and click the Power icon visible at the bottom right.
- Choose the Restart option from the flyout menu.
8. Change The Default application
Several Windows users have mentioned that changing the default program which opens the photos on your Windows 11 PC can help restore the JPG preview. You can change the default application with a few clicks, and who knows, the workaround might successfully resolve the problem we are facing at present. Check out the step-by-step procedure to change the default application to view files in JPG format.
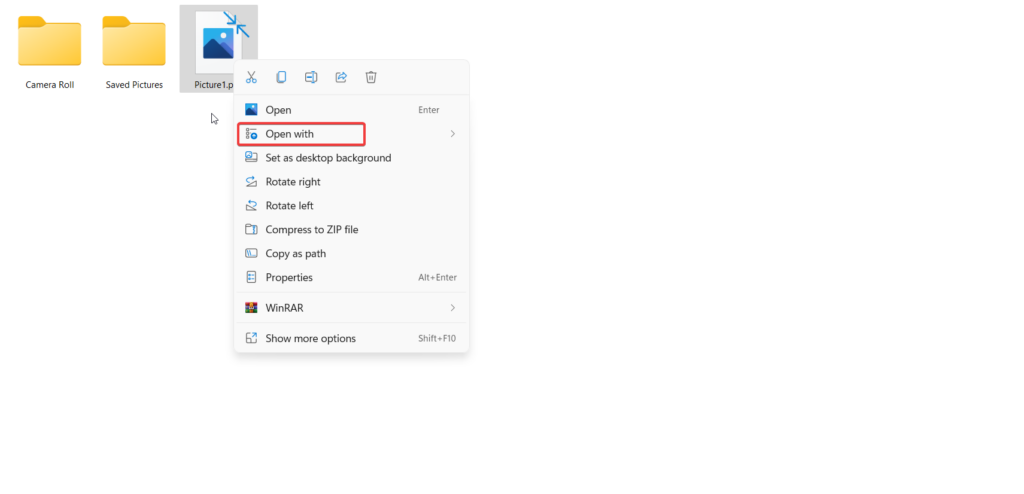
- Head to the Windows Explorer window using the Windows + E shortcut and navigate to a JPG file.
- Right-click the file to access its context menu and choose the Open with option.
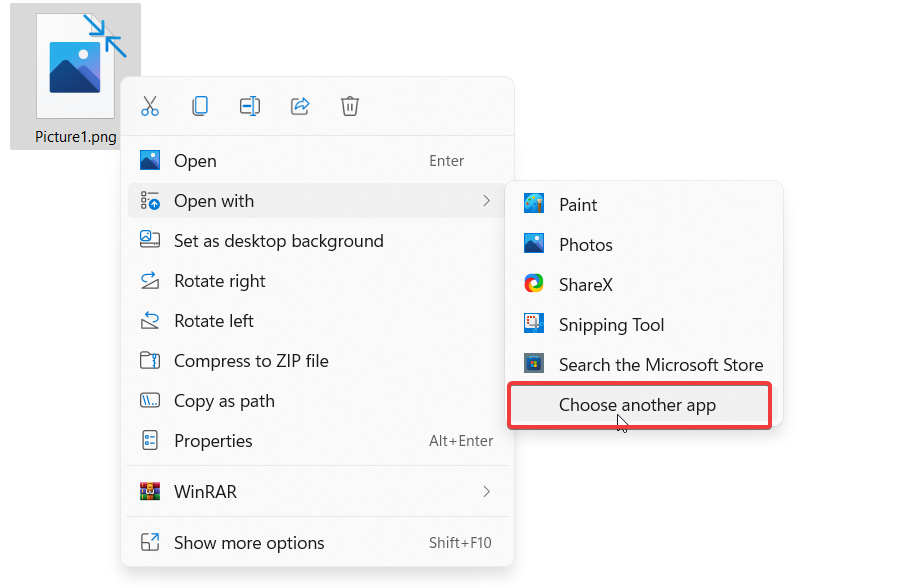
- Select the Choose another app option located at the bottom of the sub-menu that appears.
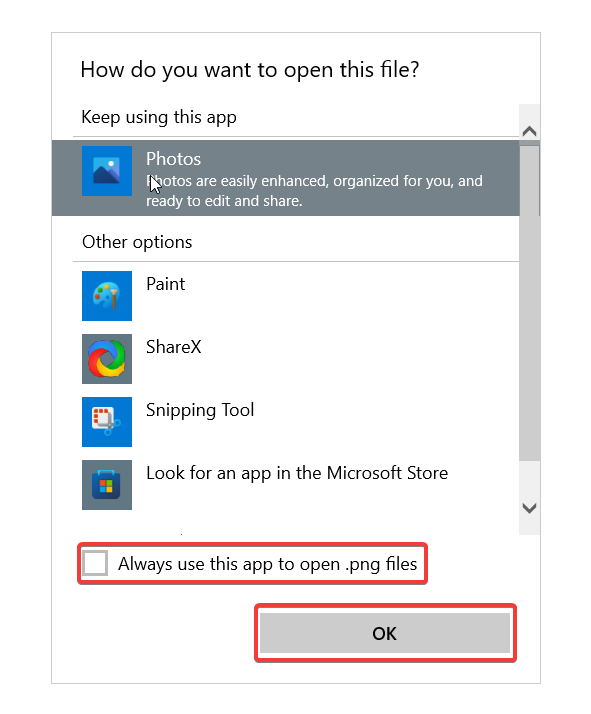
- A new dialog box named How do you want to open this file? will open on the screen. Choose a new app using which you want to open the JPG files from now onwards and check the box for the Always use this app to open files option at the bottom. As soon as you choose a new app, the thumbnails will automatically appear for the JPG files. If not, proceed to the next fix.
9. Delete corrupt thumbnails
Windows 11 uses the thumbnail cache to generate the thumbnails or previews of the different files, including JPG. So if the thumbnail cache becomes corrupt or encounters some sort of problem, the JPG previews will no longer work on your system. To resolve this problem, you need to force Windows 11 to recreate the thumbnails for all the files stored on your PC. To do that, you will have to get rid of the existing thumbnails of the files. Follow the step-by-step procedure to delete the corrupted thumbnails on Windows 11.
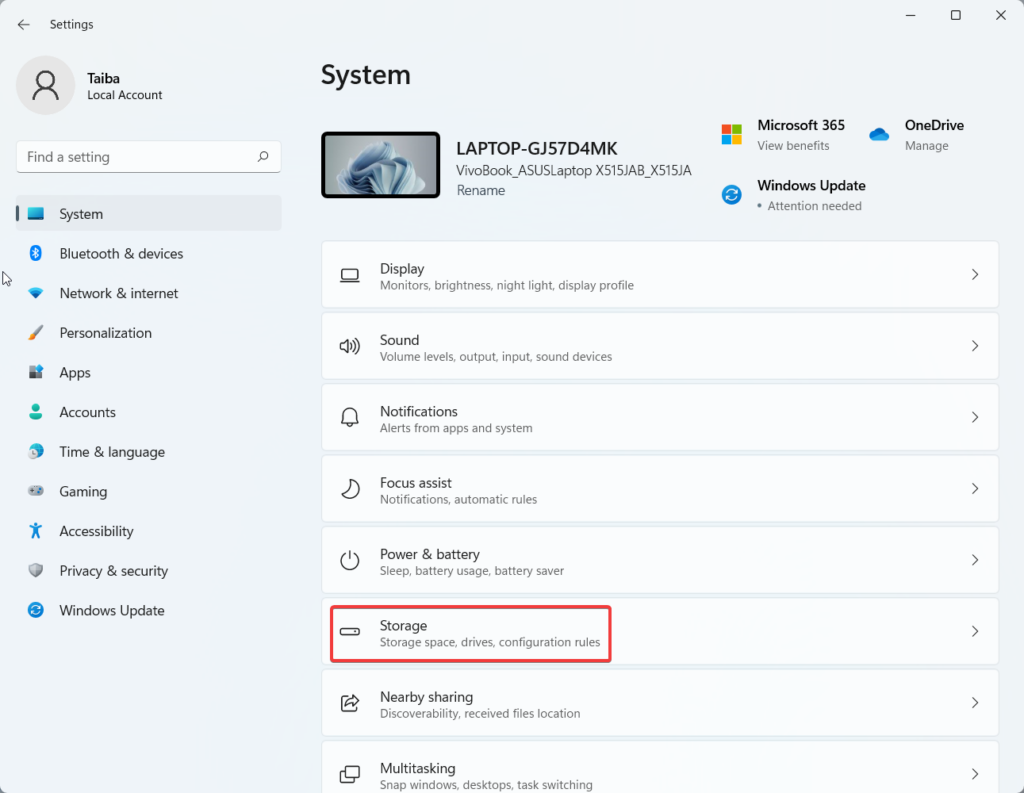
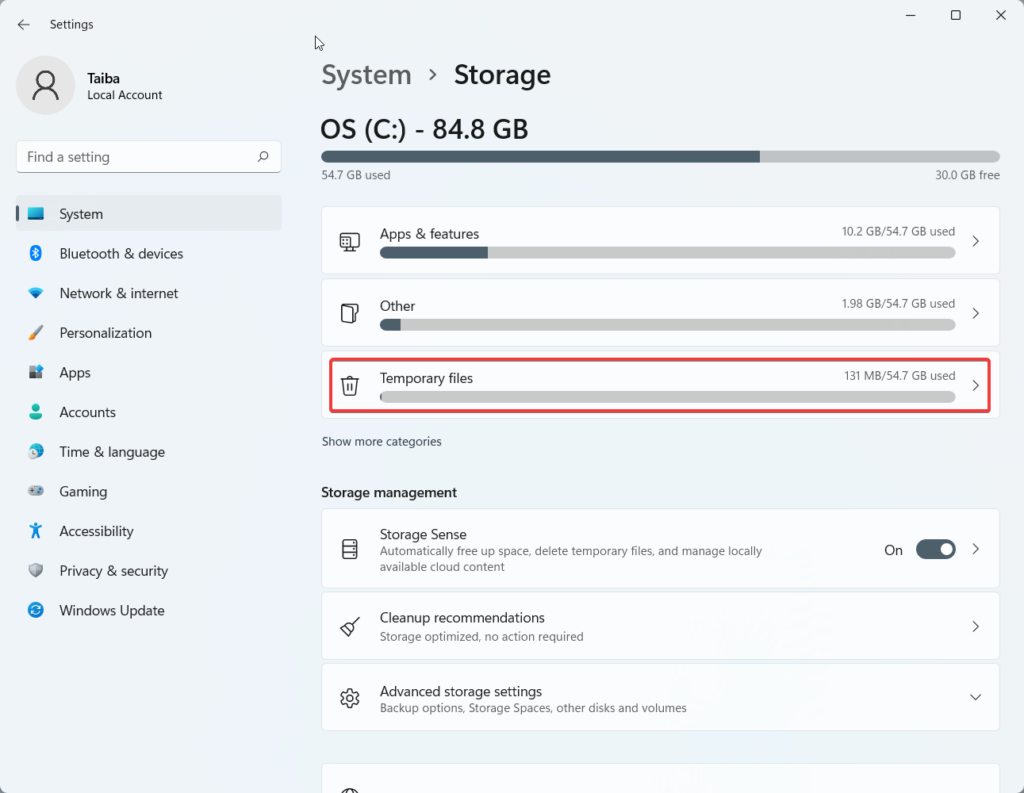
- Launch the Windows 11 Settings app using the Windows + I hotkey.
- While in the System settings, choose the Storage option from the right side.
- Wait until Windows calculates the space occupied by different categories, and then click the Temporary Files option.
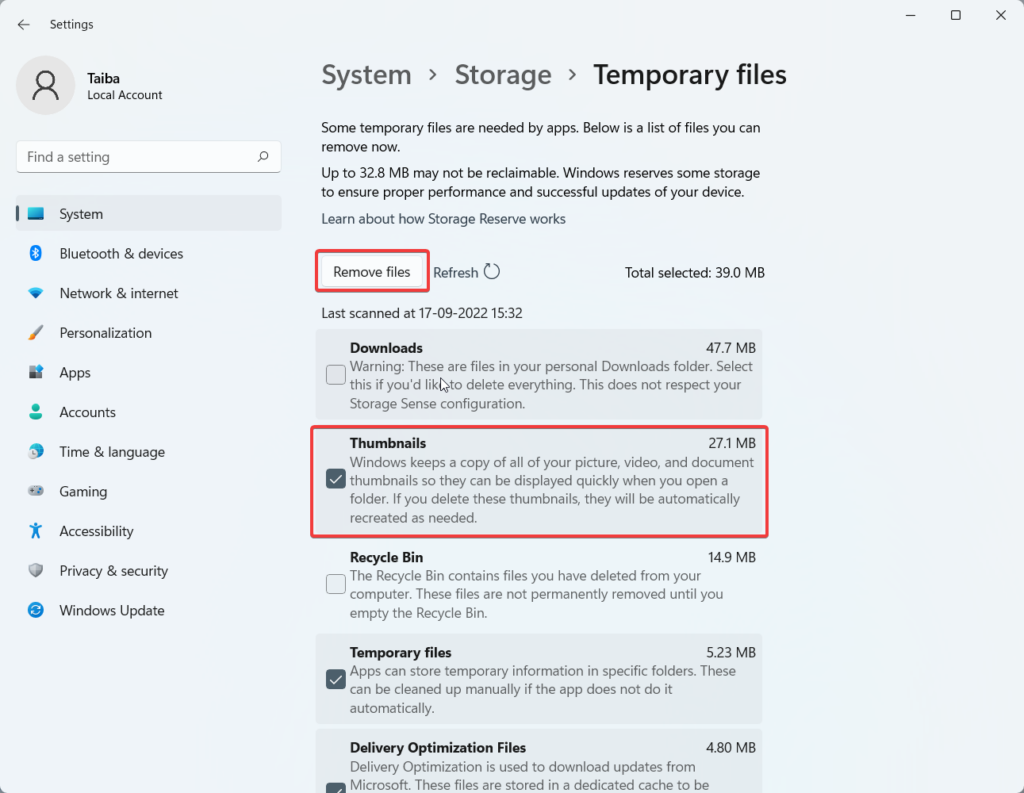
- On the resulting screen, check the Thumbnails option and press the Remove Files button on the top.
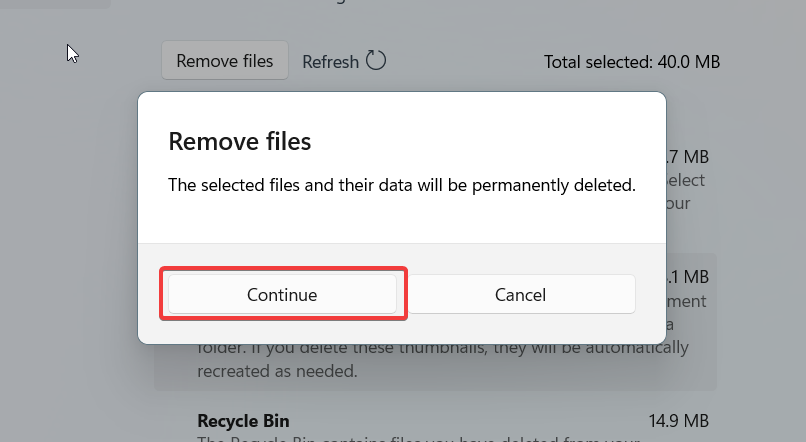
- When a confirmation dialog box appears, press the Continue button. All the thumbnails will be expelled from your Windows 11 PC, and it will now be compelled to create a fresh set of thumbnails.
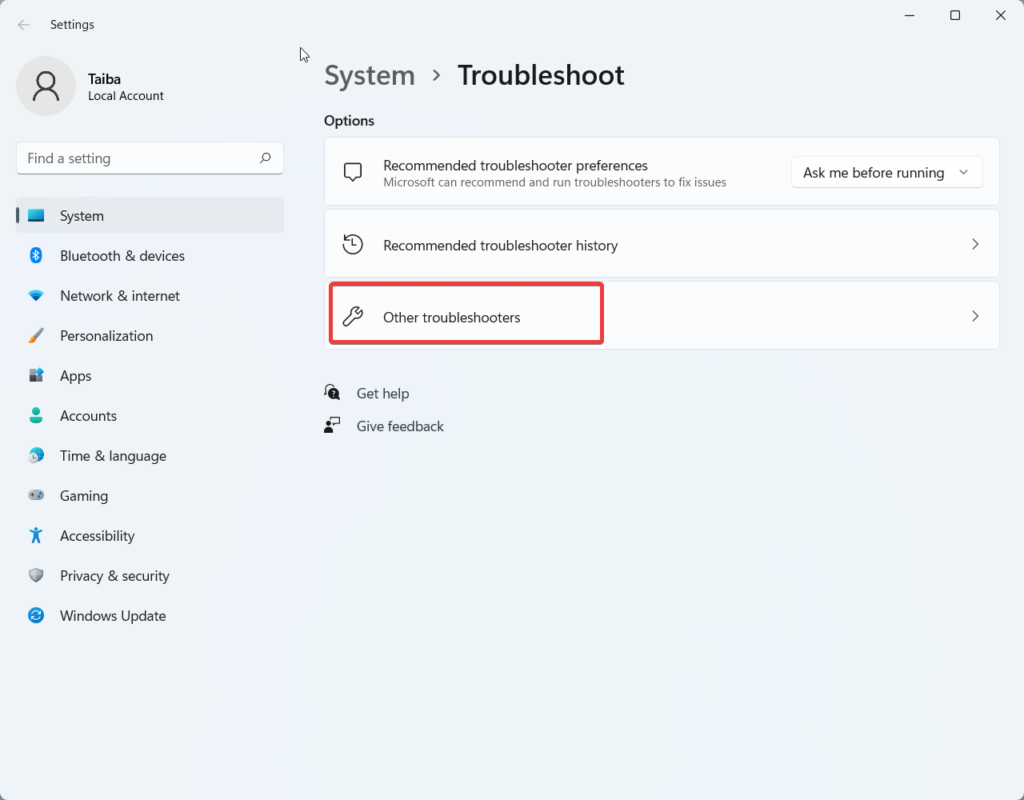
10. Run Windows Troubleshooter
If the JPG preview is still not working on Windows 11 PC, it indicates a serious underlying issue with the search and indexing of the files on your PC. Fortunately, this can be tackled easily by employing the built-in troubleshooters provided by Microsoft. These dedicated troubleshooters address the core of the problem to resolve the issue for good. Hopefully, they will be able to resolve the JPG preview not working issue on Windows 11 also. Having said that, let’s use Windows Troubleshooters to fix the problem.
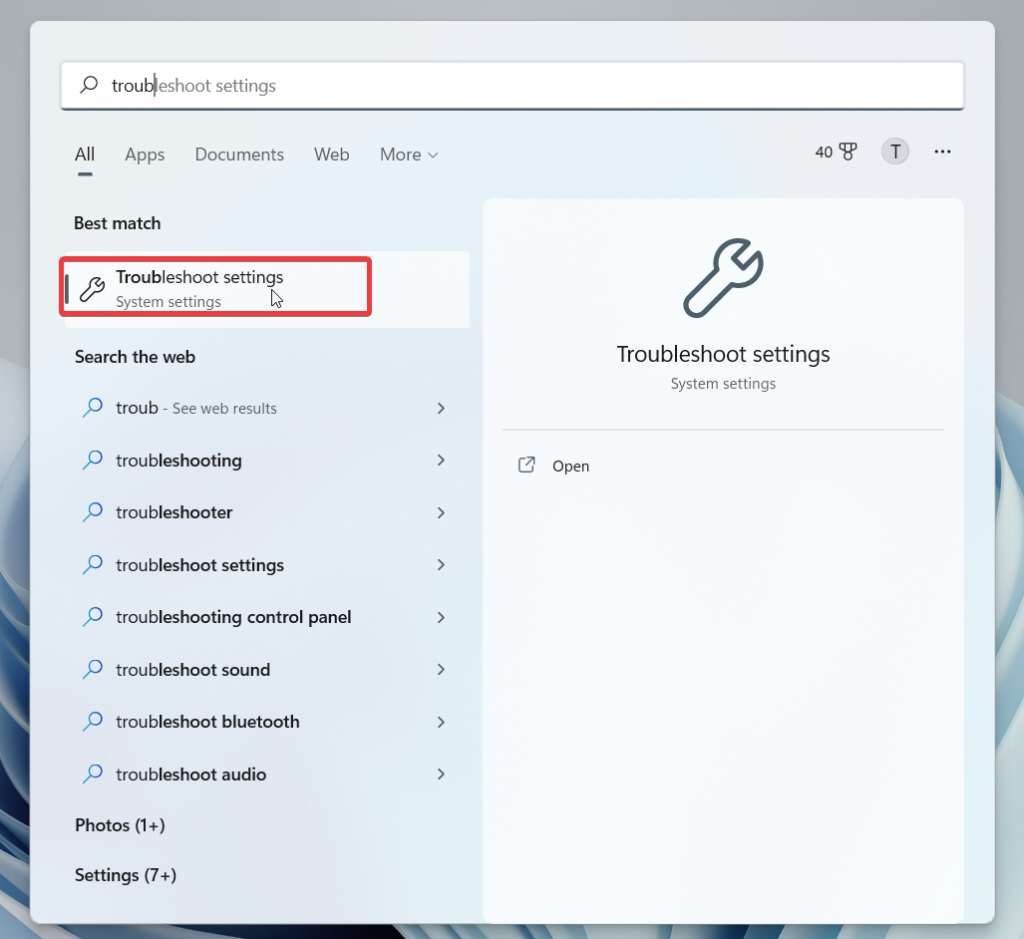
- Press the Windows and S keys simultaneously to open the Search menu.
- Type Troubleshoot in the search bar on the top and select Troubleshoot settings from the search result.
- When the Troubleshoot Settings appear, click the Other troubleshooters option.
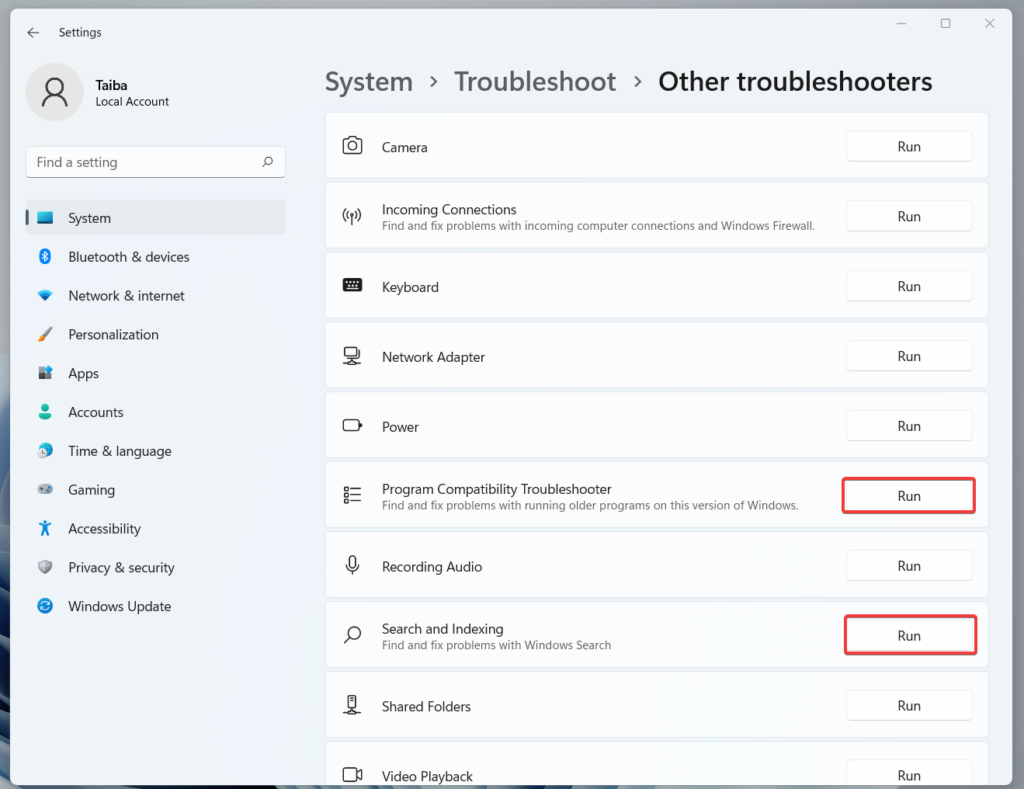
- Look for Program Compatibility Troubleshooter and Search and indexing under the Other troubleshooters category and press the Run button next to them one at a time. Wait until the troubleshooter examines the issue and recommends some relevant methods to resolve the problem.
11. Scan For Malware Infection
Malware attacks can be the possible culprit behind the absence of JPG thumbnails. Viruses attack the files stored on the hard disk and leave them non-reusable. As a result, the system will no longer be able to identify these corrupt files. The issue is a serious one, and it can affect more file types gradually. You need to catch the culprit at the earliest and get rid of them. It is recommended to scan your PC with an antivirus to protect it against malware infections. You can use Windows Defender or a third party antivirus to scan your PC.
Why are JPG thumbnails not working for one folder in Windows 11?
Right-click the problematic folder and choose properties. Navigate to the Customize tab and press the Restore Default button present in the Folder pictures section.
Why do I see small icons instead of JPG thumbnails in Files Explorer?
Go to the folder and click the view option present on the ribbon toolbar. Here choose the Medium Icons, Large Icons, and Extra Large Icons options from the drop-down instead of the small icons option.
Final Words
Here we reach the end of our comprehensive guide addressing the JPG preview not working on Windows 11. JPG thumbnails offer more convenience than simple icons, and the non-availability of the thumbnail previews is definitely displeasing. Hopefully, the solutions described above will troubleshoot the issue disrupting the thumbnails of the photos on your computer.
Δ
![]()

![]()


![]()