Since Windows users are habitual in using the Drag and Drop feature, being unable to use it was surely as disheartening for them. Thankfully, Microsoft was quick to address the issue and restored the feature in Windows 11. Moreover, several neat workarounds come in handy when you have to drag and drop files to different windows when the official feature is malfunctioning for some reason.
Fix Drag and Drop Not Working In Windows 11
If you are unable to drag and drop files between Windows 11 PC, keep scrolling below to acquaint yourself with the tried and text fixes that are capable of resolving the issue.
1. Update to Windows 11 20H2
Looking at the concerns of its users, Microsoft has finally brought the drag-and-drop functionality back in the latest Windows iteration as a part of the recent update rolled out by them. Thus, the easiest and sure-shot way to get the drag-and-drop feature working on your Windows 11 PC is by upgrading to Windows 11 22H2 update. Updating to Windows 11 22H2 is an uncomplicated task, just like installing any other Windows update. Here is the step-by-step process of updating to Windows 11 PC to drag and drop files once again.
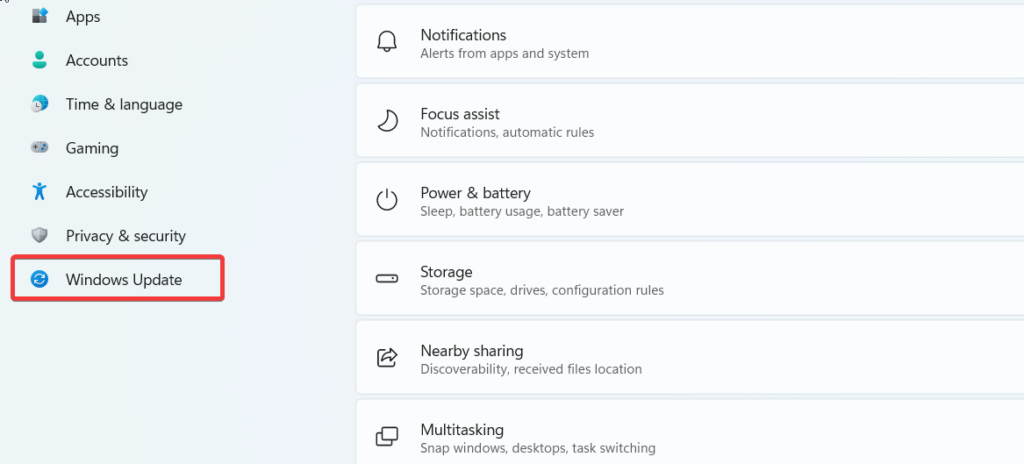
- Press the Windows and I keys simultaneously to access Windows settings.
- Click on the Windows Update option on the left panel.
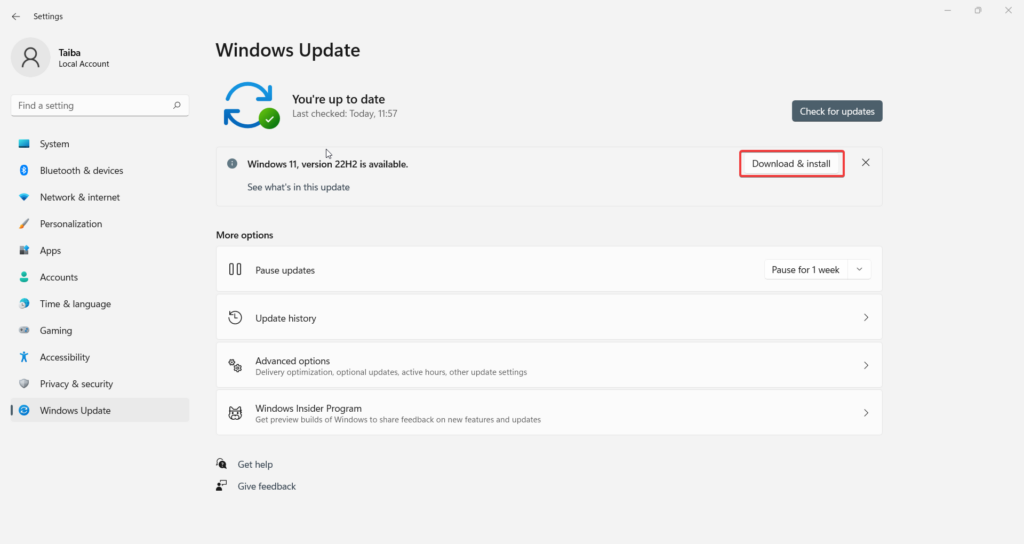
- If the Windows 11 22H2 update is listed on the right pane, press the Download and Install button.
- Restart your PC to complete the installation process, and you’ll be able to drag and drop files to the Windows taskbar. While upgrading to Windows 22H2 will bring the much-awaited drag-and-drop functionality back on your Windows PC, several users have reported that the drag-and-drop gesture sometimes decides to act up even if you successfully do it. This mostly happens due to the presence of glitches in the Windows 11 22H2 update. Until Microsoft address these pesky bugs, you can try some neat hacks which serve as an alternative to drag-and-drop functionality.
2. Restart File Explorer
If you still face problems when dragging and dropping files after upgrading to Windows 22H2, you can restart the File Explorer program in an attempt to resolve the issue. Doing so is simple. Below are the steps for doing so.
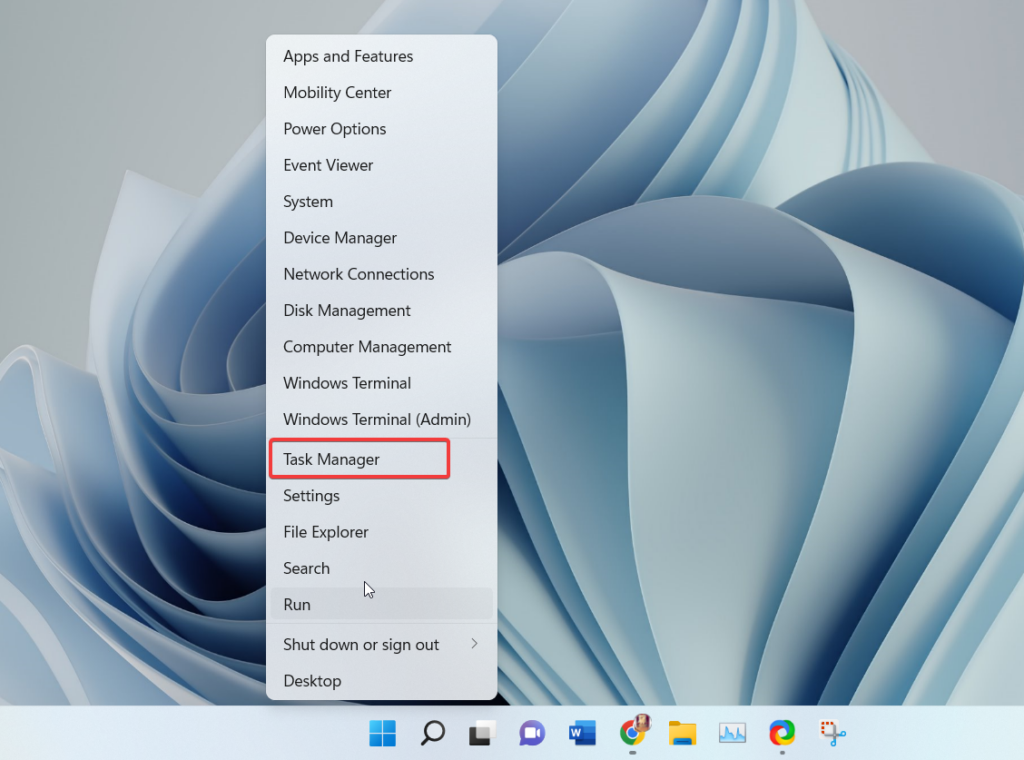
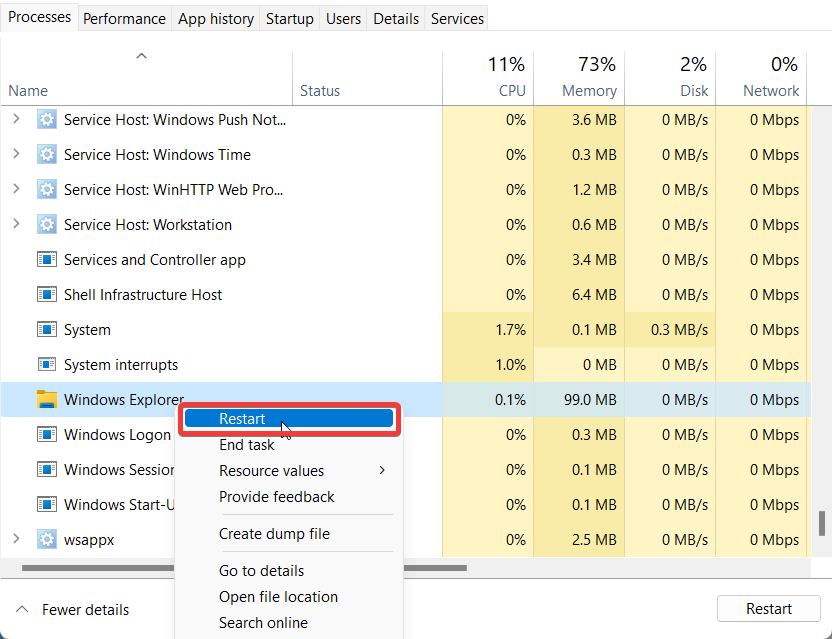
- Use the Windows +X key combination to open the quick links menu. Choose the Task Manager option from the list.
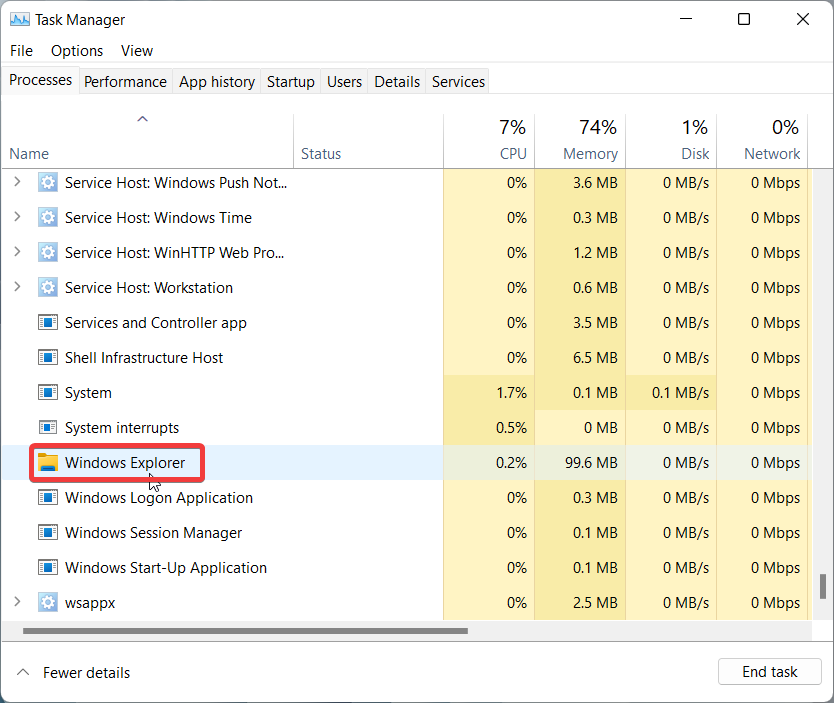
- Stay in the Processes tab and look for the Windows Explorer process. It will be listed under the Windows Process section.
- Right-click the process and choose the Restart option from the context menu.
- Doing so will cause the desktop and taskbar icons to vanish and reappear after some time. Now exit the task manager and attempt drag and drop of files.
3. Relaunch The Application
If you are unable to use the drag and drop gesture only for a particular app, it may happen due to a trivial bug in the application if the app is opened for a long time. You can easily fix this by quitting that application and the related processes through the Task Manager window. The steps to quit the application and its related processes are the same as described above. Once the application is forcefully closed, relaunch the application and effortlessly drag and drop files to it from different locations.
4. Reboot Your PC
Just like any other electronic device, your PC needs a reboot from time to time. This is necessary to clear the system memory and data from the cache, which tends to act erratically and cause weird issues like the one we are facing now if not done for a long time. If you cannot recall the last time you restarted your PC, save your work and do it now. Rebooting your PC has always proven effective for resolving glitches, and we have positive it will do the trick here as well.
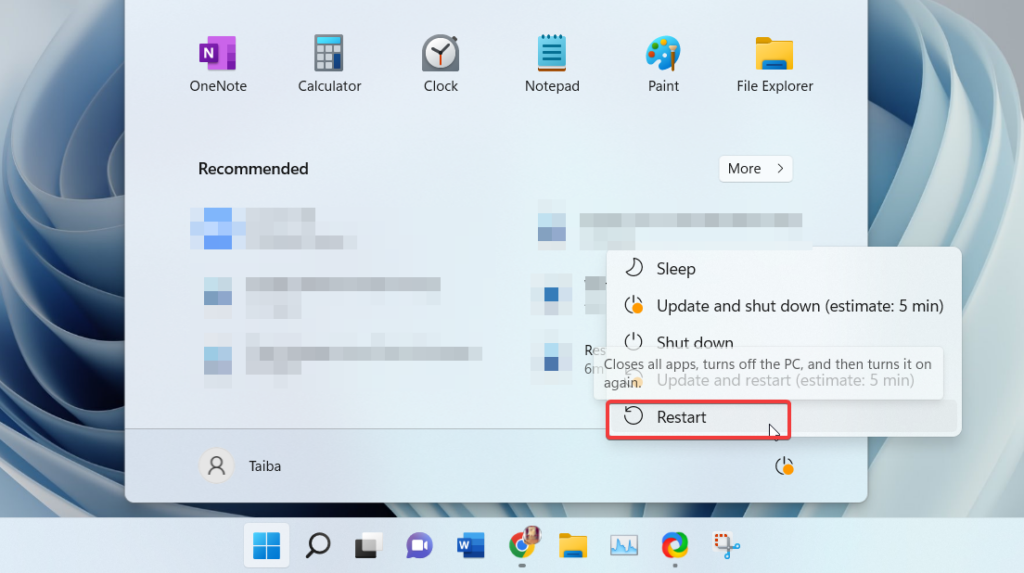
- So, press the Windows key to open the Start menu.
- Click the power icon on the bottom right and choose Restart from the sub-menu that opens up.
5. Reinstall Mouse Driver
If you are unable to drag and drop files successfully even after employing the fixes listed above, it points out that the mouse or the touchpad driver has become corrupt and is causing the device to malfunction. Let’s quickly reinstall the mouse driver to start using the drag-and-drop feature.
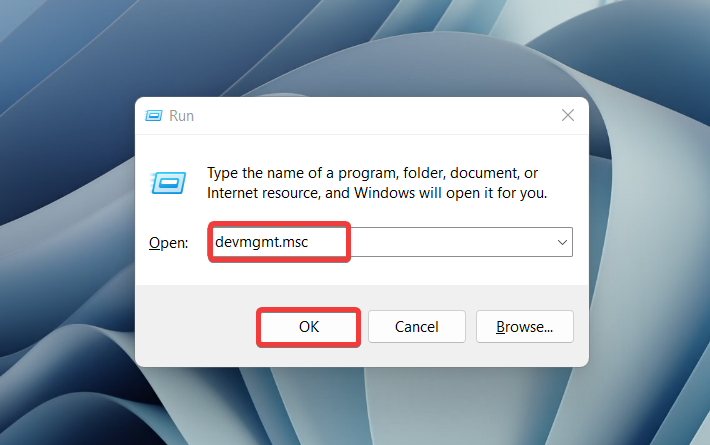
- Use the Windows+R shortcut key to open the Run command.
- Type devmgmt in the text box and press the OK button to execute the command.
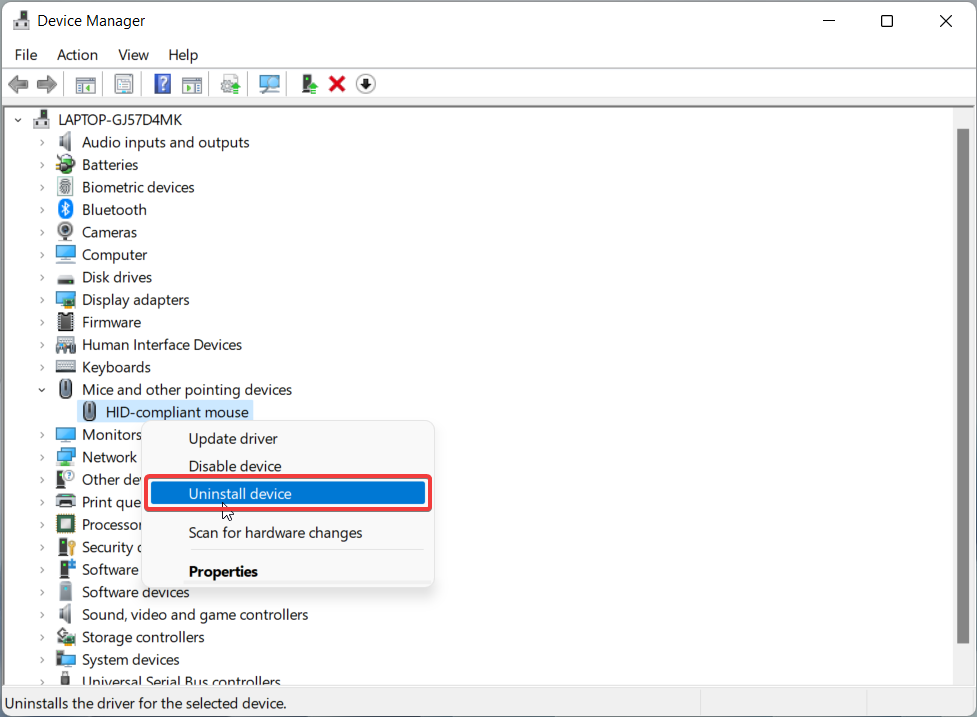
- When in the device manager window, expand the Mice and other pointing devices category.
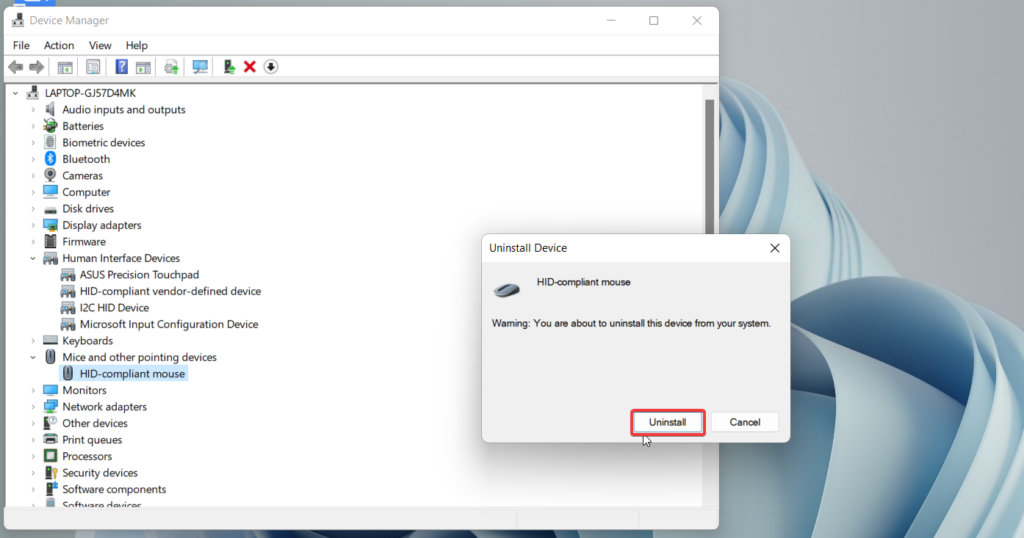
- Right-click the HID-compliant mouse/touchpad option and choose the Uninstall device option.
- Press the Uninstall button on the confirmation box.
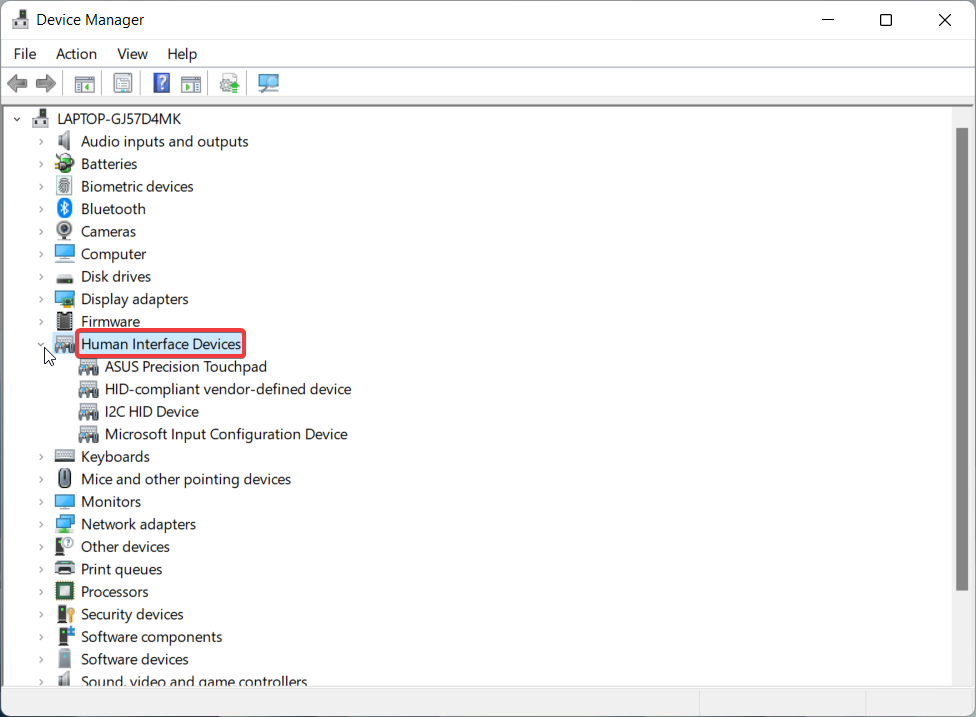
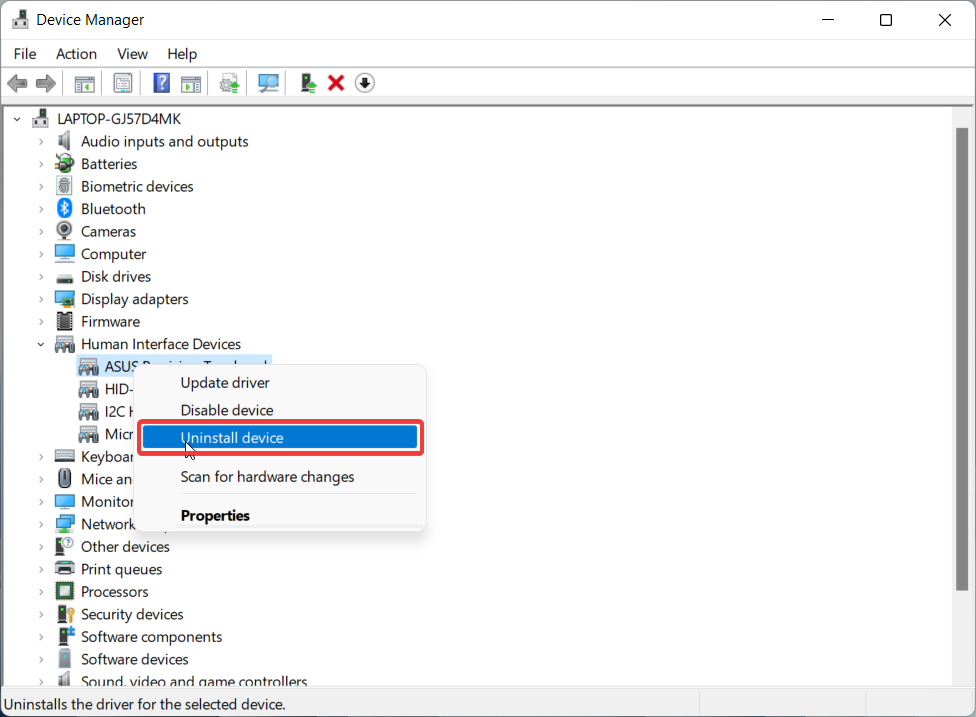
- Similarly, expand the Human Interface Devices categories this time and right-click the touchpad driver.
- Here, choose the Uninstall option to uninstall the touchpad driver. After this, you need to restart your PC. As the mouse and touchpad driver will no longer function, you will have to rely on the shortcut keys. Use the Ctrl + Alt + Delete shortcut and then choose the Power > Restart option with the help of Tab and Enter keys. As your device will reboot, Windows will automatically reinstall the missing drivers without your intervention.
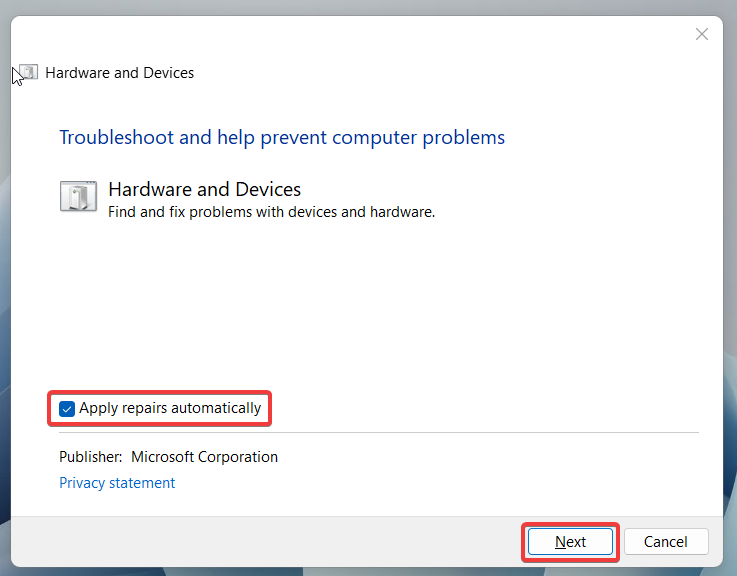
6. Run The Windows Hardware Troubleshooter
If you are still struggling with the issue, it’s best to approach the hardware troubleshooter to resolve the issues lurking in your mouse and trackpad. Windows has an array of troubleshooters dedicated to resolving a particular problem. Similarly, we have a windows hardware troubleshooter that addresses and resolves the problem related to hardware devices which might not be possible to find out yourself. Here are the steps to use the hardware troubleshooter in Windows to resolve the drag-and-drop gesture using a mouse or trackpad.
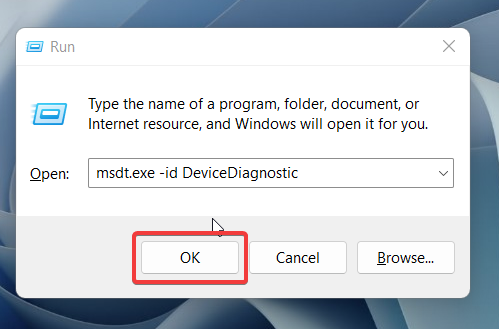
- Use the Windows and R shortcut keys to launch the Run command window.
- Copy and paste the following command in the run dialog box and press the Enter key.
- On the next window that opens up, choose the Advanced option.
- Tick the checkbox next to Apply repairs automatically option.
- Press the Next button on the screen and walk through the on-screen instructions and recommendations to fix the drag-and-drop errors on your PC.
7. Edit The Registry
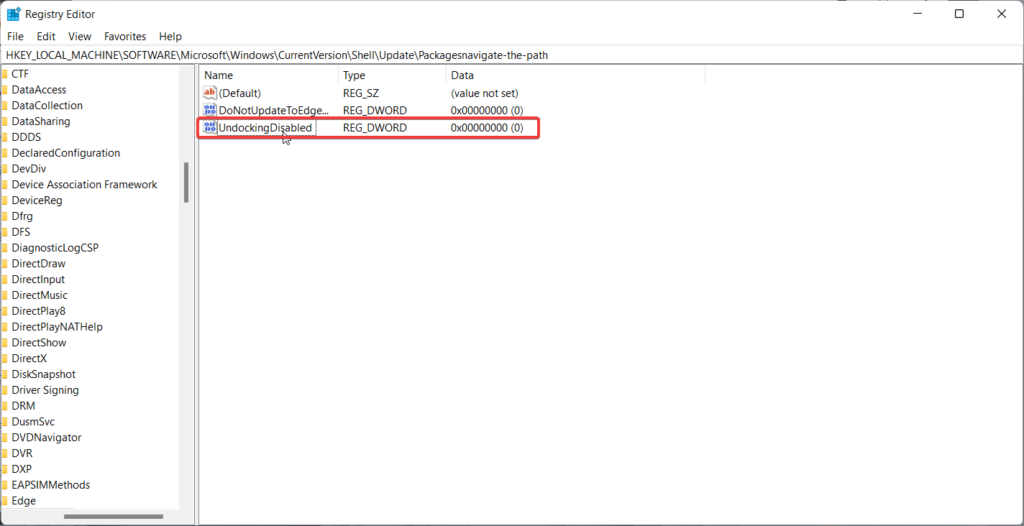
Tweaking the registry to enforce certain changes on Taskbar, like accepting dragged and dropped items, can fix the drag-and-drop working issue. But there is a catch! While it may resolve the problem at hand, it will break the Cortana functionality where you will no longer be able to access Cortana using the Taskbar. If this drawback does not seem a big deal, you can use the registry editor to edit the registry and enable the drag-and-drop feature using a new Registry value called UndockingDisabled. Follow the steps defined below to edit the Registry Editor and begin utilizing the drag-and-drop functionality.
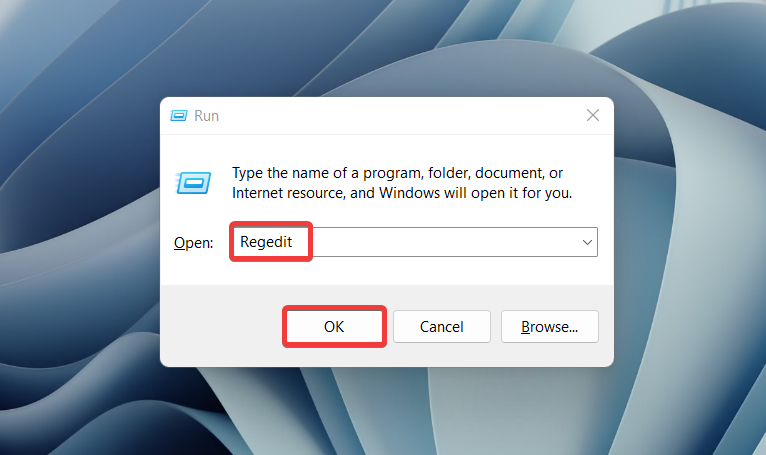
- To launch Windows Run, use your keyboard’s Win + R keys.
- In the Run dialogue box, type regedit hit the Enter key on your keyboard, or click the OK button.
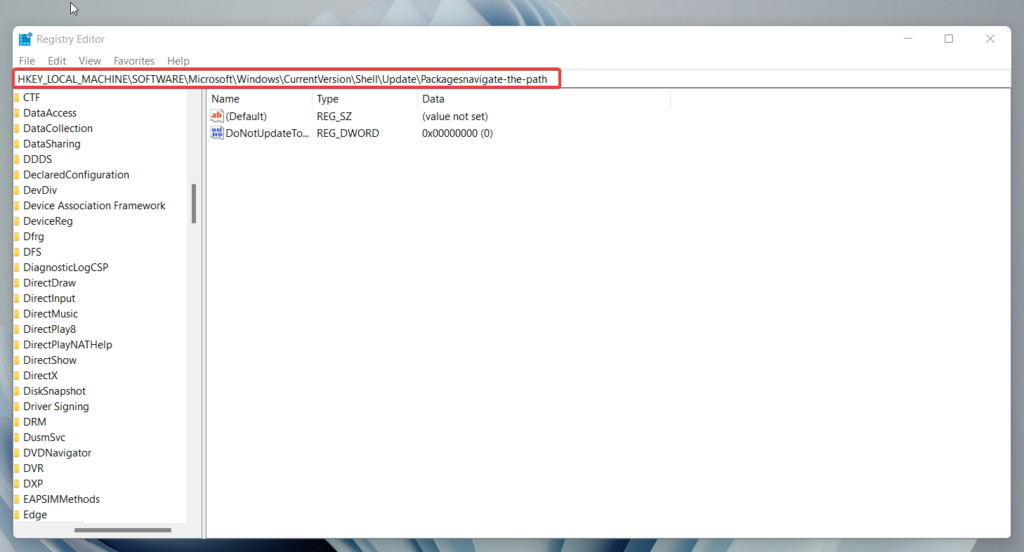
- To navigate the path, type the following path into the address bar:
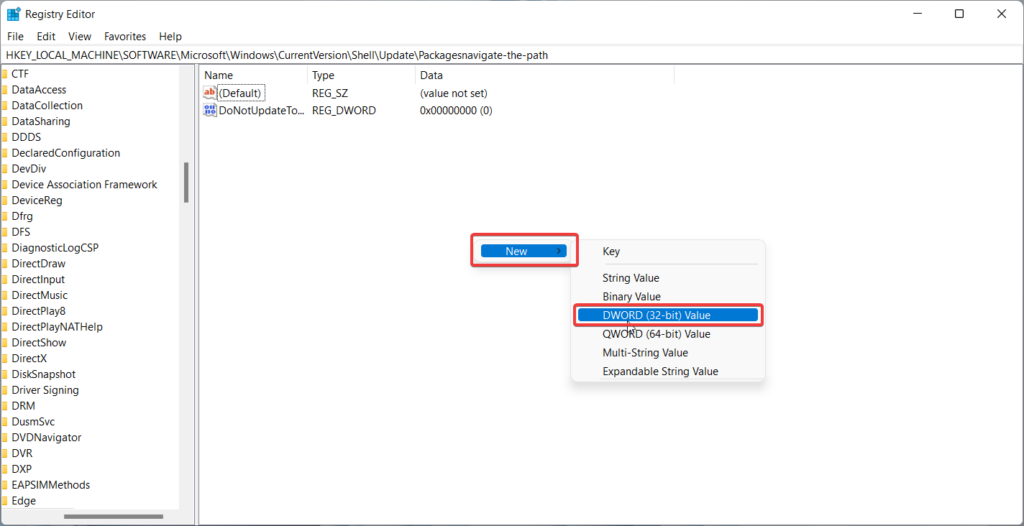
- Right-click the space on the right side of the screen, select New, and then pick DWORD (32-bit) Value.
- Enter UndockingDisabled as the value’s name.
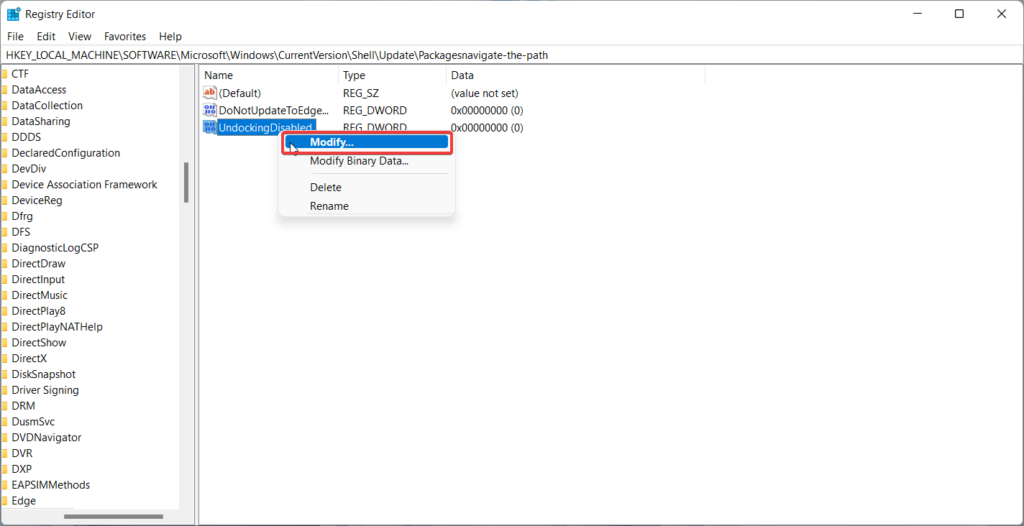
- Right-click it and select the Modify option.
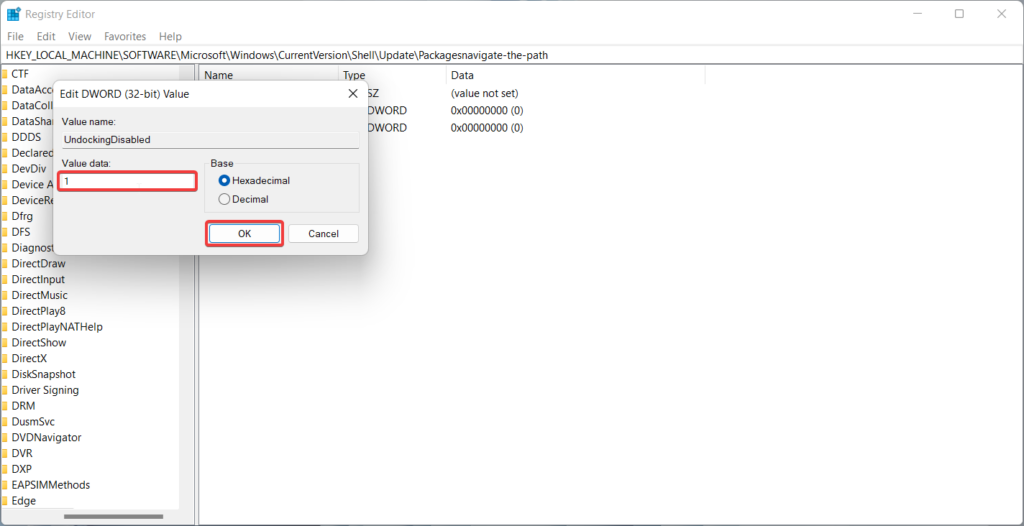
- Put 1 in the Value data area. To apply the changes, press the OK button.
- Close the Registry Editor after saving the changes, then restart your computer.
8. Use the Alt+Tab Shortcut
If you are here, it means the issues with the drag-and-drop gesture have not been resolved despite using all the possible methods. It’s best to consider that the drag and drop functionality though introduced through the Windows 22H2 version, is not been fully implemented in Windows 11 until now. The reason for this can be incompatibility issues or the presence of random bugs. In such as scenario, you can consider using alternative techniques to attempt dragging and dropping of files. It’s worth stating that using the Alt+Tab shortcut is the quickest way to drag and drop files and folders on a Windows 11 PC when the native drag-and-drop function fails to work at times of need. Once you master this trick, I promise you will love it! To utilize the Alt+Tab shortcut to use drag & drop, follow these steps:
- To drag and drop a file or folder, open the application or drive location where the file or folder is.
- Now drag and drop your files or folders to pick them. The file or folder will be slightly shifted when you will click and hold the left mouse button.
- To see every open app window, keep the left mouse button pressed and hit Alt+Tab on your keyboard. In this section, each app that is accessible will have its tile. A list of open windows will start with the most recent or active window, then move on to the preceding window, and so on. You can easily move to the required windows by holding the Alt key and pressing the Tab key.
- To open the application or place, select the tab of your choice and let go of the Alt key. Once the target window has shown, click and hold to drop the file.
9. Use The Split Screen Feature
If you are intended to drag and drop the files between two folders or programs, you can efficiently use the split screen feature to open two programs side by side and drag the files from one folder to another. This not only resolves the problem by also utilizes the split screen feature to the fullest. To drag & drop items between two windows in split-screen mode, use the following steps:
- To drag and drop a file or folder, open the application or drive having the file or folder.
- Now access the split-screen option if you place your mouse over the maximize button for the presently open window. By selecting the first alternative, the current window will take up half the screen.
- Select the window in which you want to move the file or folder. The other half has a list of all the additional open applications. Drag the file or folder to the other window by clicking and holding the left mouse button. To drop the file, let go of the left click. Your file has now been relocated to the app or folder you’ve opened on the other window, as you can see.
10. Use The Copy Paste Shortcut
Another quick and simple workaround to replace the drag-and-drop method of transferring files or folders is to use the cut-and-paste function. This method is nothing new, and hopefully, you already have to use it to improve the workflow. Let’s quickly remind you how to use the cut/copy and paste functionality on your Windows 11 PC to transfer files to different apps when the drag and drop functionality refuses to work.
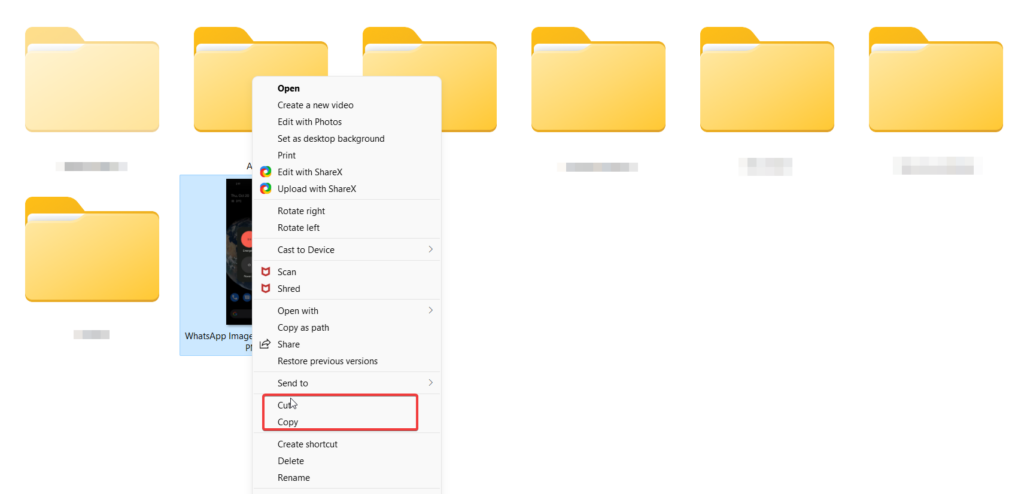
- Head over to the location where your file or folder is stored.
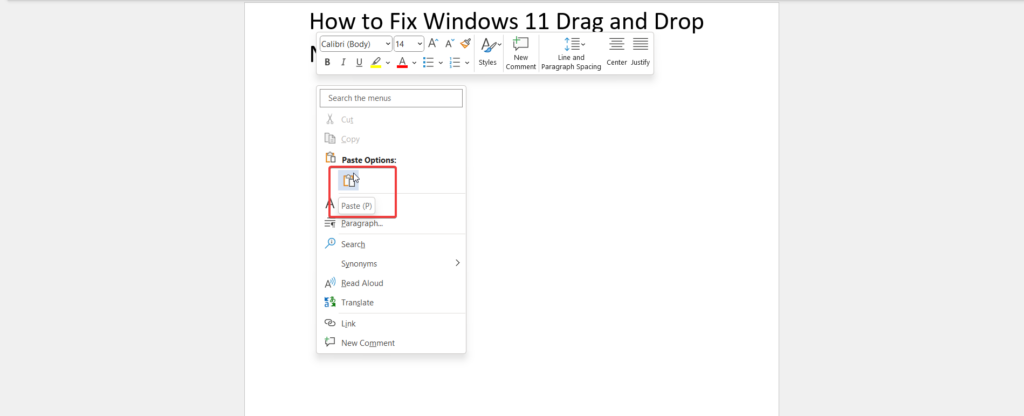
- Right-click on the file or folder by selecting the Copy / Cut option from the context menu.
- Launch the program where you intend to drop the file or folder. Select Paste from the context menu by right-clicking on the text or file input box. Your file is now transferred to the preferred location, as you can see.
11. Use The StartAllBack app
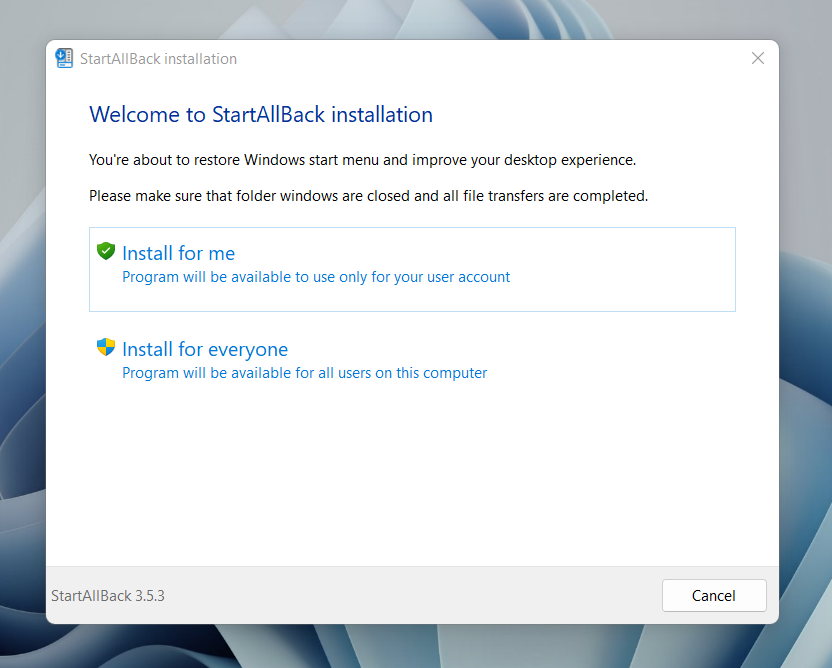
If you do not want to use the native drag-and-drop functionality until the underlying glitches are taken care of by Microsoft, you can certainly seek help from third-party tools. Apps like StartAllBack elegantly perform the drag-and-drop function even if the drag-and-drop functionality does not respond after installing Windows 22H2 update. What’s more, you get to enjoy the earlier taskbar aesthetic if you were missing it in the latest Windows update. We have listed below the method of installing the StartAllBack app on your Windows 11 PC.
- Visit the official StartAllBack for Windows 11 download page by opening your browser.
- Click the Download option once you’ve reached the correct download page to start the StartAllBack installer’s download.
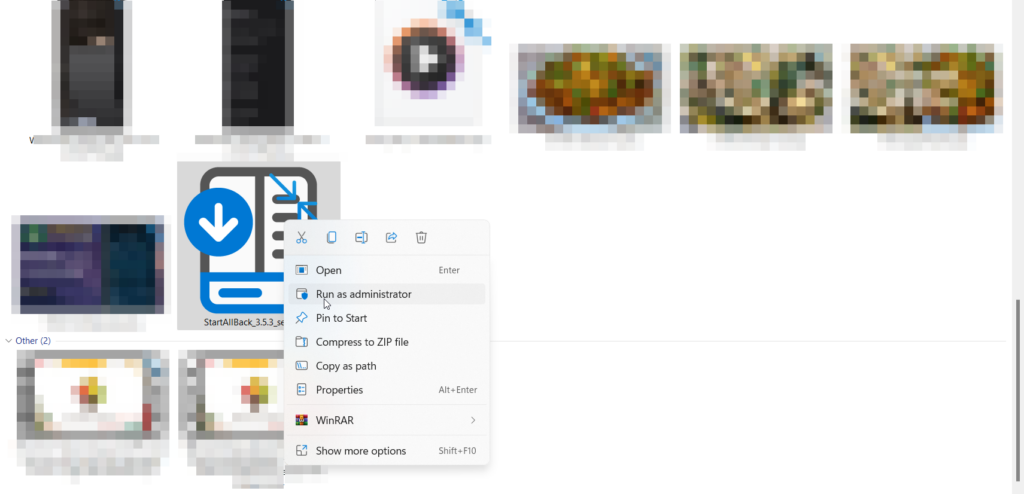
- Right-click the StartAllBack program when it has finished downloading, and then select Yes when prompted by User Account Control to give admin access.
- Choose Install for everyone or Install for me on the initial installation screen, depending on whether you want to install this utility just for your user account or for every user who has access to this computer.
- Please ensure that you must employ an administrator account to install it for every user. Wait until the program has been installed before attempting to use this functionality. You can try to drag and drop various files to different applications without using the innate drag-and-drop functionality.
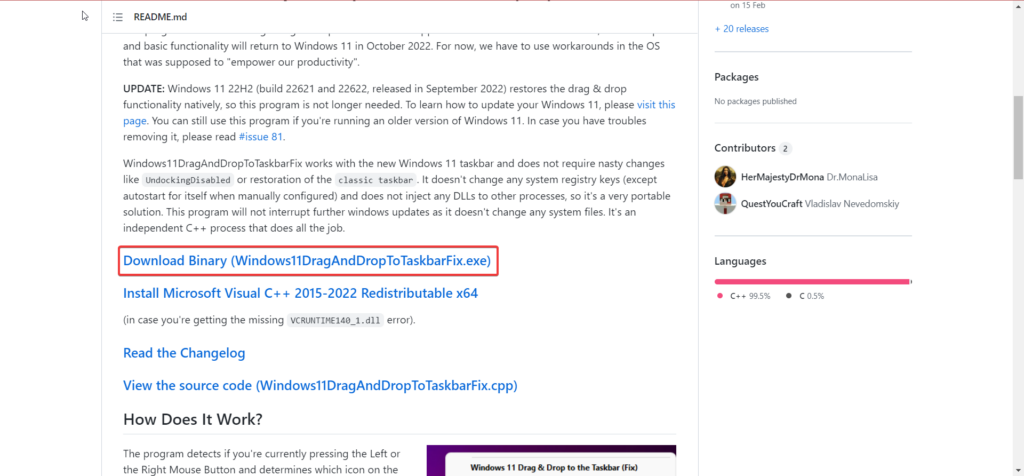
12. Use Windows11DragAndDropToTaskbarFix
Similar to the StartAllBack app, Windows11DragAndDropToTaskbarFix is another app by third-party developers, which, as evidenced by the name, can help you use the drag-and-drop functionality in Windows 11 for time being. To use this tool, you first have to install it on your system. Here is the step-by-step method to proceed with the same.
- Use the Windows11DragandDropToTaskbarFix as directed to use it:
- Visit its GitHub website. Find and click on the Windows11DragAndDropToTaskbarFix.exe file on the page to download it.
- Open and run the downloaded file once it has finished downloading.
- Now open the system tray by selecting the icon on your taskbar. Select the Mona Lisa icon. Attempt to drag any file from a folder and drop it into Photoshop or any other app listed on the taskbar. You’ll see that the drag-and-drop function is now working on your Windows 11 PC without any obstruction.
Final Words
Here we reach the end of our comprehensive article explaining the different ways for fixing the drag-and-drop functionality. While upgrading the Windows 22H2 is sufficient itself, you can try other workarounds when the functionality struggles to respond from time to time. If you need any further assistance in this regard, feel free to reach out to us in the comment section.
Δ
![]()


![]()
