Moreover, the start menu is now fully customizable, offering all the features you might need. The revamped Start menu seems promising, isn’t it? But what if the Start menu fails to open up when you click on the Windows icon or does not respond to the click of the Windows button? This issue will surely hamper your workflow. Luckily, the Start Menu not working in Windows 11 is a pretty common issue, and its troubleshooting process does not require any expertise. To help Windows users restore the Start Menu functionality, we have put forward a comprehensive guide containing all the possible fixes. Let’s dive right into them without any time.
Fix Windows 11 Start Menu Not Working
Here are ten methods to try for resolving the Windows 11 Start Menu not working issue. It is advisable to try these troubleshooting methods in the same sequence as mentioned to get quick results.
1. Reboot Your PC
Before trying the mainstream fixes, rebooting your Windows 11 PC, is recommended to get rid of the weird issues lurking on your PC. Hopefully, when your computer will reboot, the Start menu will start working as normal. You can easily restart your Windows 11 machine using a handy shortcut. Before attempting to restart your PC, save your work and close all the windows.
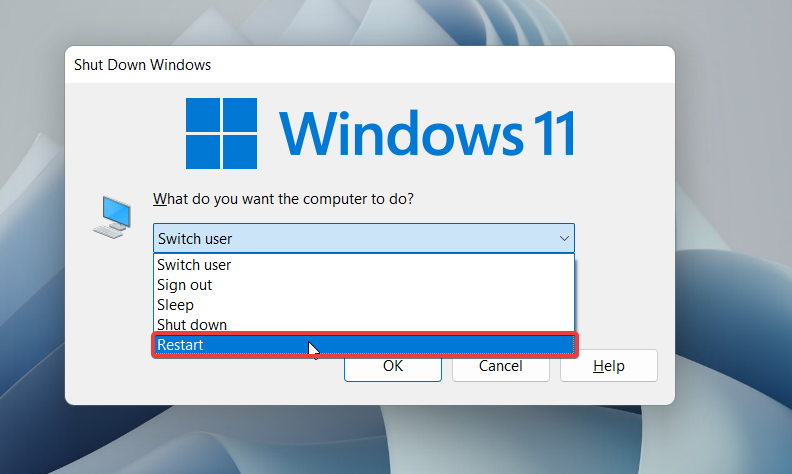
- Use the Alt+F4 shortcut key combination to summon a special Shut Down Windows menu.
- In the drop-down, choose the Restart option and press the OK button.
2. Restart Windows Explorer
Not responding Start Menu indicates some problem with the Taskbar and File Explorer. Sometimes, the File Explorer starts malfunctioning for some unexplained reason causing issues like the one we are facing now. Luckily, restarting the process related to Windows Explorer will help resolve the issues with the Start menu. To restart the Windows Explorer process, follow the step-by-step process described below.
- Use the Ctrl + Alt + Del shortcut key combination and choose Task Manager from the list of options.
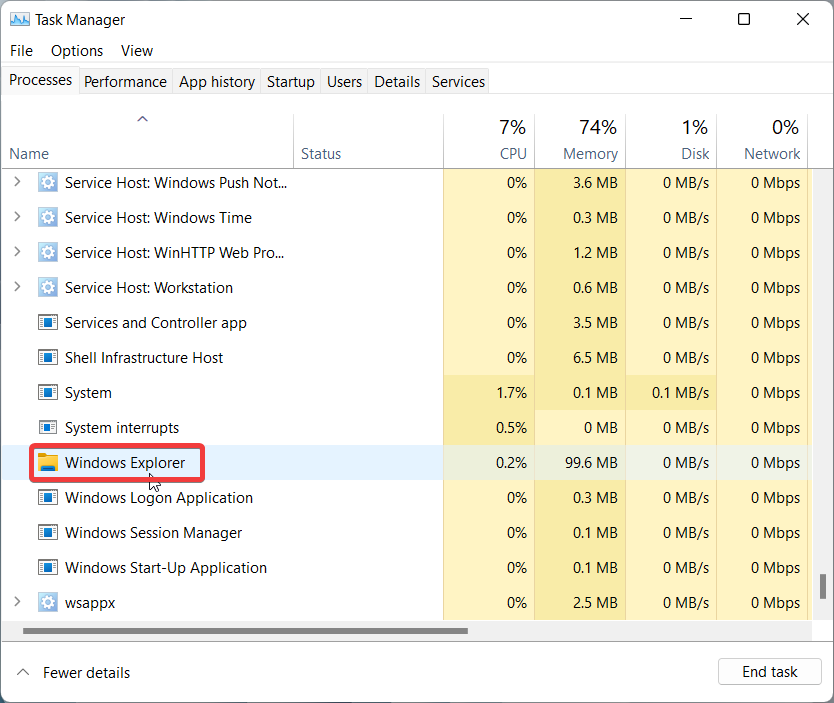
- In the Task Manager window, look for the Windows Explorer process under the Processes tab. You can sort the list by name, and you will find the process under the Windows processes list.
- When you find it, right-click the Windows Explorer process and choose the Restart option from the context menu. The Taskbar and other related Windows components will blink for a second, indicating that the Windows File explorer service has restarted.
3. Restart Windows Background Services
Similar to Windows Explorer, several windows processes are running in the background that directly affects Windows features, including the Start menu, which is malfunctioning at the moment. Along what the Windows background services, we recommend restarting the ShellExperienceHost.exe process to get the Start menu working. You can restart the ShellExperienceHost.exe process using the steps outlined below.
- Right-click the Start menu and choose Task Manger from the quick links menu.
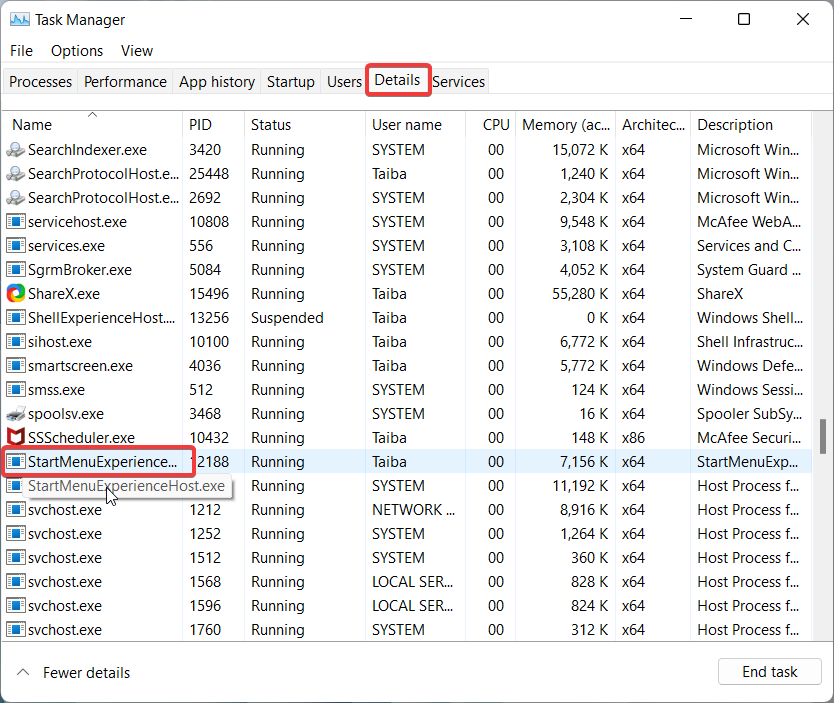
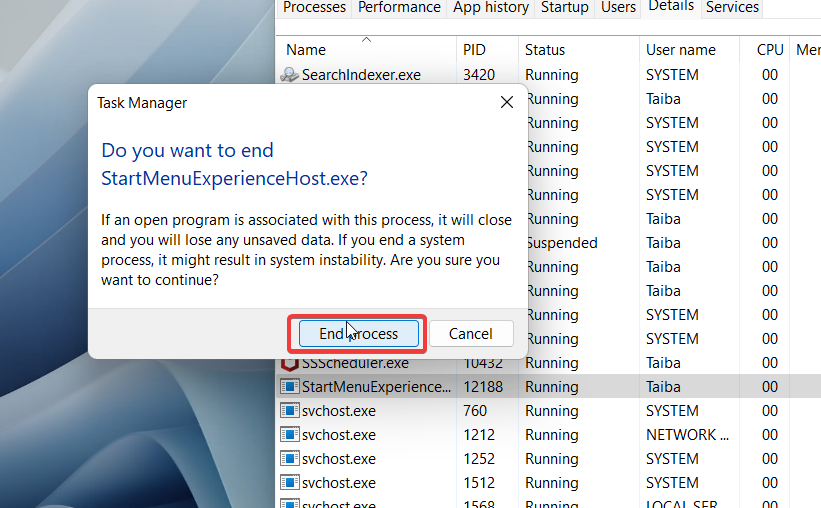
- Go to the Details tab, and hunt the StartMenuExperienceHost.exe service.
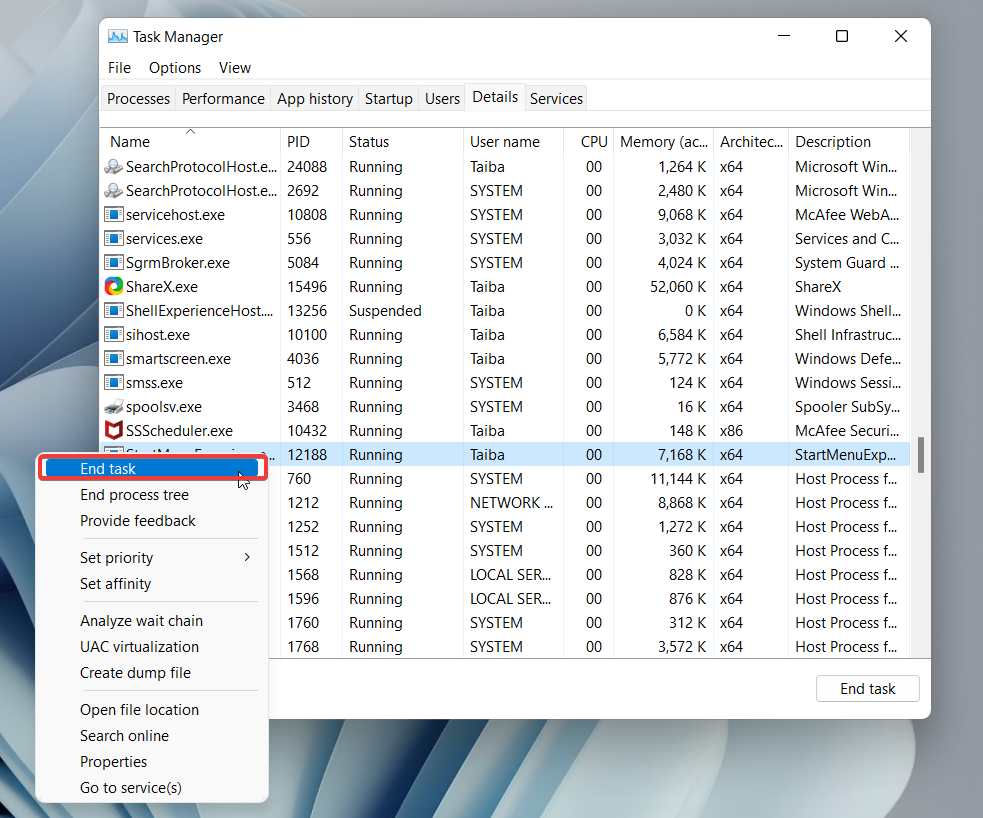
- When you find it, right-click it and choose the End task option.
- When the confirmation pop-up appears, press the End process button to confirm the action. Wait for a few seconds so that the process restarts automatically. Now go and see if the Start menu is working on your Windows PC. Along with the StartMenuExperienceHost.exe, you can also restart the services mentioned below on your Windows 11 PC.
SearchIndexer.exe SearchHost.exe RuntimeBroker.exe
And that’s it! If a background process was stopping you from accessing the Start menu, then the issue should be fixed for you by now.
4. Force Restart IRIS Service
If the Start menu does not function, even after restarting the Windows service, it’s worth restarting the IRIS service on your Windows 11 PC. The process of doing so is straightforward, though completely different from how to restart Windows processes. Save and close all the work going on in the background and follow the steps outlined below.
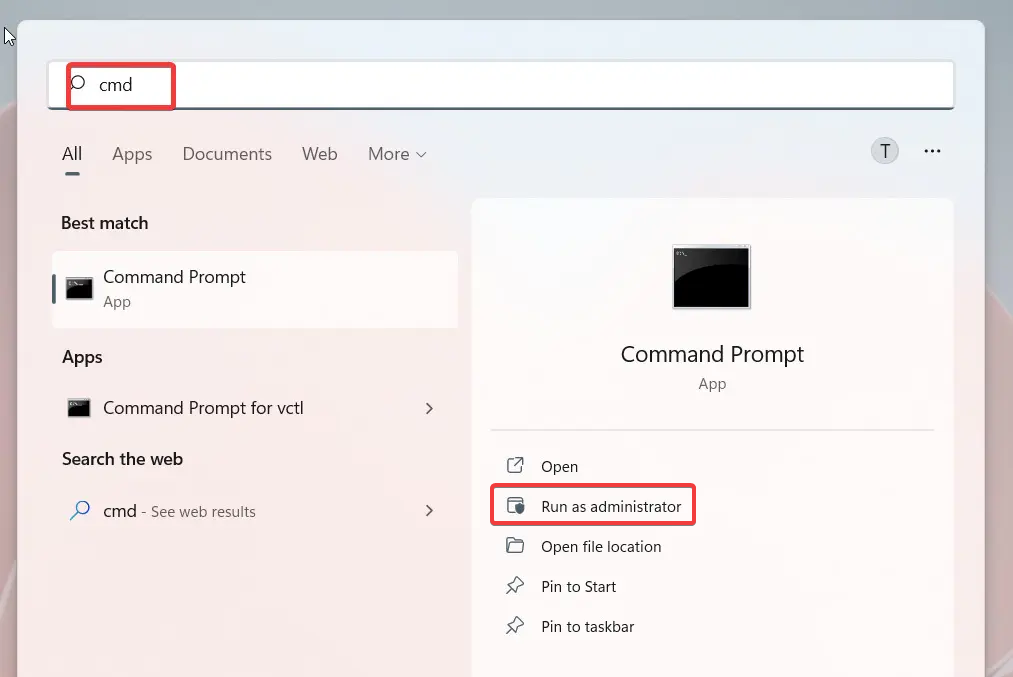
- Use the Windows + S shortcut to bring up the Search menu and type Cmd in the search bar on the top. Select the relevant search result and choose the Run as Administrator option.
- When the Command Prompt opens on the screen, copy-paste or type the following command and press the Enter key. Doing so will restart your PC. When your PC successfully restarts, log into your user account, and we are positive that the Start menu will now work on your Windows 11 PC.
5. Update Windows
If the Start Menu is not operational even now, it will not be wrong to say that a random bug hogging the current Windows 11 version is interfering with the functionality of the Start Menu. Hopefully, Microsoft might have addressed the problem and released the patch for it in the latest update. Hence, it is vital to keep your Windows 11 PC up-to-date for restoring the broken Windows functionality and get rid of the underlying bugs. So, let’s proceed to install the latest available update for Windows 11.
- Use the Windows + I shortcut key combination to bring up the Settings window.
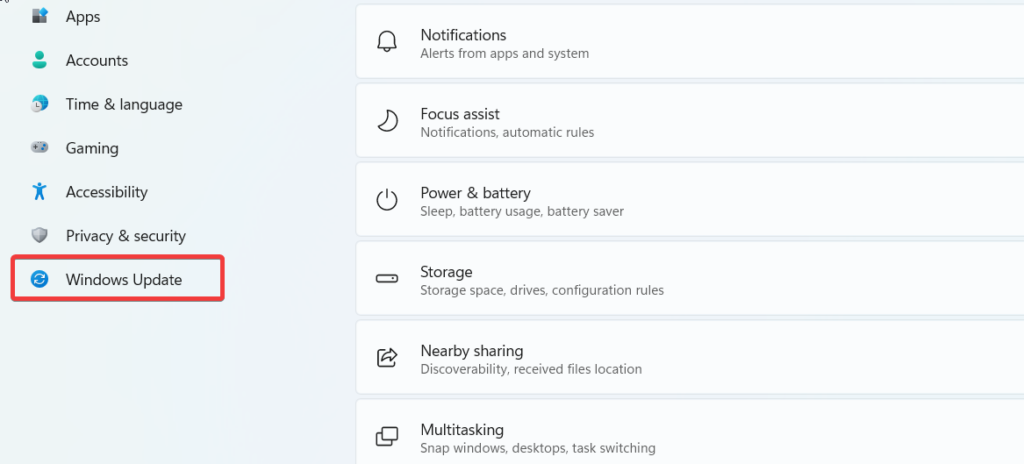
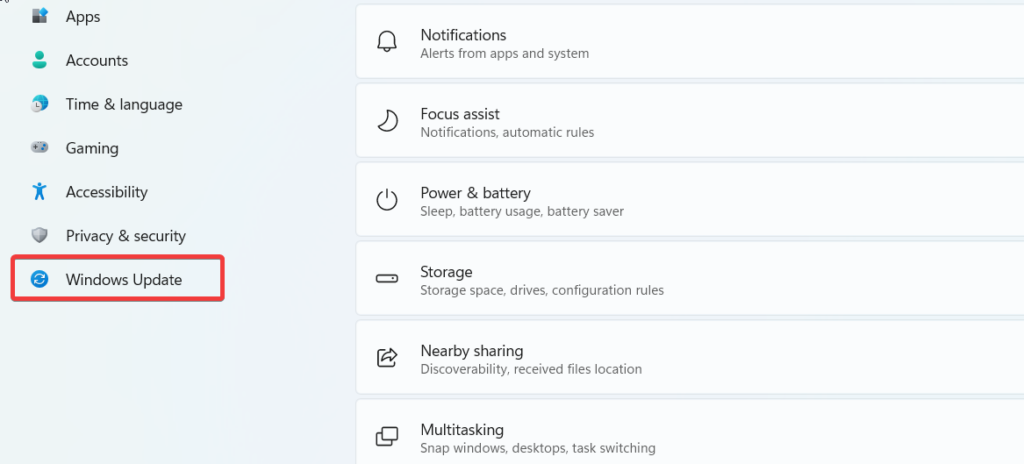
- Choose the Windows Update option from the left pane.
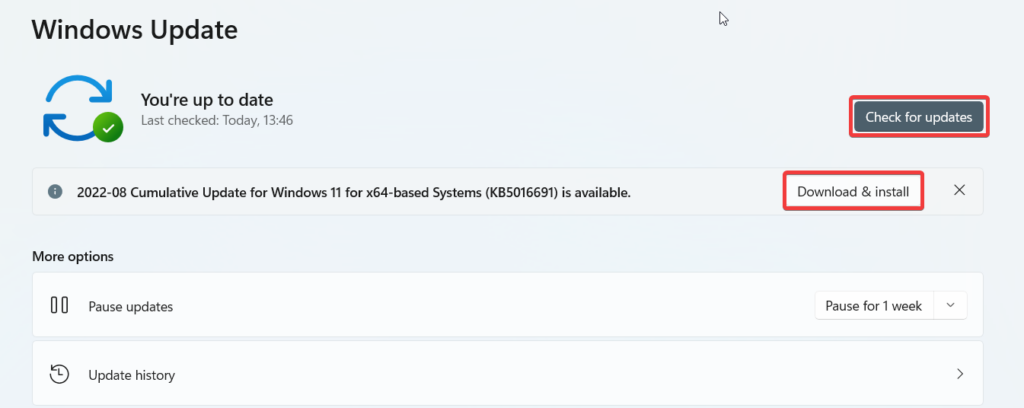
- On the right pane of the new window, press the Check for Updates button and press the Download & install button for the available updates below.
- Finally, reboot your PC to complete the installation process of the Windows updates.
6. Remove Third-party Programs
If you are fond of third-party apps that customize the functionality and look and feel of the Start menu, they might be the reason why your Start Menu is unable to show up on your Windows 11 device. Most of these third-party customization apps were designed for the previous iteration and are incompatible with Windows 11. Hence, you should immediately uninstall any of the below-mentioned third-party programs that are hampering the functionality of the Start Menu.
Open Shell Classic Start WinAero Tasbar TaskbarX
If the Start menu starts to work on your device after you uninstall the customization apps, you should avoid using them until the developer releases a compatible version for Windows 11.
7. Upgrade Graphic Drivers
While it may seem unlikely, corrupt or outdated graphics drivers can break the functionality of the native Windows graphical user interface, including the Start Menu like the one we are facing now. However, the problem can be easily resolved by installing the latest available graphic driver update. The method of doing so is straightforward.
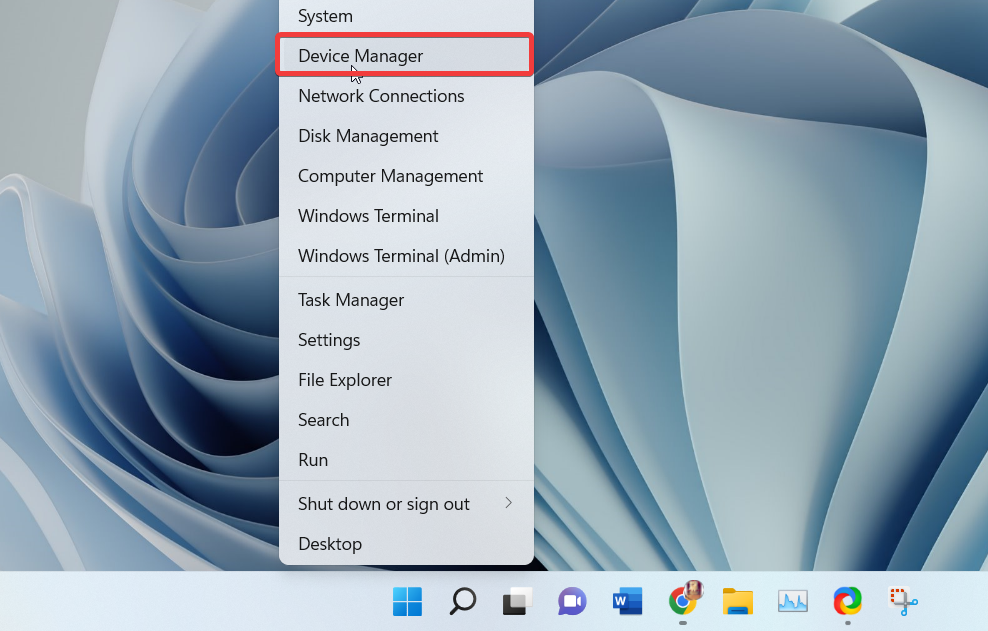
- Use the Windows + X shortcut key combination to bring up the Quick Links menu and choose the Device Manager option.
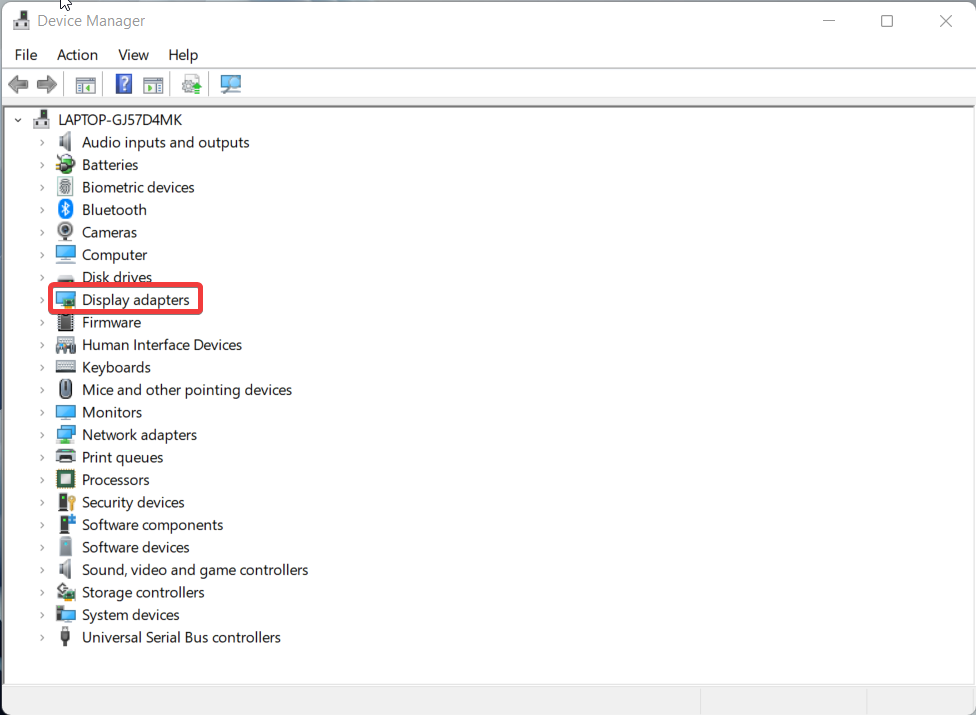
- When in the Device Manager window, look for the Display Adapters category and expand it.
- Look for the Graphics Card Driver and choose the Update Driver option after right-clicking it.
- From the pop-up window that appears on the screen, choose the Search Automatically for Drivers option to let Windows look for the most recent driver update. After the driver gets installed successfully, hopefully, the Start Menu will start to function. If more than one display adapter is installed on your device, you should repeat the same process for each of them.
8. Reinstall the Start Menu Shell Experience Package
All the apps and features of Windows 11 have a dedicated set of packages that streamline the troubleshooting process of issues hogging them. The Shell experience package manages the native apps and graphical interface elements of Windows 11. When Windows 11 UI elements begin to act up, re-registering or re-installing these packages is required. Reinstalling the Start menu Shell Experience package seems more complicated than done. Here is the step-by-step procedure the re-install the Start menu Shell Experience package and getting the start menu up and running.
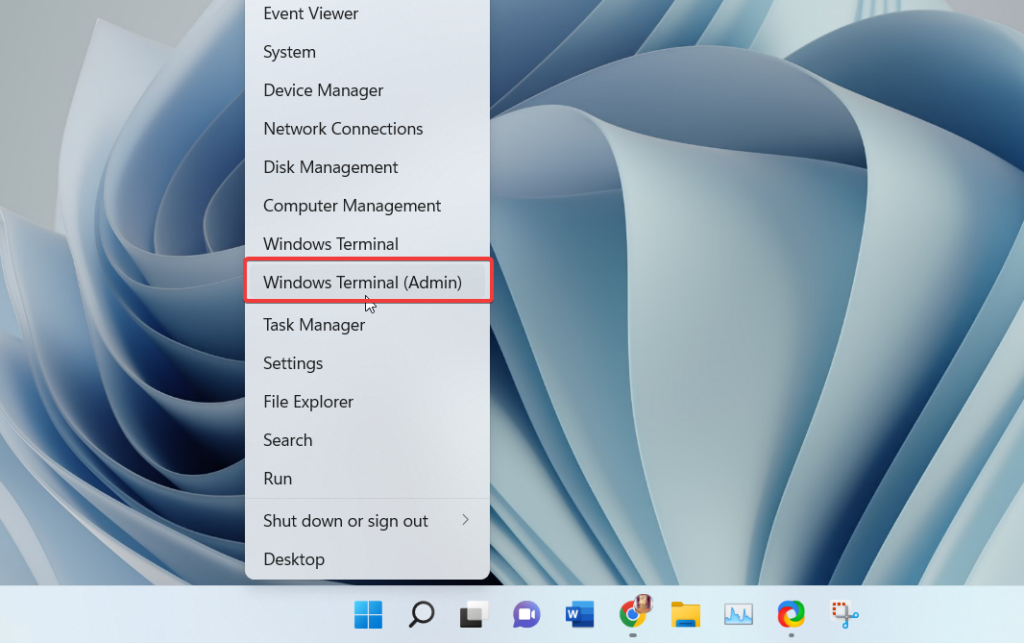
- Right-click the Windows icon on the taskbar and choose Windows Terminal (Admin) option from the Quick Links menu.
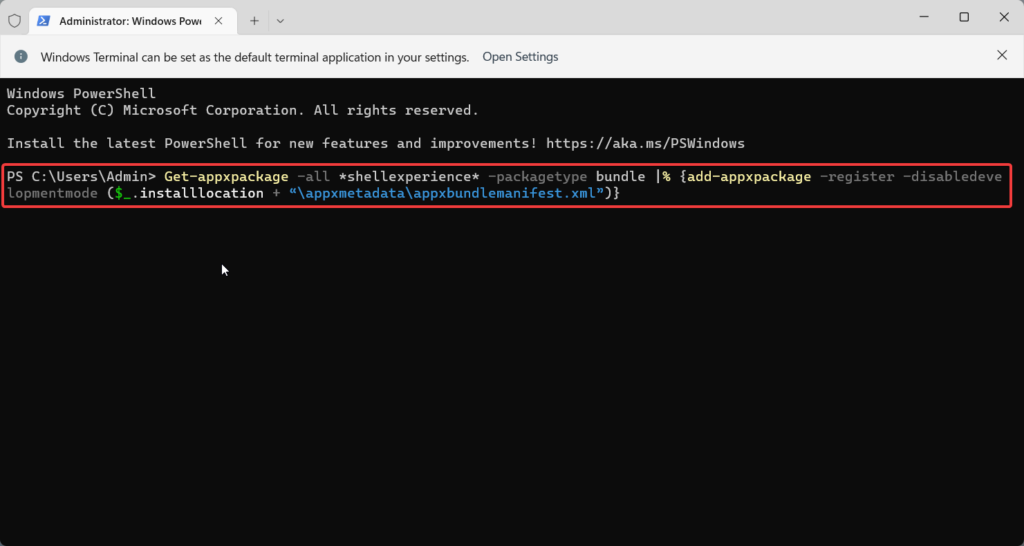
- In the PowerShell window, type or copy-paste the following command and hit the Enter key on your keyboard. Windows will present you with a set of warnings. Ignore them and complete the re-install process. Once the re-install process is complete, reboot your Windows 11 PC.
9. Rebuild the Windows Search index
Flaunting the Search bar on the top, Windows 11 Start menu closely integrates the Windows Search functionality. If you are facing issues with the Start Menu on Windows, there are chances that buggy search and indexing functionality may have caused the trouble. To rule out this possibility of a problem, it’s time to rebuild the search index entirely. Here is how to proceed.
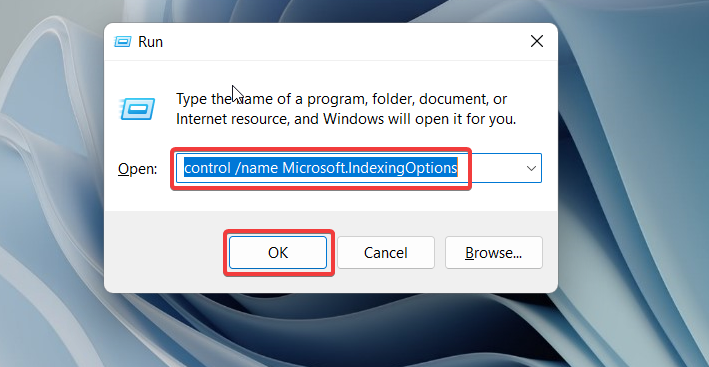
- Use the Windows + R shortcut key to launch the Run dialog box.
- Now type or copy-paste control /name Microsoft.IndexingOptions in the command line and press the OK button.
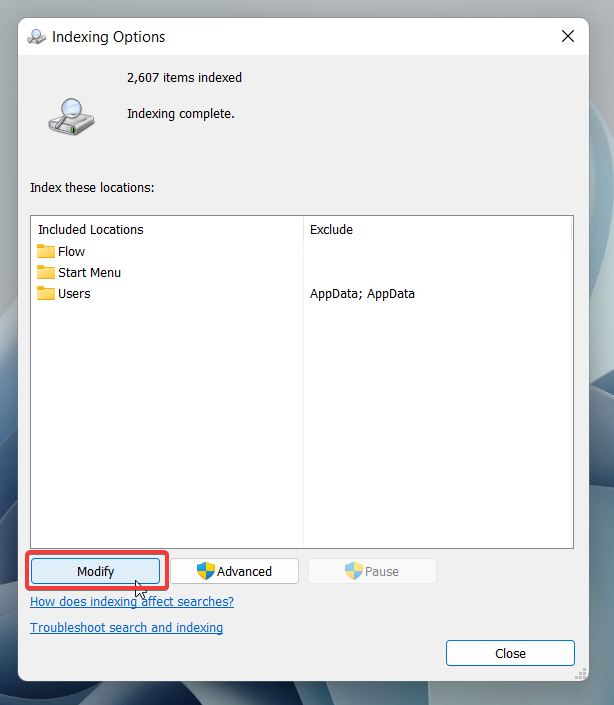
- This will quickly take you to the Indexing Options pop-up. Press the Modify button present here.
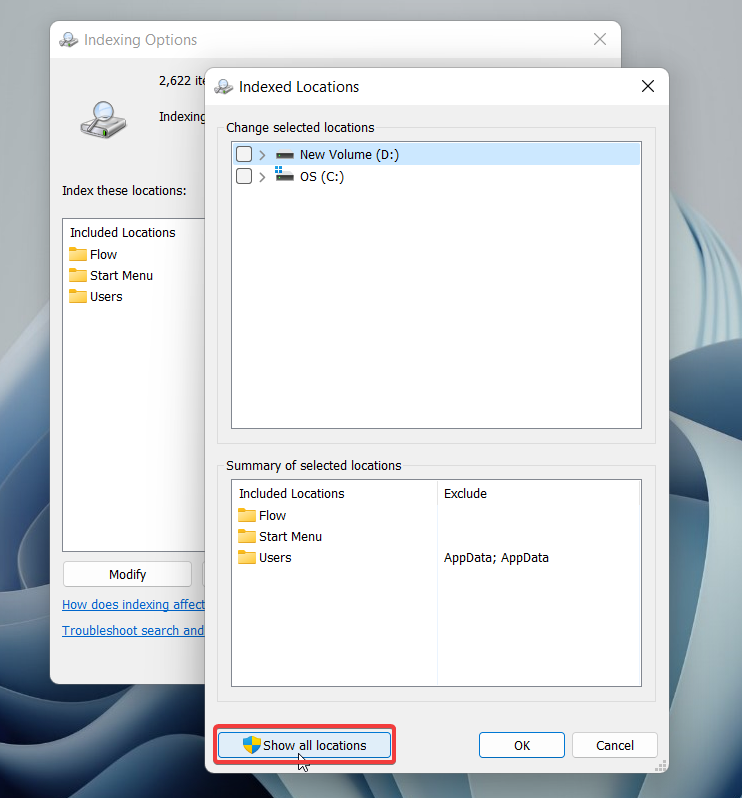
- Press the Show all Locations button.
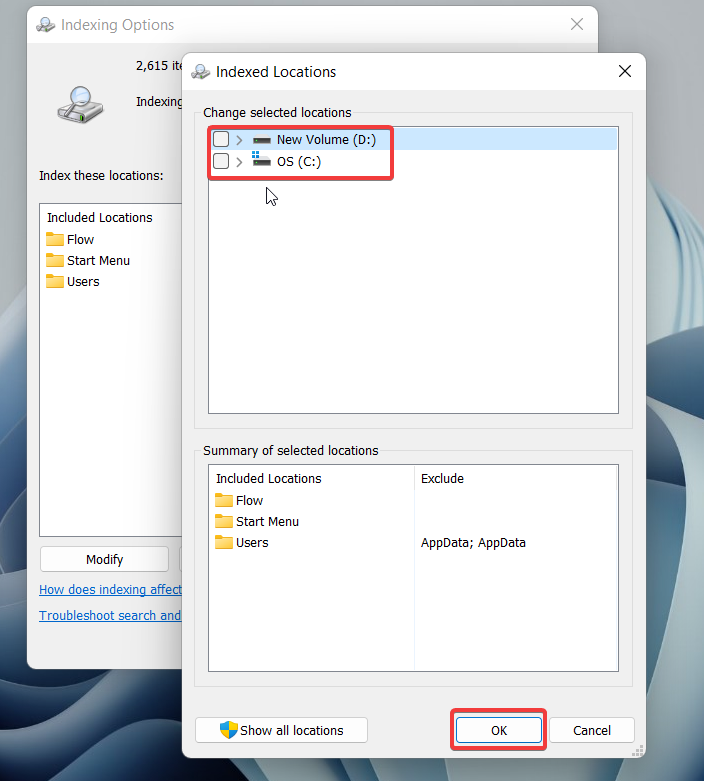
- Next, uncheck all the check boxes that are ticked here and press the OK button.
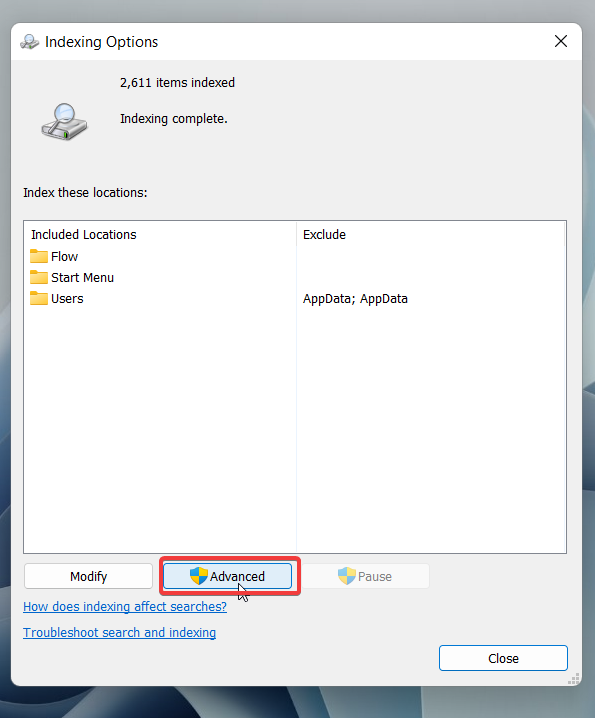
- Now press the Advanced button.
- Finally, press the Rebuild button to initiate the Search Index rebuilding process on Windows 11 PC. The entire process can take some time and is automatically handled by Windows without requiring your intervention. When the Search Index is rebuilt, reboot your Windows 11 PC and try opening the Start menu.
10. Reset Windows 11
If you are here, it means the Start Menu is still not working on Windows 11. At this point, there is nothing much that you can do than reset your Windows 11, which is the sure-shot way of resolving all the unexplained issues on your Windows 11 PC. Thankfully, it is possible to reset your Windows 11 without losing your data. Below are the steps to reset Windows 11 PC easily.
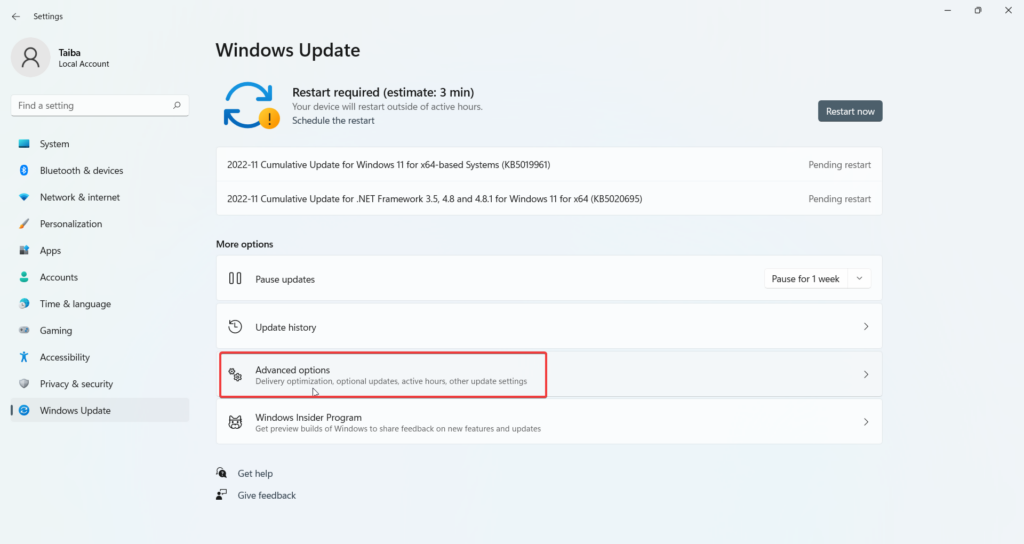
- Use the Windows + I shortcut key combination to launch Windows settings and choose the Windows Update option from the left pane.
- Choose Advanced Options from the right pane.
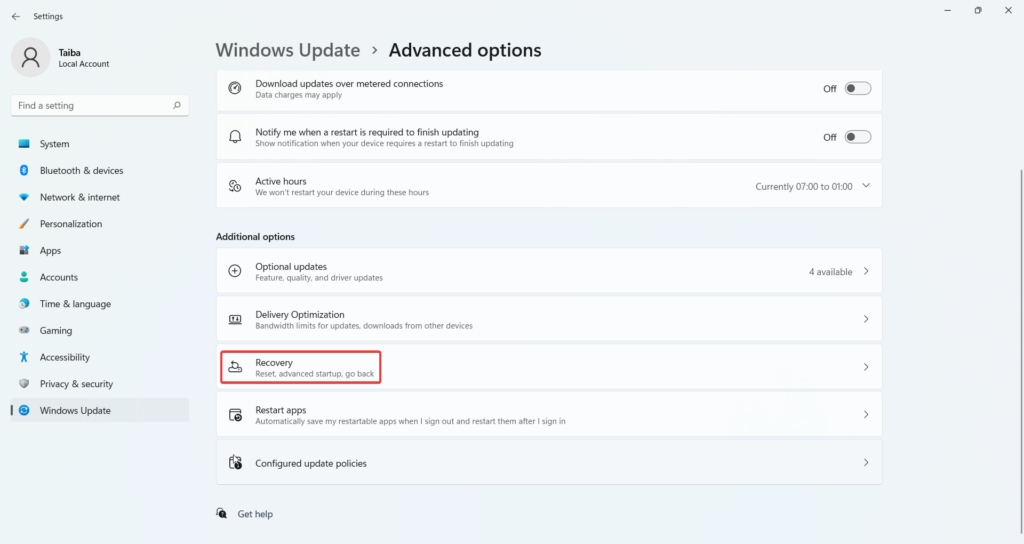
- Click the Recovery option listed under the Additional Settings section.
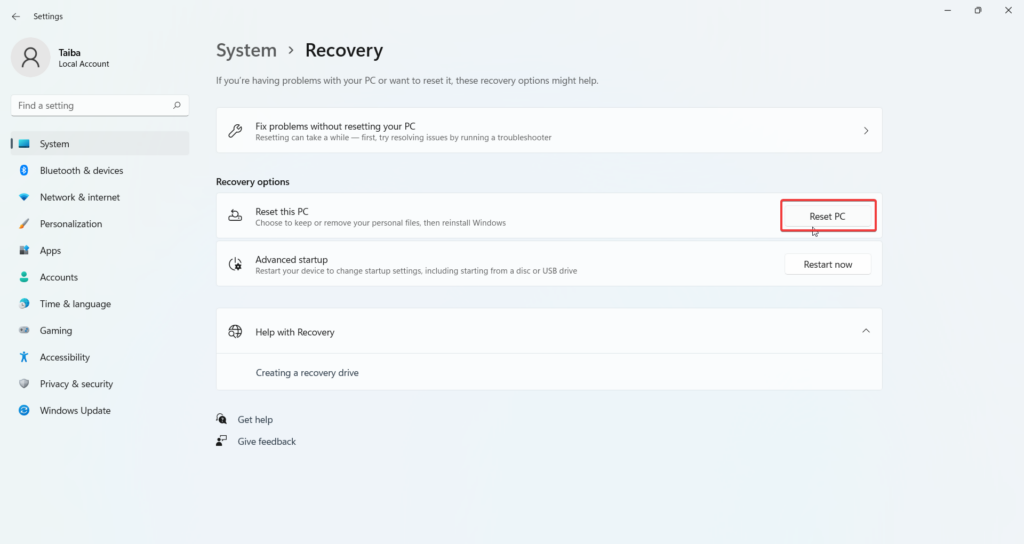
- Finally, press the Reset PC button under the Recovery options.
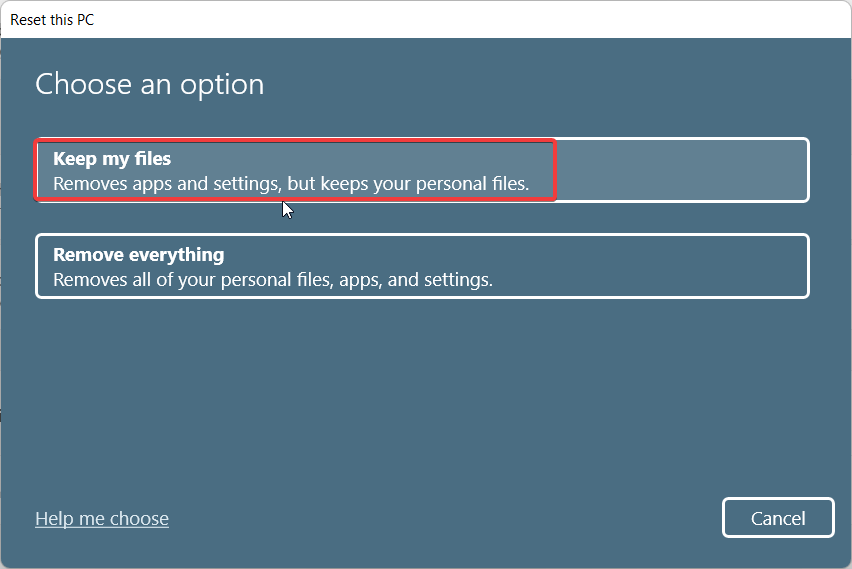
- On the next window that pops up, choose the Keep My Files option and follow the on-screen steps to set up your Windows 11 PC.
Conclusion
This brings us to the end of the article discussing all the hacks that can prove useful for resolving the annoying Start Menu not working issue on Windows 11 PC. Hopefully, the Start menu will function after employing a few of the fixes discussed here. If not, resetting your Windows PC will surely get rid of the problem without affecting your data. If you need any further assistance, feel free to reach out in the comment section.
Δ
