I’m not the only one who welcomed the feature; millions were excited to get their hands on it. Sadly, many Windows users are unable to access the Snap Layouts after upgrading their machine to Windows 11. If you are one of that unfortunate lot, you’ve landed on the right page. Here we have discussed the possible reasons why the Snap Layout feature is restricted for you and what you can do to get it working on your Windows 11 PC.
Why Snap Layout Not Working In Windows 11?
Installing Windows 11 on a PC not meeting the minimum requirements mentioned by Microsoft is the most common reason that users cannot make the productivity feature work. If you are currently using the Insider Preview Build of Windows 11, the probability of it being bug ridden is extremely high and will interfere with the working of Windows 11 features, including Snap Layout. Apart from these, the third-party apps, especially the ones offering the same functionality, may overshadow the working of the native multi-window arrangement feature. It’s worth mentioning that some features on Windows 11 do not operate on devices having a resolution of less than 720p, and what’s more disheartening is that some third-party apps haven’t been optimized to work with this feature yet. Keeping this aside, let’s get the Snap Layout feature working for you by employing some useful hacks.
Fix Snap Layouts Not Working in Windows 11
Below we have put together several troubleshooting methods that can help resolve the underlying problem that is preventing Snap Layouts from working on Windows 11.
1. Use Keyboard Shortcuts
If the layouts options do not appear after hovering the maximize icon of the window. You can use the keyboard shortcuts to access the feature on the compatible Windows 11 PC. The Windows + Z shortcut combination performs the same function that hovering the maximize icon on the title bar does for you. If you wish to arrange the active window on the screen, press the windows and the arrow key corresponding to that direction. The other active programs will automatically appear as suggestions in the available space. If the snap layouts feature does work with the keyboard shortcut, move on to the next fix.
2. Make Sure Snap Layouts Is Enabled
The most likely reason behind the inaccessible snap layouts feature on your PC is that it has been disabled for some reason whatsoever. Don’t worry! It is possible to enable this productive feature manually. Here are the steps to enable the snap layouts to feature from the Settings App in Windows 11:
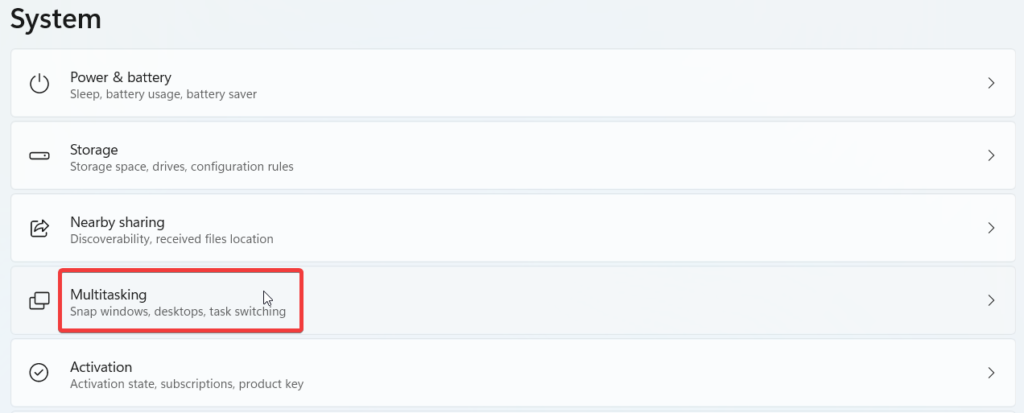
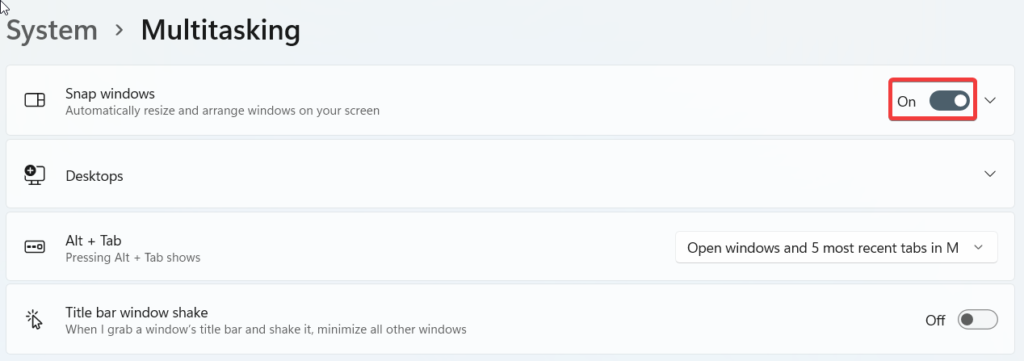
- Access the Settings app on your Windows 11 PC by pressing the Windows and I keys together.
- While staying in the System settings, scroll down and click the Multitasking option.
- On the next page, make sure the toggle next to the Snap Windows option is in the On position.
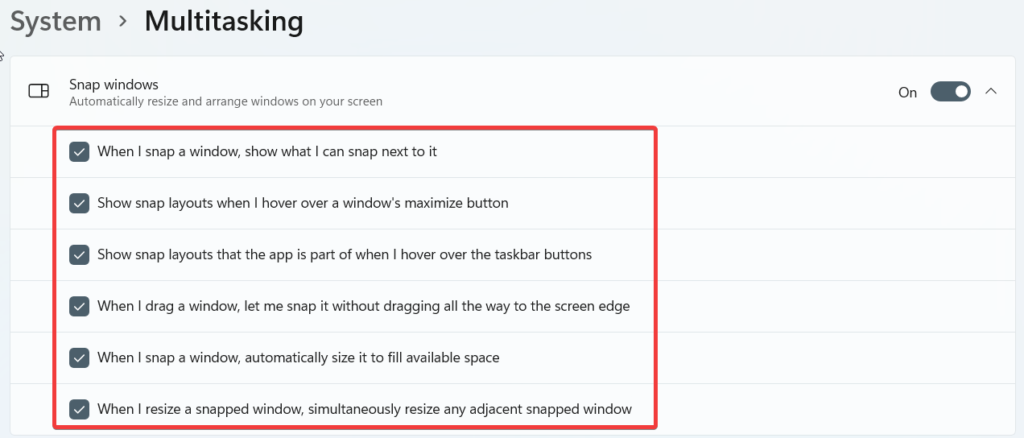
- Click the little downward arrow icon next to the toggle to reveal the additional snap windows settings. Note: We recommend enabling the checkboxes for the first three options; enabling the last two is up to you.
3. Turn on Snap Layouts Using Registry
If the Snap Layout feature is not operational despite the toggle for Snap Windows being in on position, you will have to edit the Windows Registry to make the feature work. The registry Editor method to enable snap layouts is somewhat tricky but do not worry! Our step-by-step guide will help you in the right direction.
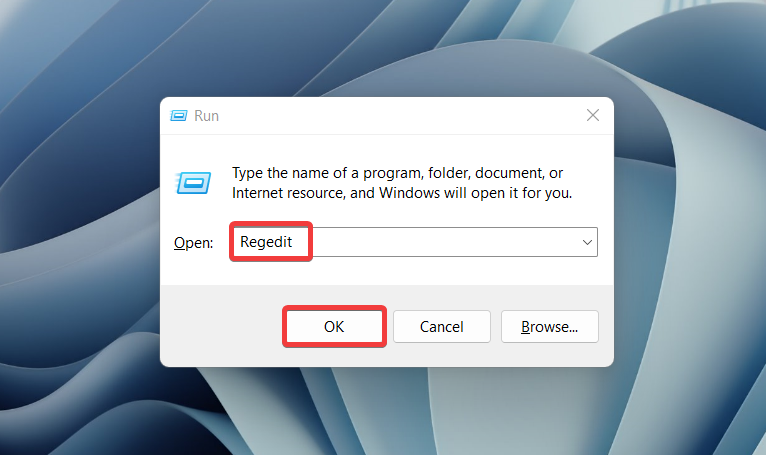
- Launch the Run dialog box using the Windows + R shortcut combination.
- Type regedit in the command line and press the OK button to execute it.
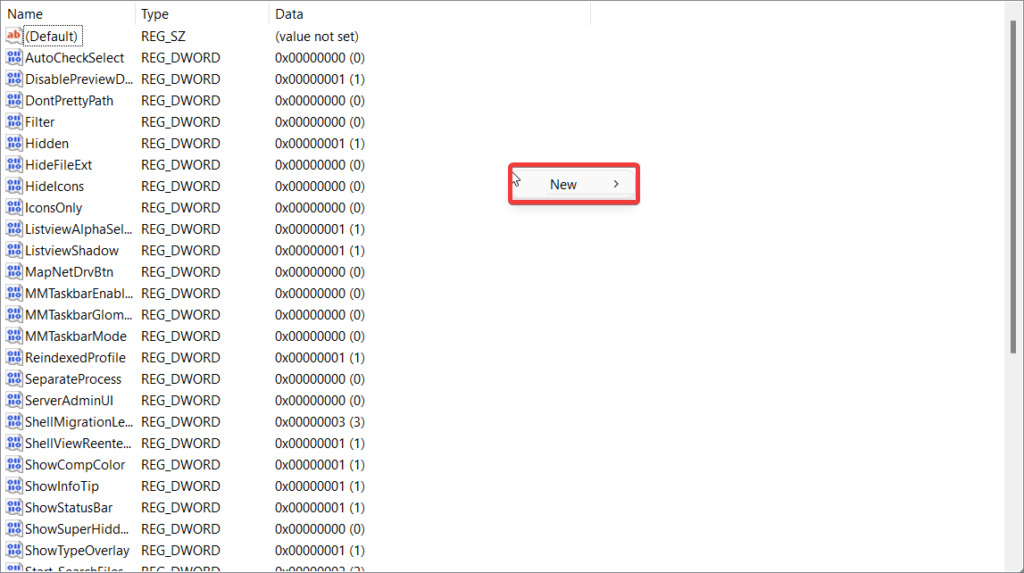
- The registry editor window will open in front of you. Copy-paste the following path in the address bar to navigate to the desired location.
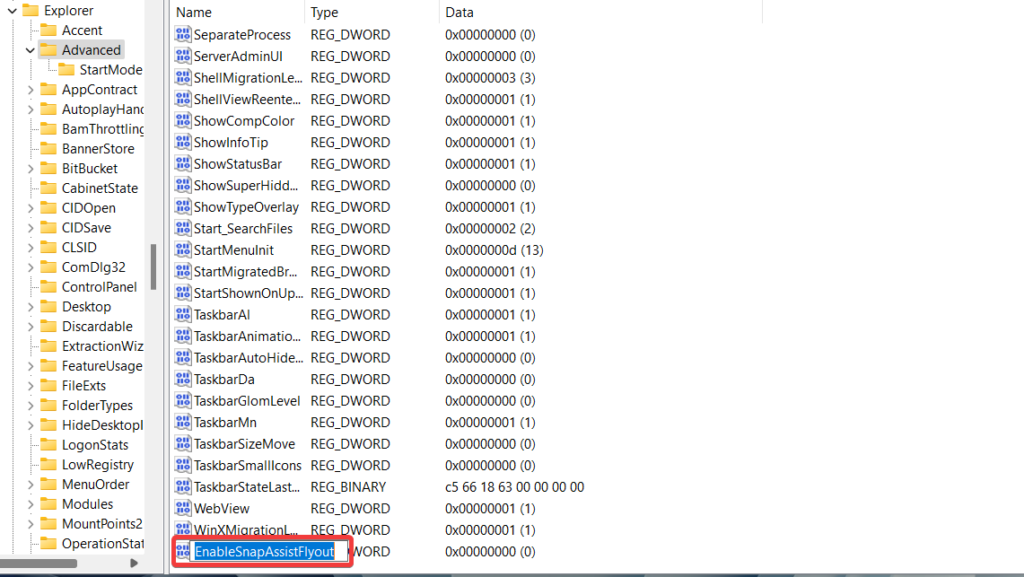
- Look for the EnableSnapAssistFlyout registry in the right pane.
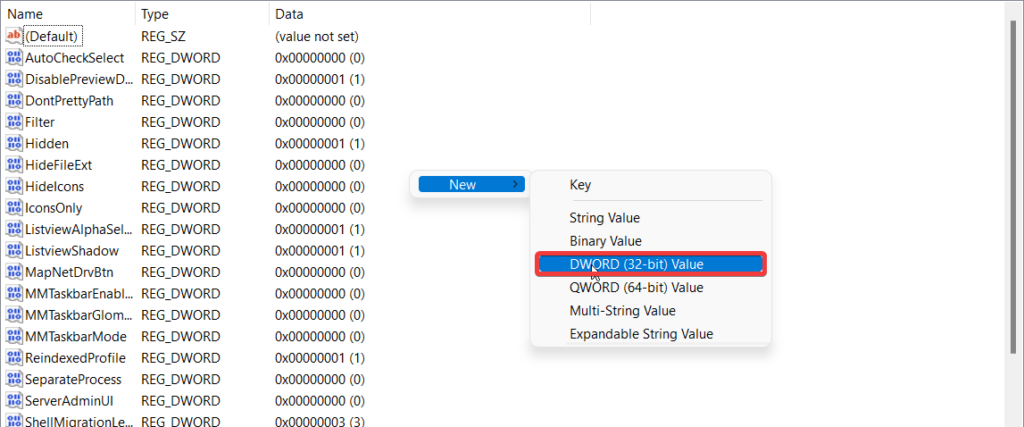
- If you do not find it, don’t fret! you can create it. For this, right-click anywhere on the right side and choose the New option from the context menu.
- Choose DWORD (32-bit) value from the sub-menu that opens up.
- Assign its name as EnableSnapAssistFlyout and hit the Enter key.
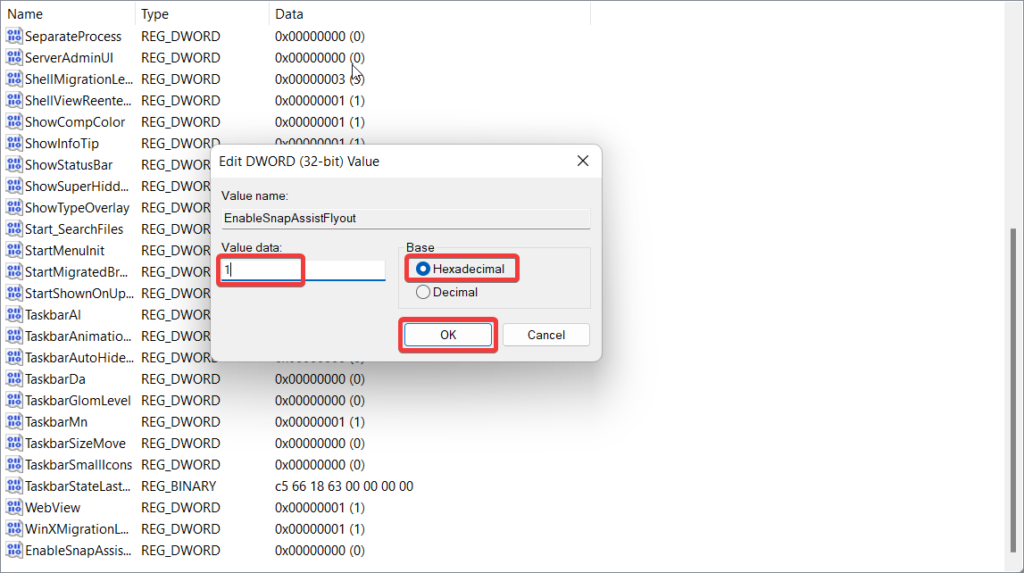
- Double-click the registry you just created and assign 1 in the value data field. Don’t forget to choose Hexadecimal as the base and press the OK button below. Now reboot your PC and try snapping the program window. Hopefully, the Snap Layout feature will now work on your Windows 11 PC.
4. Is Windows 11 Compatible with your PC
Ever since Microsoft unveiled Windows 11, everyone is in a hurry to switch to Windows 11 by hook or by crook. Microsoft has listed the minimum hardware requirements that need to be fulfilled for successfully installing Windows 11 on your PC- Secure Boot and TPM 2.0 are the essential ones. Unfortunately, users have disregarded it since several workarounds are available for installing Windows 11 on incompatible systems. While it is possible to install Windows 11 on a PC not fulfilling the minimum requirements, there is no guarantee that it will work flawlessly. You will be unable to many of its features- in our case, it is Snap Layouts. Below is the checklist for the minimum system requirements of Windows 11, and it is advisable to ensure that your PC is eligible for the Windows 11 update. If your system is incompatible, this might be the reason behind Snap Layouts feature not working for you.
Processor: 1GHz or faster with 2 Core 64-bit processors or SOC.RAM: 4GB or more (6GB or more for Windows 11 Pro and Enterprise editions.)Storage: 64GB or aboveSystem Firmware: UEFI, Secure Boot capableTPM: Required version 2.0Graphics: Compatible with DirectX 12 or later with WDDM 2.0 driver.Display: High definition (720p) display that is at least 9” diagonally, 8 bits per color channel
5. Check If App Supports Snap Layouts
Microsoft has ensured that all the built-in programs and the apps available on Microsoft Store support the snap layout feature, but plenty of third-party apps out there are still incompatible. This means the grid options will not appear when you will hover the Maximize button for that app or use the keyboard shortcuts mentioned above. While Microsoft has not released a list specifying the apps incompatible with Snap Layouts, generally, the apps whose window sizes are managed by a container do not support it. You should try using a snap layout with apps like Google Chrome or Microsoft Edge to get the correct idea of whether the snap layout feature is working on your Windows 11 PC or not. When a program is snapped at a required place, Microsoft does not recommend incompatible apps in the suggestion window. Unfortunately, there is nothing you can do from your end to make this work.
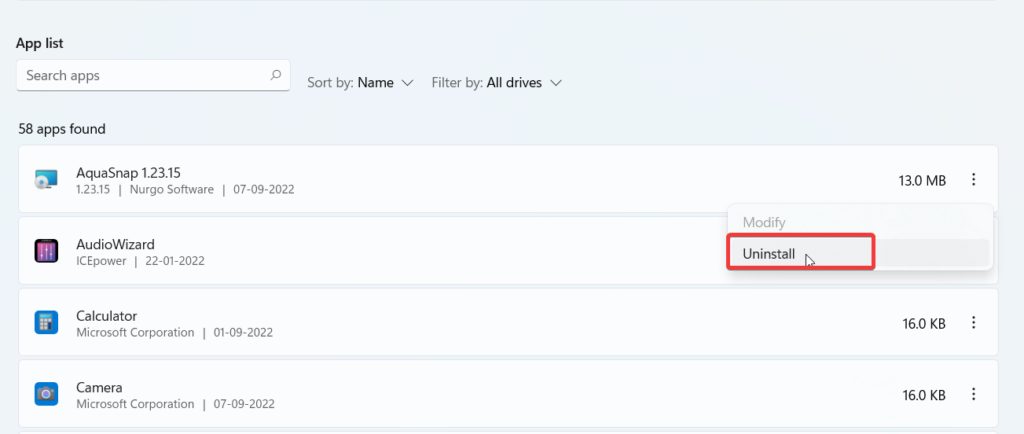
6. Uninstall third-party Apps Offering Similar Functionality
Several third-party apps, such as PowerToys, AquaSnap, and Divvy, to name a few, offer similar screen layout management capability as the snap layout does. If you have one of them installed on your PC, it’s best to uninstall them now as they will interfere with the latest snap layout of Windows 11. Here is the step-by-step procedure to uninstall the conflicting apps from your Windows PC.
- Quickly launch the Settings app using the Windows + I shortcut.
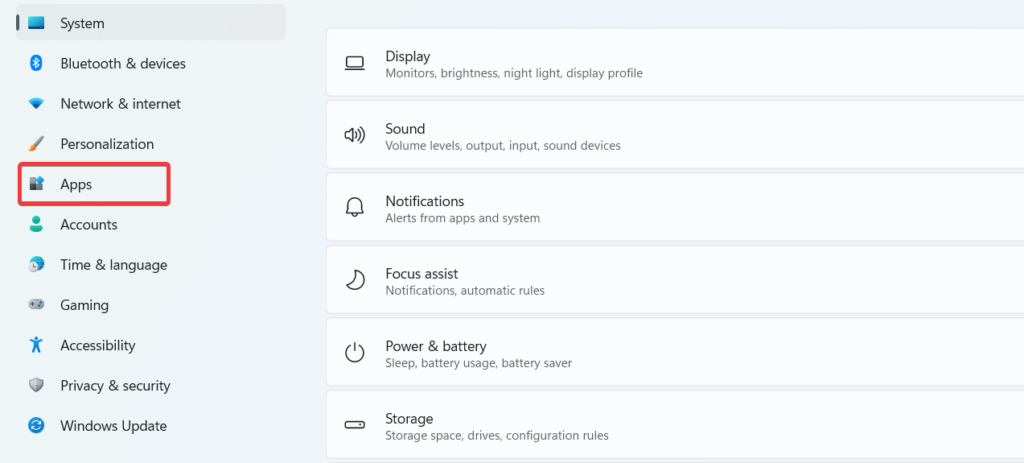
- Click the Apps category located on the left panel.
- Look for the third-party Windows Manager app you wish to uninstall and click the ellipsis icon for it.
- Choose Uninstall option from the fly-out menu and follow the step-by-step procedure to get rid of it successfully.
7. Update Windows
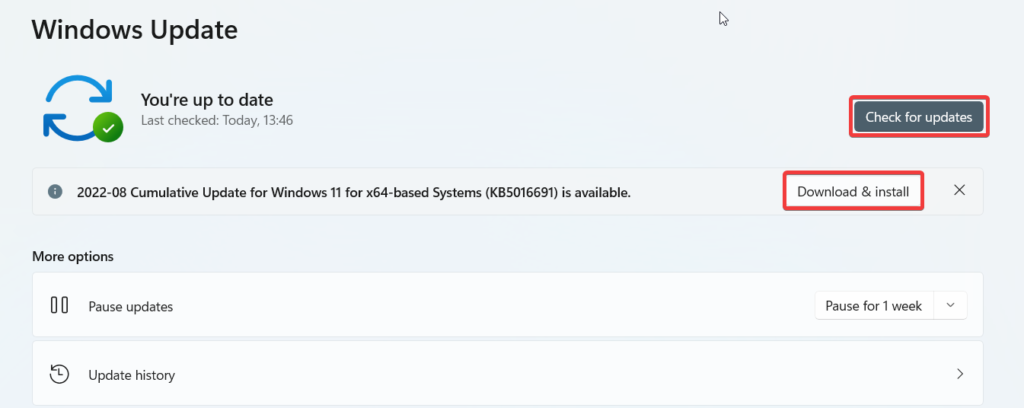
If the Snap Layouts is still not working in Windows 11, there is a good chance that the currently installed version of Windows 11 is bugged. Microsoft might have released a patch to fix the issue with this feature, so updating Windows is the next best thing to try. Upgrading to the latest version available for your system does not require any expertise. However, if you feel lost in the new Windows interface, we will guide you in the right direction.
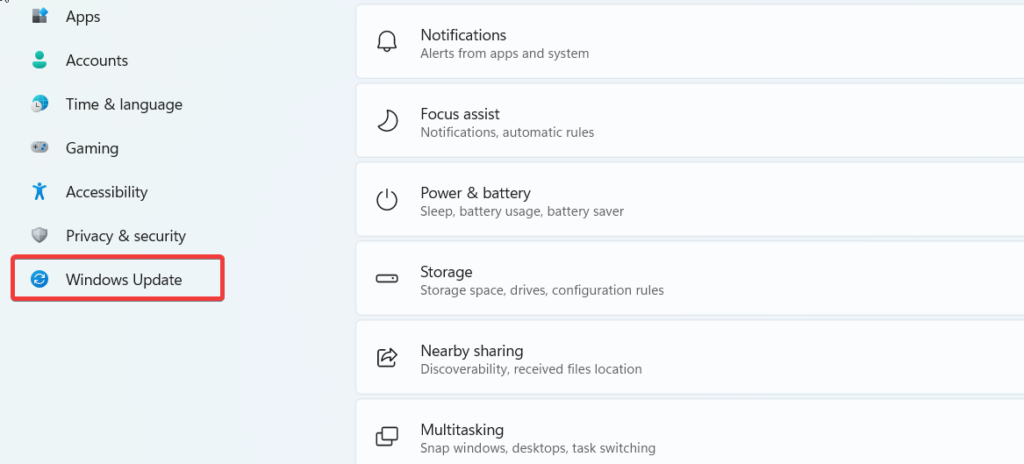
- Bring up the Settings app using the Windows + I key shortcut key combination.
- Click on the Windows Update option on the left pane to access the Windows Update settings.
- To manually check for available updates, press the Check for updates button located in the top right corner. Download and install the available update and reboot your PC. Hopefully, you will now be able to snap multiple app windows on the screen in the desired fashion.
Why is Snap Layouts not working with Mozilla Firefox?
Right Click on the Mozilla toolbar and choose Customize Toolbar option. Under the customization section, enable the checkbox for the Title bar and restart the browser.
Snap Layouts feature is not working on Touchscreen devices?
The Snap Layout feature is not compatible with the touchscreen size smaller than 9 inches. Additionally, if you see only two layout variants, it is due to the small screen size.
How to use the Snap Layouts feature on Windows 10?
You can download and install the PowerToys app, which includes FancyZones, a powerful utility feature offering advanced layouts that efficiently arrange and resize windows in different ways improving your workflow.
Get Snap Layouts To Work on Windows 11
The Snap Layouts feature positively impacts the workflow, and its addition in the latest iteration of Windows is definitely welcoming. So, being unable to use Snap Layouts after upgrading to Windows 11 is no less a heartbreak. Thankfully, the tried and tested methods mentioned above will get snap layouts working for you in no time.
Δ

![]()