Suppose you’re having a good time while listening to your favorite track on AirPods you possess but the audio doesn’t seem fine. One side of the AirPod has a significantly louder audio level than the other which results in an unpleasant sound experience. If you’re someone who’s also facing this one AirPods is louder than the other problem, then we’ve jotted down various methods to get rid of this issue with your pair of Airpods which will gonna work like a charm for all the Airpods Generations owners which also includes Apple Airpods Pro.
Fix One AirPods is Louder Than The Other
Airpods are Truly Wireless Stereo (TWS) earphones that synchronize left and right audio channels to provide a well-balanced audio output on both ends. In such scenarios, when one AirPod reluctantly sounds louder than the other then it spoils the overall holistic experience of enjoying the music. This issue can occur due to various problems which include software-related problems which result in an imbalanced audio experience, a buggy connection between the Airpods and your iPhone or it can be physical damage due to your Airpods not being clean. To solve this problem, we’ve listed 8 methods to resolve this issue for Airpods users.
1. Clean the AirPods Thoroughly
It’s quite obvious that the AirPods don’t provide any kind of dust and dirt resistance and since AirPods are mainly worn to the ears, it makes them prone to catch dirt particles and ear wax with ease. With that, the very first piece of advice will be to provide a proper and effective cleaning process for your lovely AirPods. Following this fix ended up helping a lot of AirPods users who’ve been encountering this issue where one AirPod is louder than the other one. I know removing the dirt from the speakers of the AirPods sounds astonishingly kiddish and isn’t a technical way to fix this. But, this method has worked like a charm for most of the users who’ve been facing this. It’s recommended to use a lint-free cloth to clean the surface of the AirPods. Do keep in mind that giving a proper cleaning to the AirPods is a healthy practice to keep the life of your product longer and should be followed by everyone who owns an AirPods. If you feel that you’re not skillful enough, you can handover it over to anyone to clean those AirPods for you. If you’re not aware of how to clean your AirPods, then consider watching this AirPods Cleaning tutorial which is listed below for a more elaborated overview:-
2. Use AirPods with a different Apple Device
If the cleaning process didn’t make any considerable improvement to the sound quality of your AirPods, it’s the moment to pair and use your AirPods with another device like a different iPhone, iPad, Max, etc. After finding another device with whom you’ve chosen to pair your AirPods, try to play some music to check if the same issue persists with the newer device or not. This will offer a propositional idea about the problem whether it’s a device-based or an AirPods problem. If AirPods are sounding perfectly fine then there are some issues with your earlier Apple device. However, if this problem still exists then there are some problems with your AirPods only.
3. Fix the Audio Balance
Sometimes, this issue can occur due to audio balance adjustment not properly aligned from your device end. If you’re the owner of AirPods Gen 1 and Gen 2, the procedure will be slightly different for you and the same will be followed for the AirPods 3rd Gen and AirPods Pro. Both the procedures are mentioned below:- For AirPods Gen 1 and Gen 2 Step 1: Launch ‘Settings’ on your iPhone or iPad. Step 2: After successfully heading towards the Settings, visit the General – Accessibility – Hearing. Step 3: Open the Balance section and after launching it, you’ll be able to adjust the audio balance between your AirPods 1st Gen and 2nd Gen. Step 4: Now adjust both left and right channel sliders to the center which will distribute the audio equally in both the earbuds in the AirPods. After doing this, it’ll fix the one AirPods is louder than the other problem for Apple AirPods 1st Gen and 2nd Gen users. If you owe AirPods 3rd Gen or AirPods Pro, then following the method listed below will help for better clarity:- For AirPods Pro and AirPods 3rd Gen Step 1: Launch Settings. Step 2: Navigate towards Accessibility – Audio/Visual – Headphone Accommodations – Transparency Mode. Step 3: Turn on the Custom Transparency Mode. After completing it, you’ll be able to adjust the left and right channel slider to fix the audio problem you’re experiencing with your AirPods.
4. Reconnecting AirPods
Sometimes if you’re experiencing a softer sound experience on one of your AirPod then the reason could be a bug or a connection glitch which can easily be fixed by disconnecting and reconnecting the AirPods. After disconnecting the AirPods, it will reset the connection that’s been established with the device, and afterward, try connecting your AirPods again with your device with a fresh Bluetooth pairing process. Step 1: Insert the AirPods back into the case and close the lid off. Step 2: In your device, navigate to Settings – Bluetooth and turn off the toggle. Step 3: After 5-10 seconds, switch on the Bluetooth. Step 4: Open the lid of the AirPods case and bring it closer to your device to reconnect it with the device and follow the on-screen commands to successfully connect them again with your device. After completing the following method mentioned above, it’s time to listen to some music if the issue remains the same for you or not.
5. Pair the AirPods again
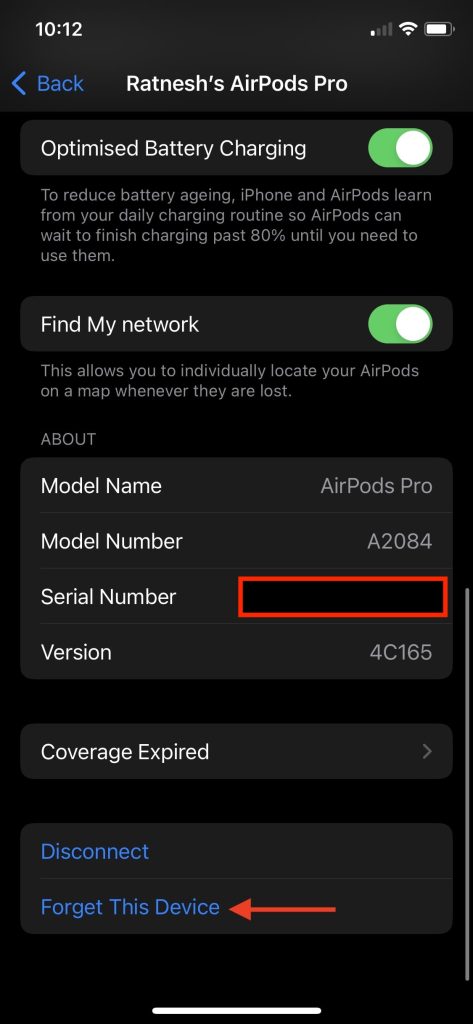
If disconnecting and reconnecting the AirPods didn’t work in your scenario, then you can try resetting the AirPods once and pair them with fresh settings with your device. This method will completely forget about the existing connection between your device and the AirPods. Afterward, pair the AirPods again with your device to establish a newer connection as a new AirPods. Step 1: Put back the AirPods inside the case and close the lid. Doing this will disconnect the AirPods from your existing device. Step 2: On your iPhone/iPad, navigate towards Settings – Bluetooth – and hit on the ‘i’ button which is located next to your paired AirPods option. Step 3: Select the ‘Forget This Device’ option and confirm the following selection to remove it from your paired device list. Step 4: Lift the AirPods lid up and now press and hold on to the back button for at least 15 seconds. After successfully doing so, the AirPod notification light will flash white and amber lighting which flashes that the AirPods are successfully reset. Step 5: Bring the AirPods close to your device and hit Connect from the popup which flashes on your device to re-connect them.
6. Reset AirPods volume balance with the help of the case.
Are you aware that the charging case of the AirPods can also be used to reset the volume balance rather than just establishing a connection with your iPhone or iPad? With this simple tutorial, you’ll be able to reset the volume balance with the charging case itself. The following method is mentioned below:- Step 1: Connect the AirPods with your iPhone/iPad. Step 2: Pull out that one AirPod on which you’re witnessing the louder sound issues. Step 3: Use that earpiece for a while and put it back inside your AirPods charging case. Step 4: With that, it’ll successfully reset the volume balance on both the AirPods as soon as closing the lid. In the process which is mentioned above, there’s no need to fiddle around with the AirPods on which you’re experiencing softer sound issues. As soon as you are done with the following steps; connect the Airpods again with your device to check if they’re behaving normally with your device or not.
7. Update and Restart the device
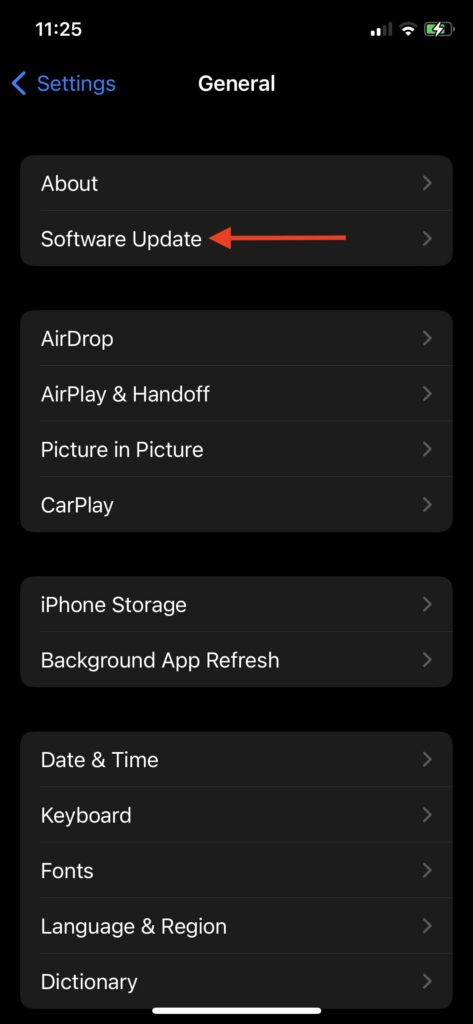
The other reason why you’re encountering such an issue might be the incompatibility issues between the software of the device and the AirPods firmware. It is highly recommended to check if any updates are on the pending list. For checking if you’re on the latest software, visit Settings – General – Software updates. If any prior updates are pending, download them straight away and restart your device. If there’s no update available, restart your device once and pair your AirPods again to check if the issue remains the same or is fixed.
8. Contact Apple for repair or replacement
If any of the methods mentioned above didn’t work for you; the last hope is to contact Apple Support or visit your nearest Apple Store for the resolution of this problem. If your AirPods are under warranty, they’ll be repaired free of cost otherwise you’ll be charged for the repair if your AirPods are not in the warranty period now. Luckily, if you’ve taken the Applecare+ program, your faulty AirPods will be swapped with fresh Airpods.
Final Words
That being said, these are 8 methods curated for you to fix if one AirPod is louder than another one. Such issues usually occur and are very common when AirPods accumulate dust particles and ear wax which blocks the sound which can easily be resolved by properly cleaning the AirPods. The other reason could be the improper adjustment of the audio balance which shifts the audio channel towards one side. Some incompatibility issues and glitches with the software which develops this one AirPod sounds louder than the other problem. Based on all of these problems, we’ve mentioned a lot of fixes that can help you to rescue your beloved AirPods.
Δ