Most of these issues are raised when the app is not permitted to run in the background or when the data becomes corrupt. If you are facing difficulties in managing your important calls and phone notifications via your Windows PC, do not worry. In this troubleshooting guide, we have put down all the potential fixes that can help resolve the underlying issues in the Phone Link app on Windows 11. Having said that, let’s jump straight into the fixes.
Fix Phone Link Not Working in Windows 11
Below we have curated all the possible fixes capable of troubleshooting the Phone Link app not working in Windows 11 that you are facing at the moment.
1. Allow App To Run In The Background
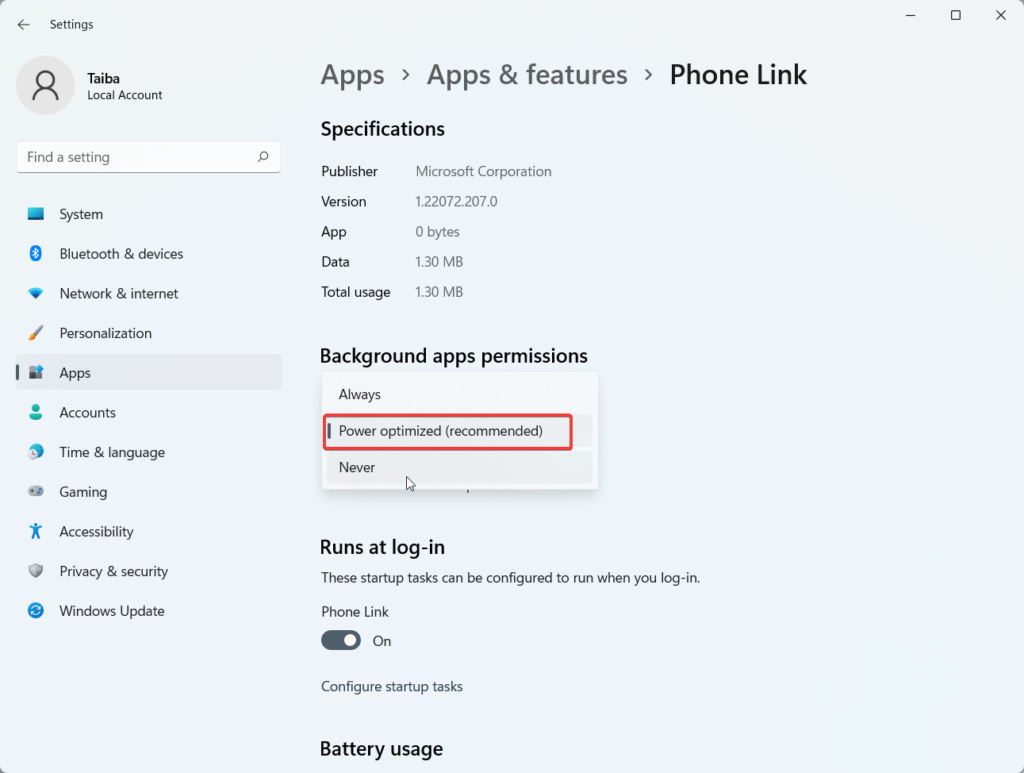
To begin with, you need to check whether the Phone link app is permitted to run in the background or not. When the app is restricted from running in the background, most of its functionalities are compromised. Allowing the Phone Link app to continuously run in the background is essential so that it can sync with the phone and deliver the notifications on your Windows PC. So, let’s enable the Phone Link app to run in the background by following the instructions given below.
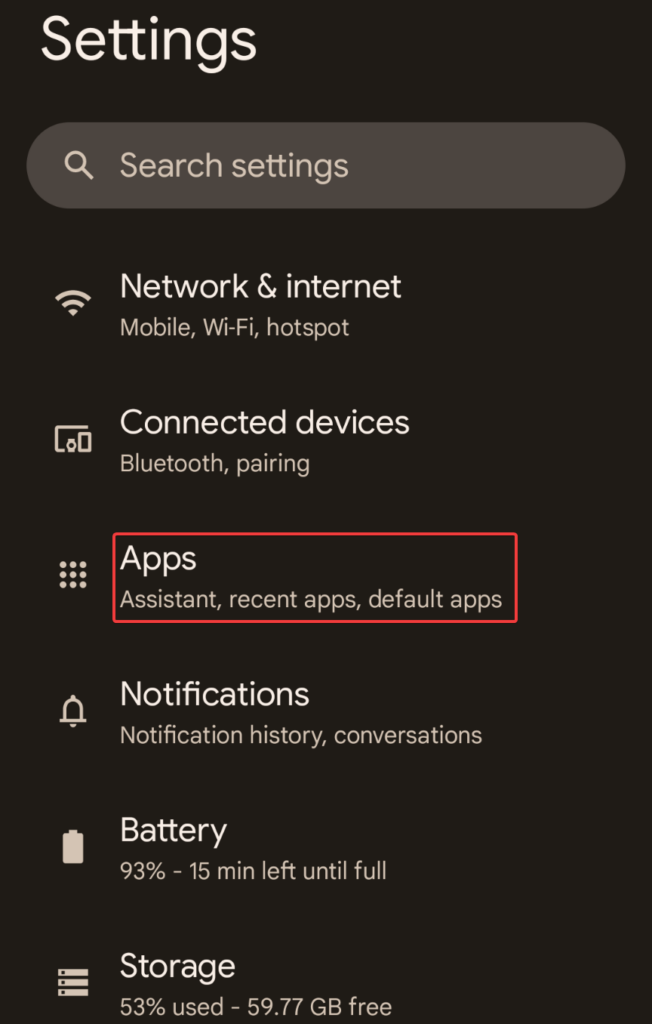
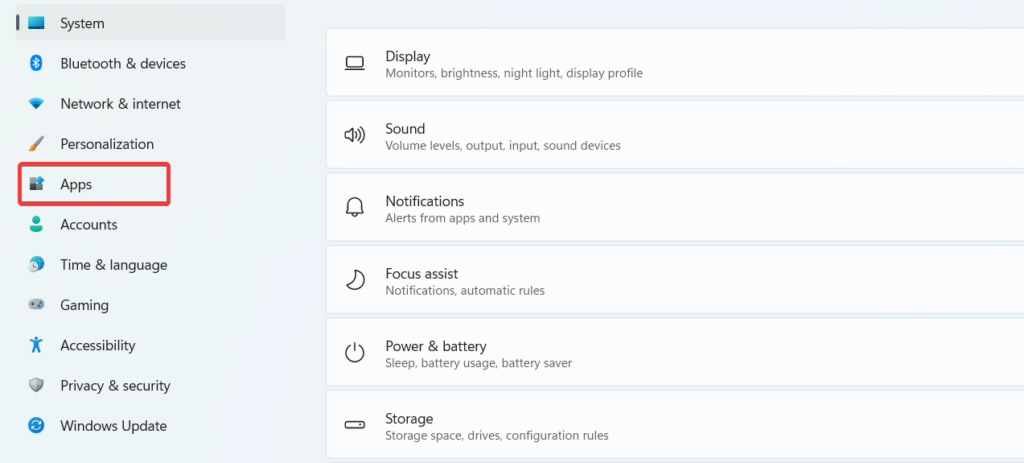
- Click on the Settings icon pinned on the start menu and choose Apps from the left pane of the window.
- Now select the Apps & features option from the right side of the Settings window.
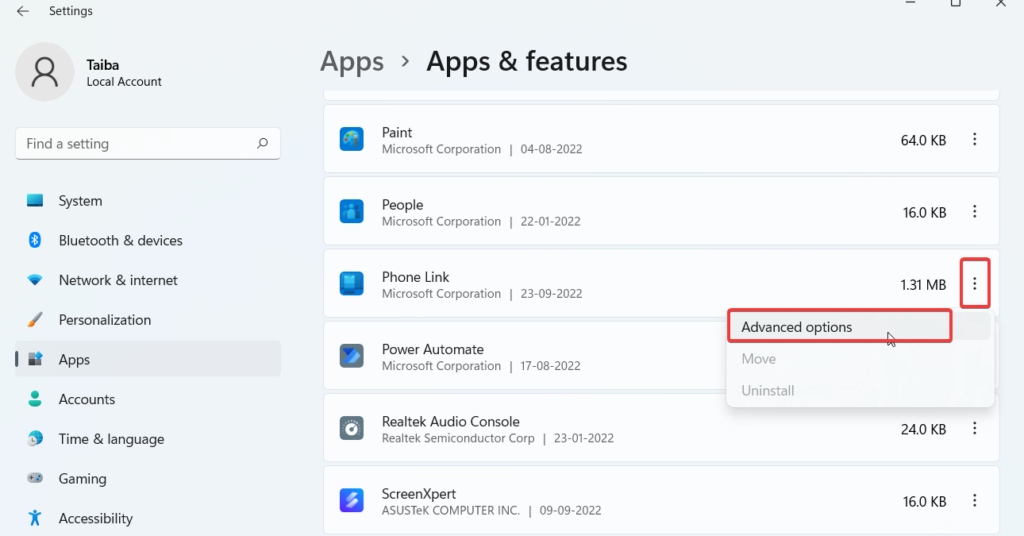
- The list of all the installed apps will appear on the screen. Locate the Microsoft Link Phone app in the list, or use the search box on top to find the app directly. Once you find the app, click the ellipsis icon.
- Choose the Advanced options from the sub-menu.
- Now scroll down until you reach the location of the Background apps permissions section. Then click the dropdown menu for let this app run in Background, and here, set Always instead of Power Optimized (Recommended) or Never. Now close the Settings window and re-launch the phone app. Most probably, it will work flawlessly now.
2. Unlink And Link Your Devices
The problem in syncing the notifications and calls can also arise if the device was not properly linked to the desktop app successfully. To rule out this cause, we will unlink the Phone app installed on your PC and smartphone and will link them again. Below is the step-by-step process to do the intended.
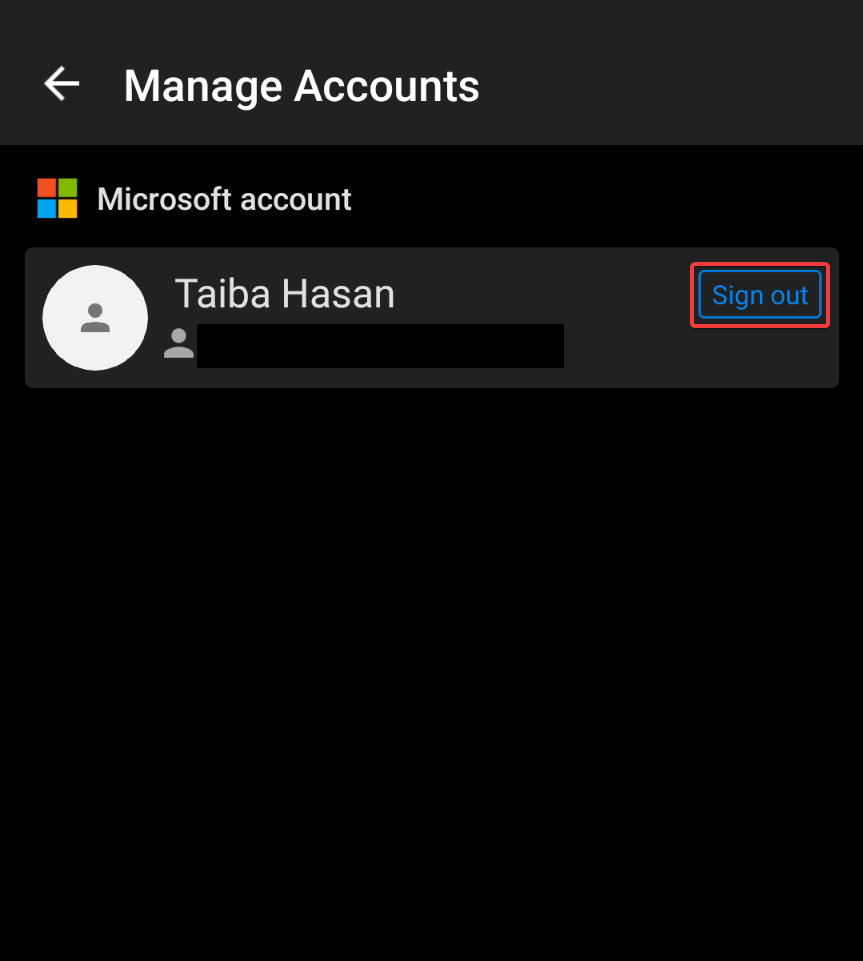
- Launch the Link To Windows app on your Android smartphone and tap the Gear icon in the upper right-hand corner of the app.
- Choose the Accounts option.
- Under the Microsoft Account section, look for the email address you are currently connected to and press the Sign Out button next to it.
- After this, open the Phone link app installed on your Windows 11 PC to complete the unlinking process.
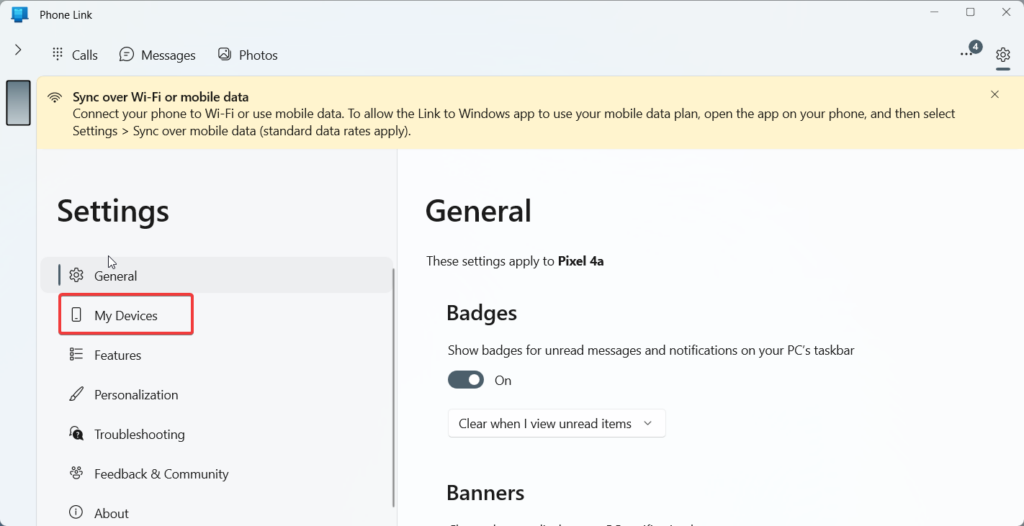
- Press the Settings icon located on the top right of the app window.
- Click on the My Devices option present in the left section of the app.
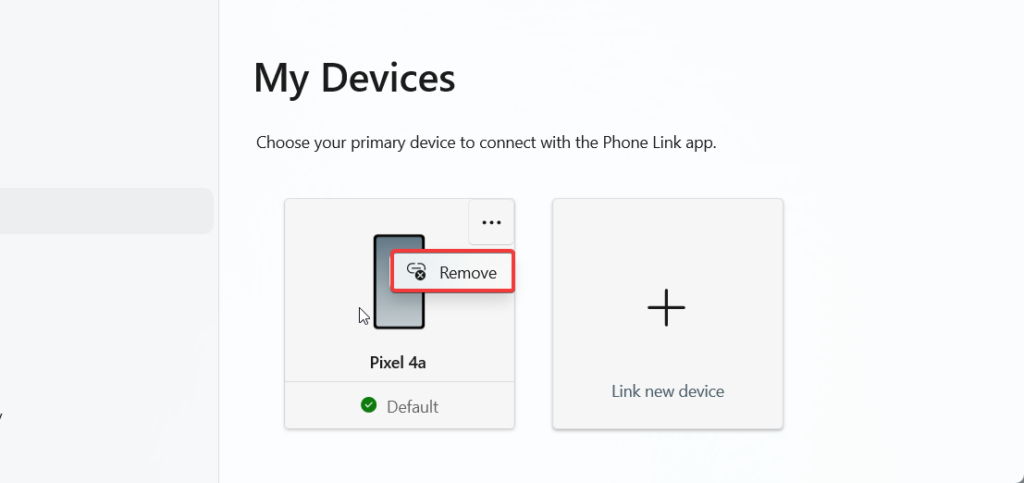
- Now all the devices connected to the Phone Link app will be visible on the screen. Click the three horizontal dots icon for the device currently malfunctioning and choose the Remove option.
- Now that the devices are unlinked, it’s time to re-link them. Sign in to the Phone link app on your Windows 11 PC Link to the Windows app on your Smartphone using the same Microsoft account and follow the on-screen steps to re-link the devices.
3. Use Windows Troubleshooter
If the Phone Link app is still misbehaving, you can employ the Windows Troubleshooter to diagnose to resolve the underlying issues automatically. Microsoft has assigned a dedicated troubleshooter to resolve the problems dominating the native Windows apps. Hopefully, the Microsoft Store Apps Troubleshooter will resolve the problem with the Phone Link app. So let’s begin the process.
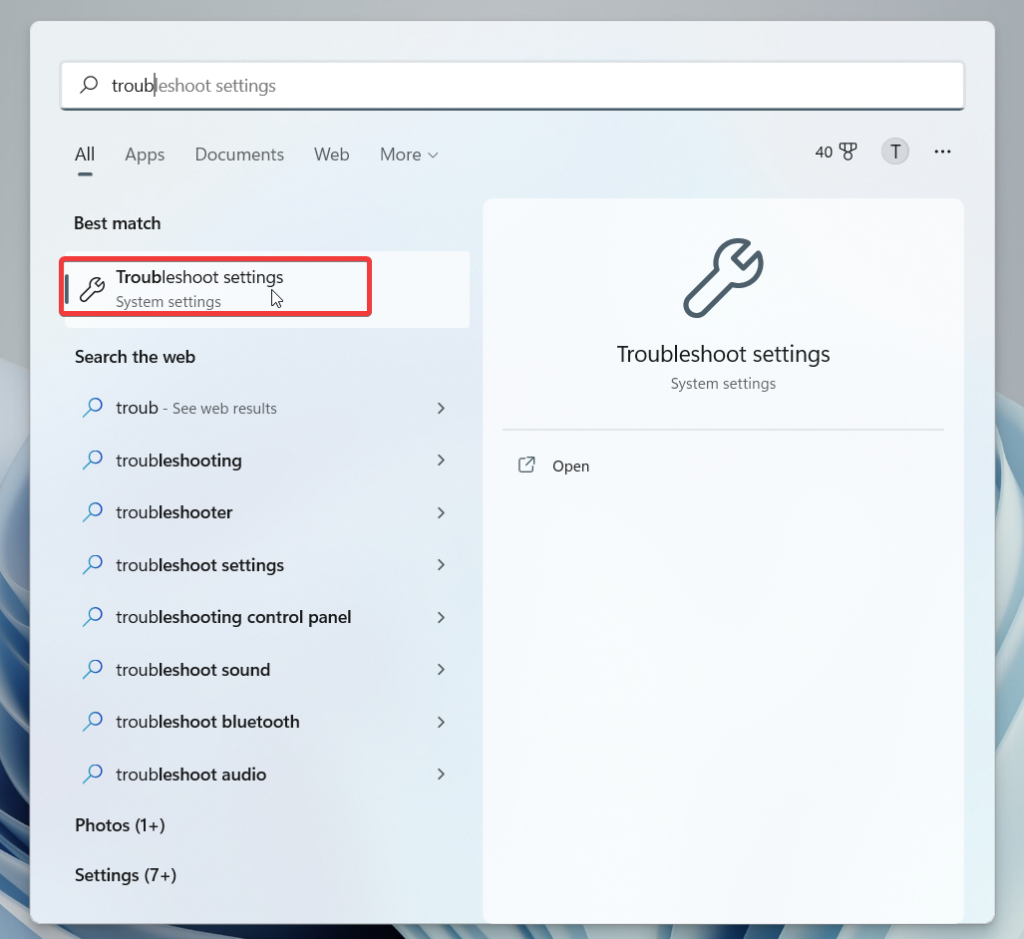
- Access the Start Menu and type Troubleshoot in the search bar on top.
- Choose Troubleshoot Settings from the search results to directly access the Troubleshooting tools.
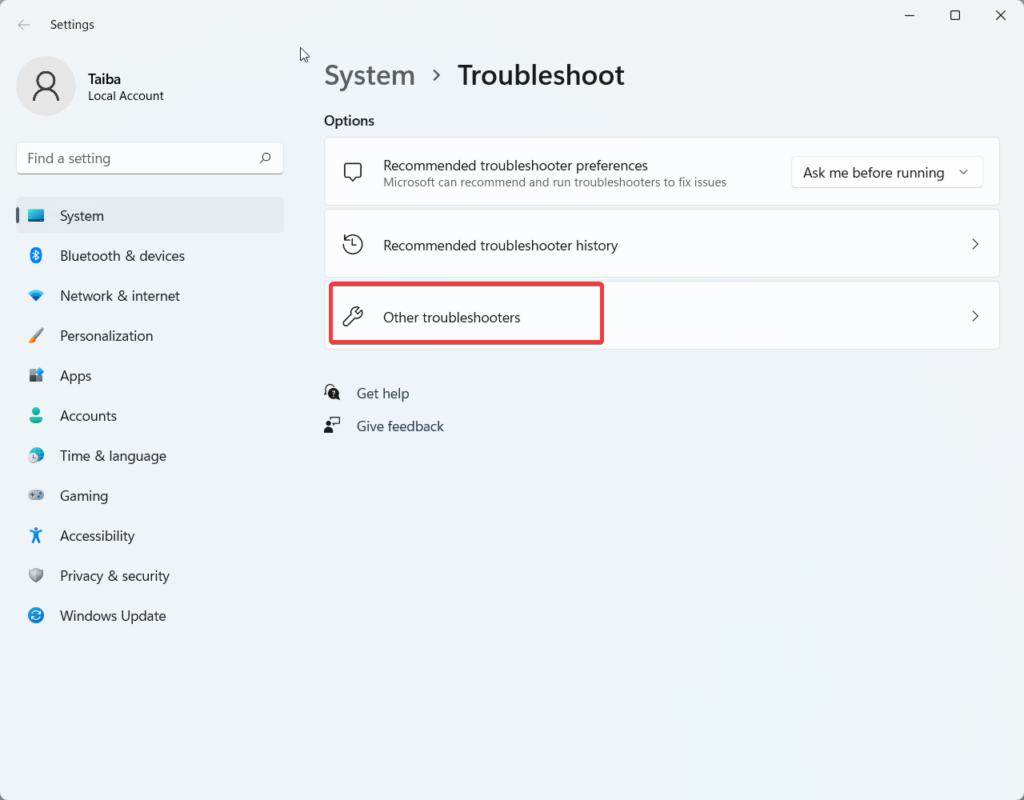
- Choose the Other troubleshooters option from the right pane.
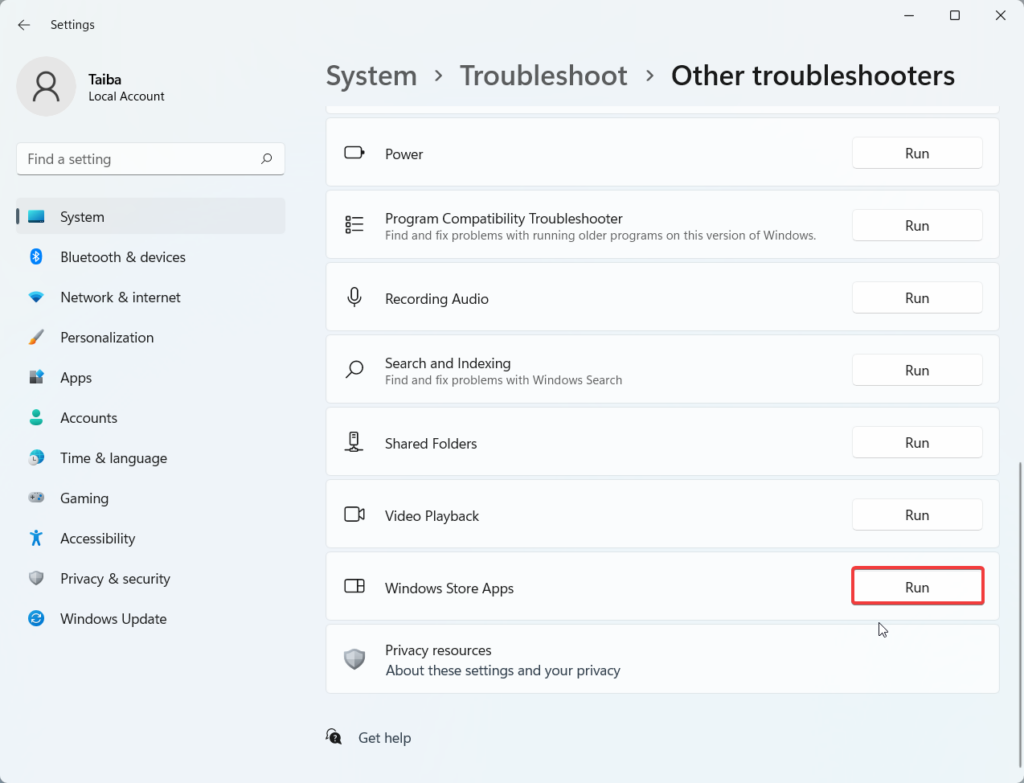
- On the new page, keep scrolling and look for Windows Store Apps troubleshooter under the Other troubleshooters category. Press the Run button next to it to run the Troubleshooter.
- Once the troubleshooter addresses the common issues with the app, re-launch the app and see if the problem is resolved.
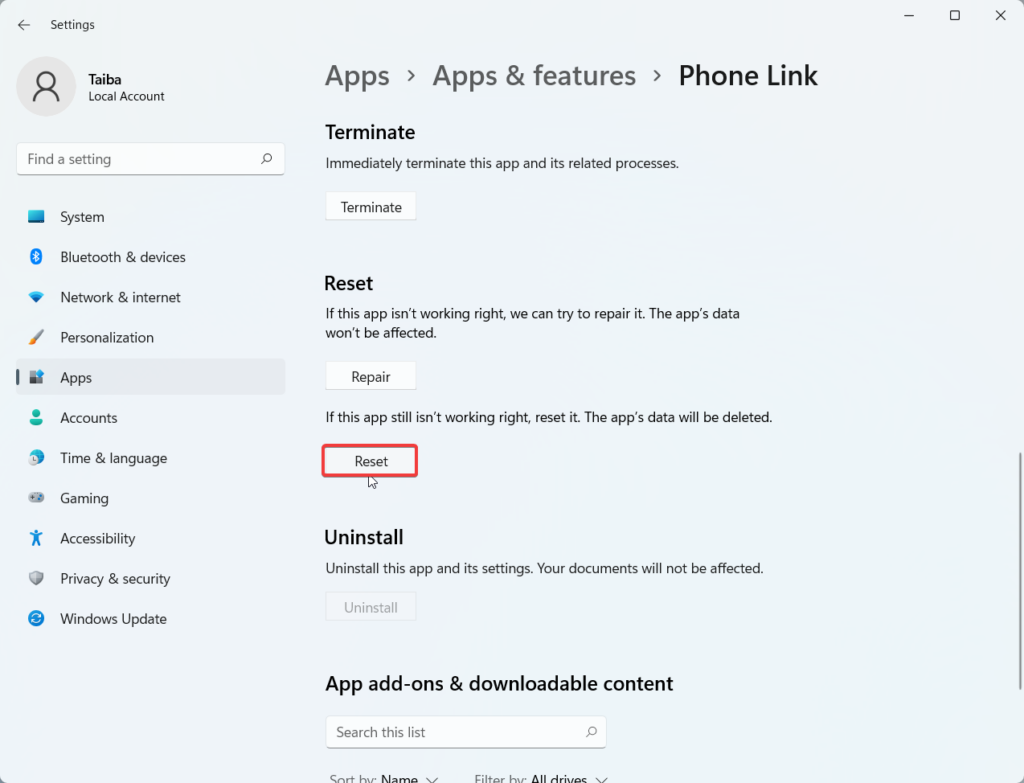
4. Reset The Phone Link App
If you are here, it means you are still struggling to mend the Phone Link app on your Windows 11. There is a good chance that the app has not been configured properly or the app data has become corrupt. If this is the case, you can easily tackle it by resetting the Phone Link App. The method to wipe the app data is straightforward and is described below.
- Use the Windows+I keyboard shortcut to open the Settings app in Windows 11.
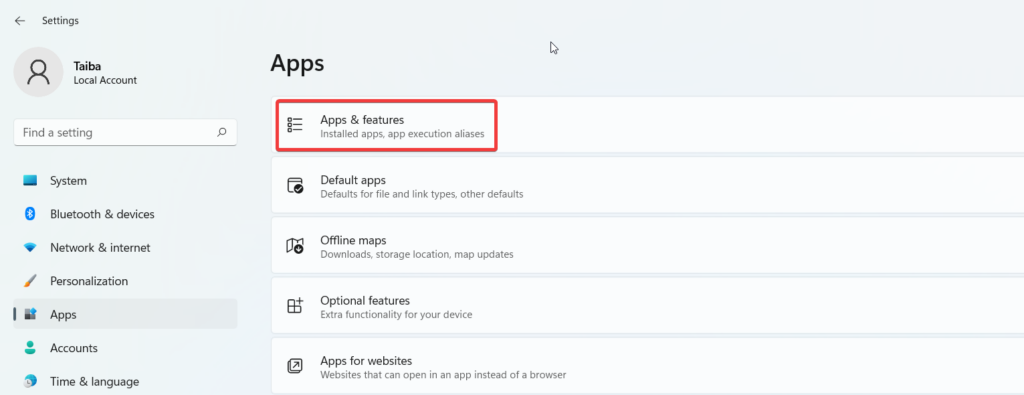
- Choose Apps from the left pane of the Settings Window.
- Next, Select the Apps and features option from the right pane.
- Type Phone Link in the search bar under the App List section. Click the ellipsis icon for the app and choose Advanced options from the fly-out menu.
- Scroll down the next page until you reach the Reset section. Press the Reset button to clear the data stored in the app. Once the above process is completed, re-link the app and see if the problem gets resolved.
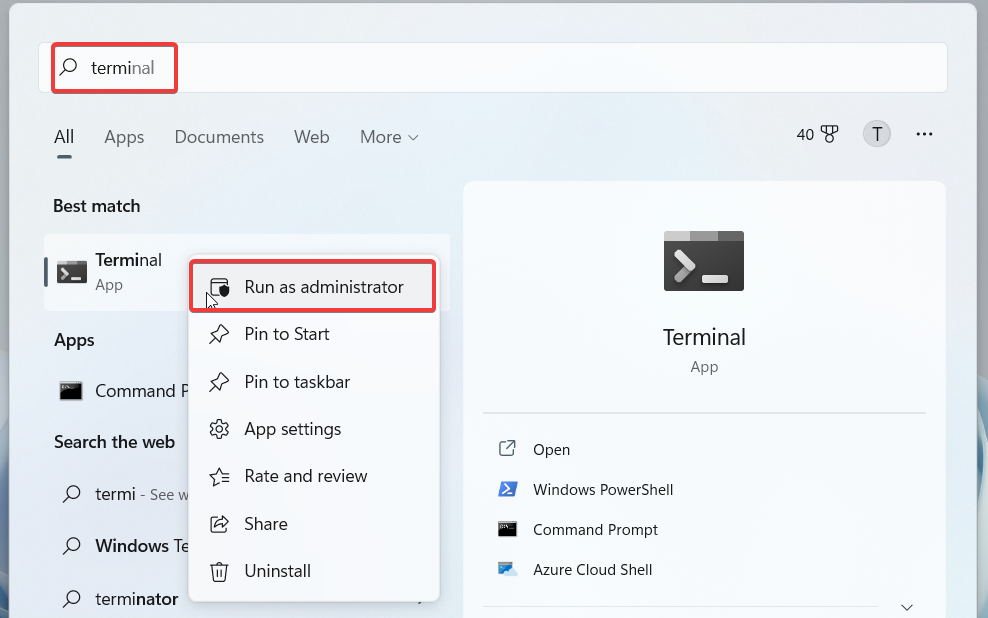
5. Uninstall and Re-Install Your Phone Link App
If resetting the Phone Link app could not make the app perform the functions in a normal way, it could be indicative of the fact that the app was not installed properly or the app is too obsolete for your Windows version. However, you can uninstall the current app from your Windows 11 PC and re-install it again from the Microsoft Store. Since Phone Link is a native Windows app, you cannot uninstall it through the conventional method. The step-by-step procedure for uninstalling the Phone Link app from your PC is described below.
- Use Windows + S shortcut to open the Search window and type Terminal in the search bar.
- Right-click the Terminal app in the search results and choose the Run as administrator option from the context menu.
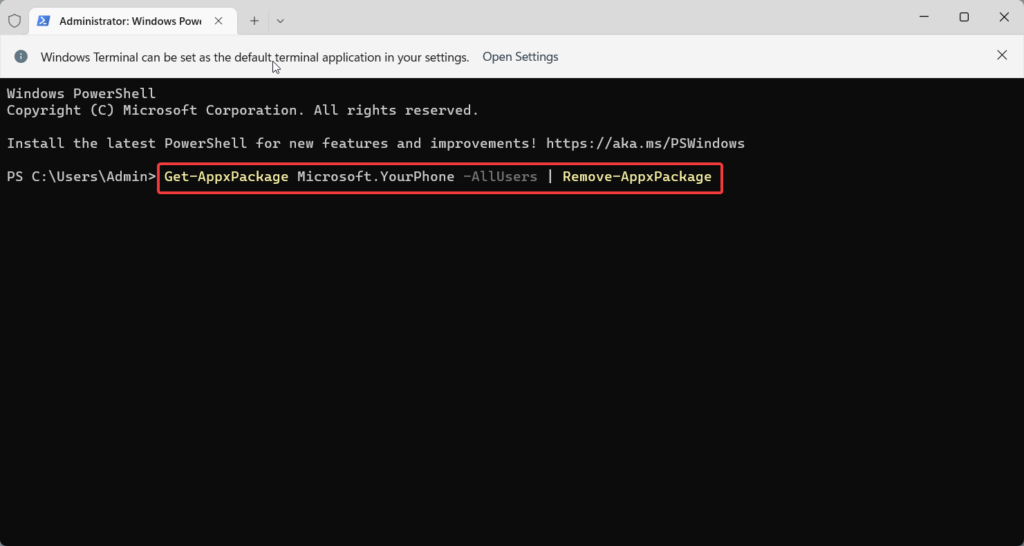
- In the Windows PowerShell, type or copy-paste the command given below and press the Enter key.
- Windows will now uninstall the Microsoft Phone Link application from your PC.
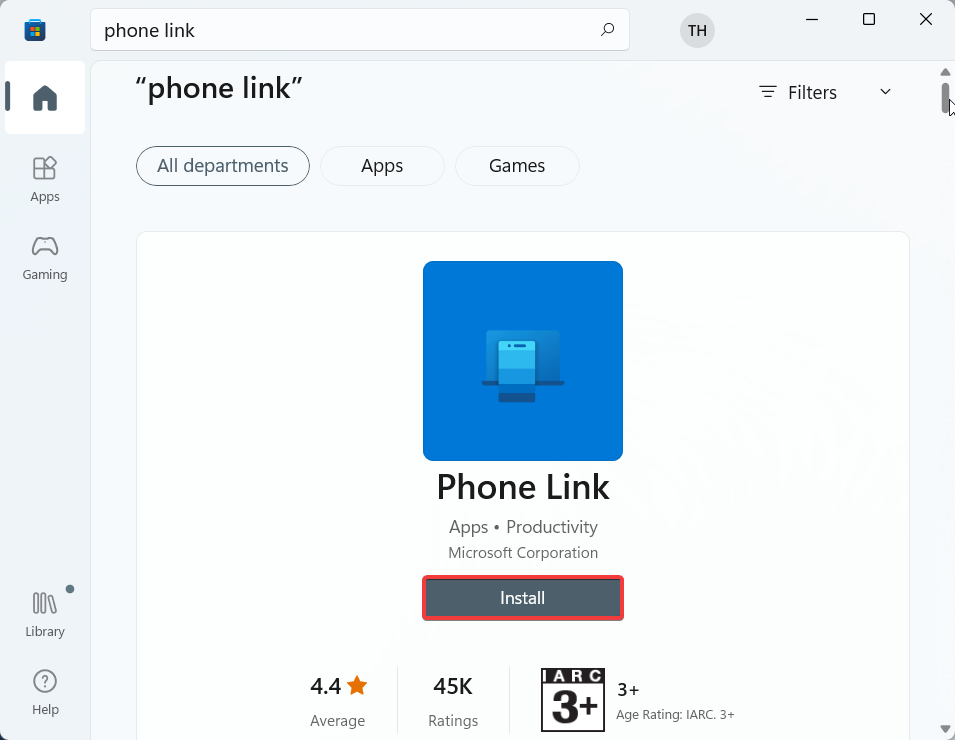
- When the app is uninstalled successfully, close the Powershell window and launch Microsoft Store on your PC.
- Type the Phone Link app on the search bar on top and press the Get button to install the app.
- Once you are done with that, use the application again to see if the problem is still there or not.
6. Reset The App Cache On The Phone
If the above methods were unsuccessful in resolving the issue, there is a possibility that the cache of the Link to Windows app on the smartphone is corrupt. So, it’s time to reset the cache of the app with the intent to fix the issues at hand. Let’s proceed:
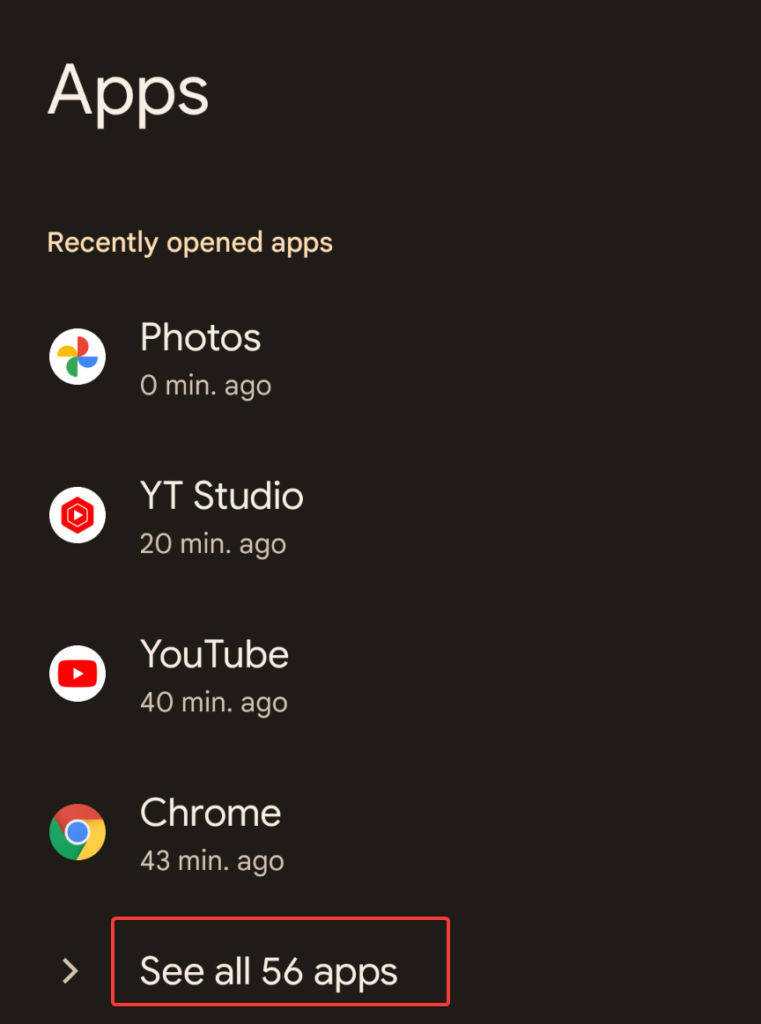
- Launch the Settings app on your Android Smartphone and tap the Apps option.
- Next, click the See All Apps option.
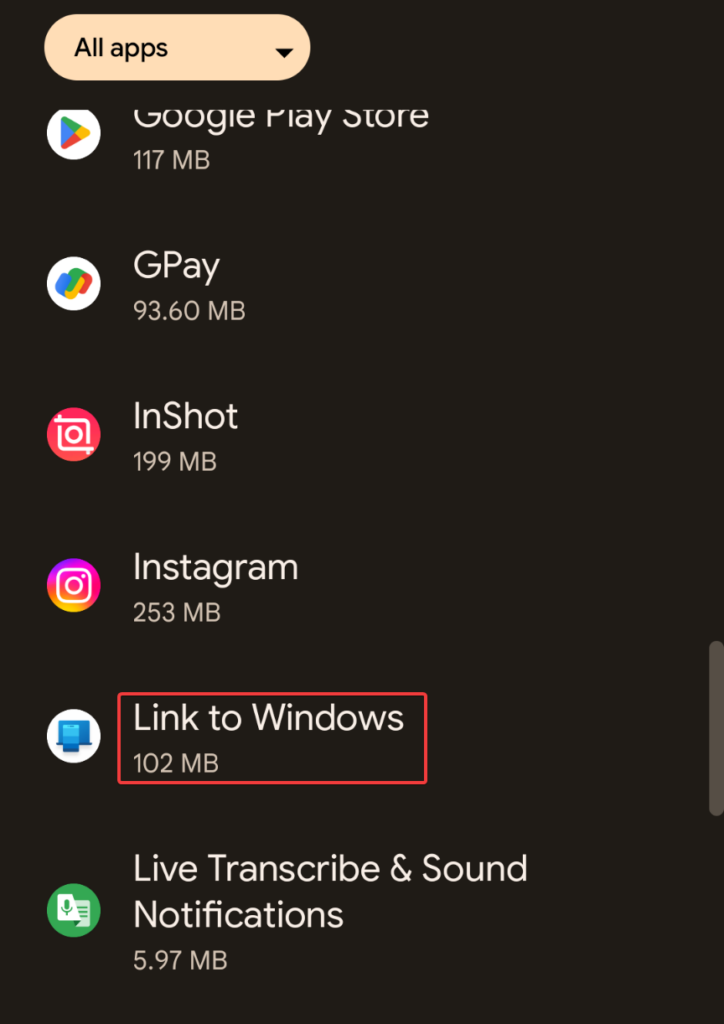
- Locate the Link to Windows app and tap it.
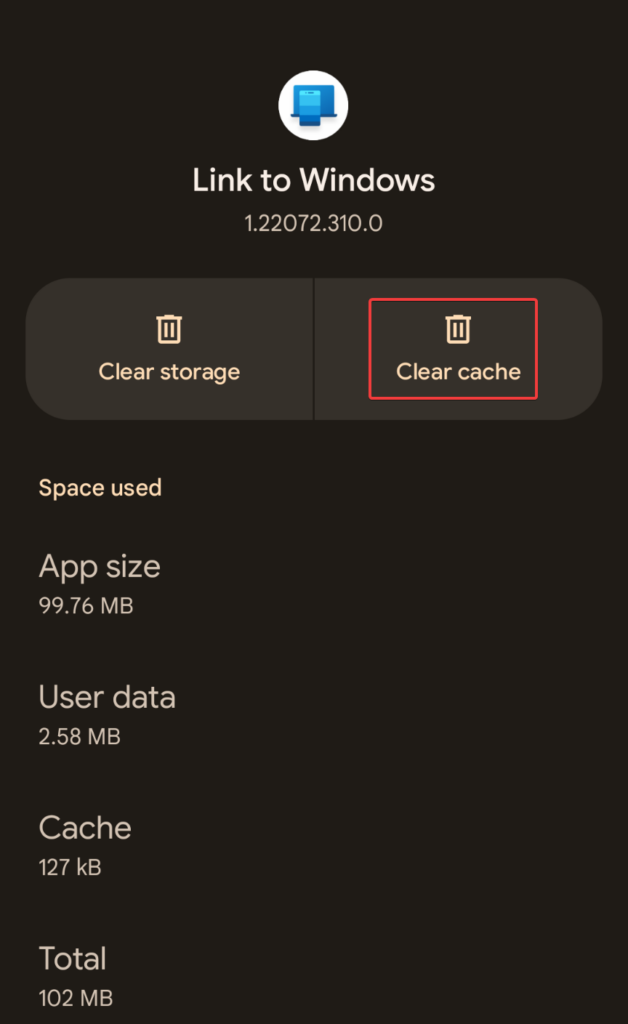
- From the next screen, choose Storage & cache option.
- Press the Clear cache button on the screen.
- Now re-launch the Phone to Link app and see if it works properly.
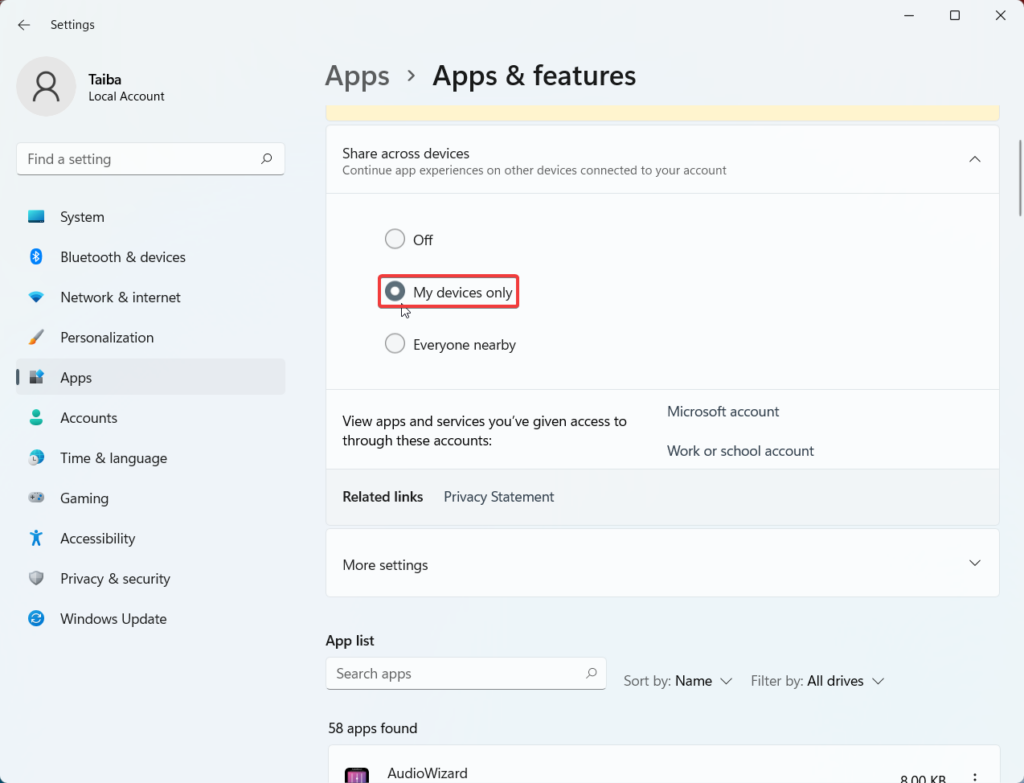
7. Allow Sharing Across Devices
For Privacy reasons, Microsoft has provided a dedicated setting that controls the sharing of data across devices currently connected to it. The phone link app will be unable to share the data with the phone app if this setting is enabled presently. As a result, you will not receive incoming calls and message notifications on your Windows PC. Luckily, this problem can be tackled easily by enabling your Windows 11 PC to share data to other devices linked via your Microsoft account. The step-by-step process to do it is mentioned below.
- Head to the Settings app on your Windows 11 PC.
- Navigate to Apps from the left pane of the Settings Window.
- Choose the Apps and features option located at the top.
- Now click on the Share Across Devices tab to reveal a set of options. Enable the radio button for the My devices only option.
- Now, relaunch the apps in question on both PC and smartphone and see if the ongoing issue is resolved now.
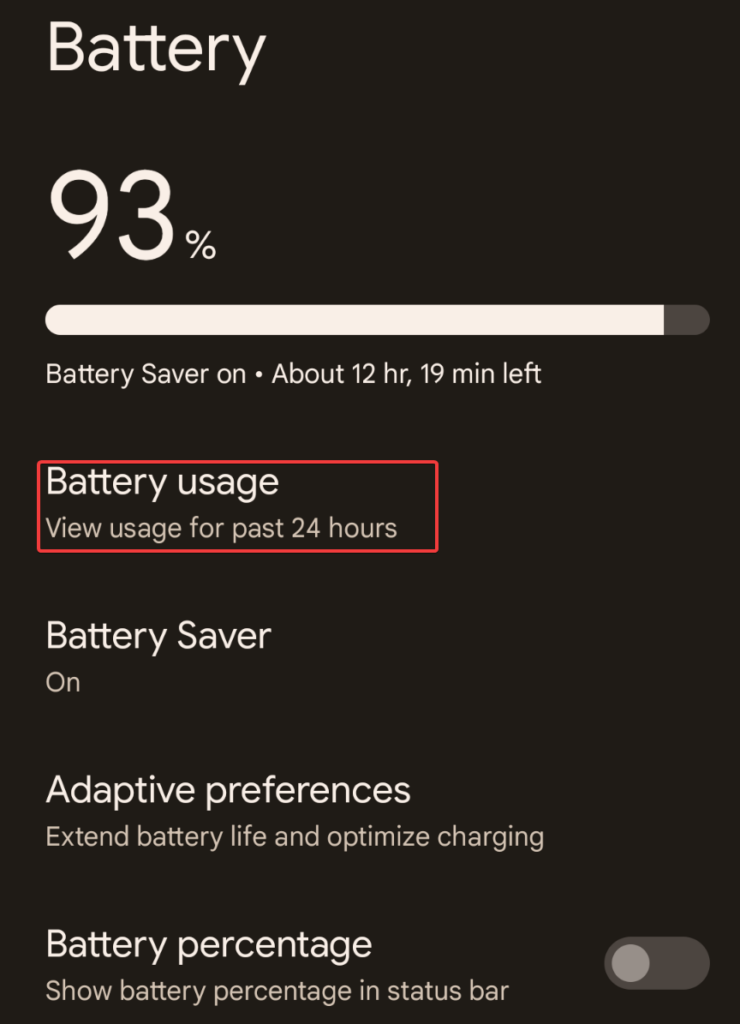
8. Disable Battery Optimization
If you have configured battery optimization settings on your smartphone, the companion app on your smartphone won’t function properly. So disabling the battery optimization settings for the app is the way to go. Here is how you can disable battery optimization on your Android phone.
- Head to the Phone Settings app and navigate to Battery settings.
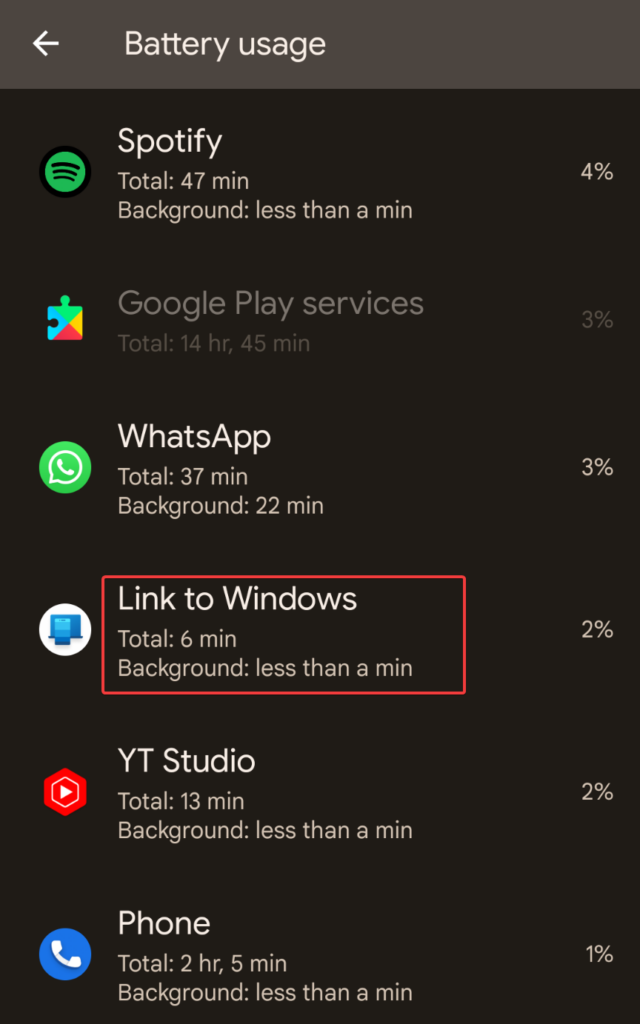
- On the next screen, tap the Battery usage option.
- Scroll down the list of apps until you reach Link to Windows and tap it.
- Enable the Unrestricted radio button located under the Manage Battery Usage section.
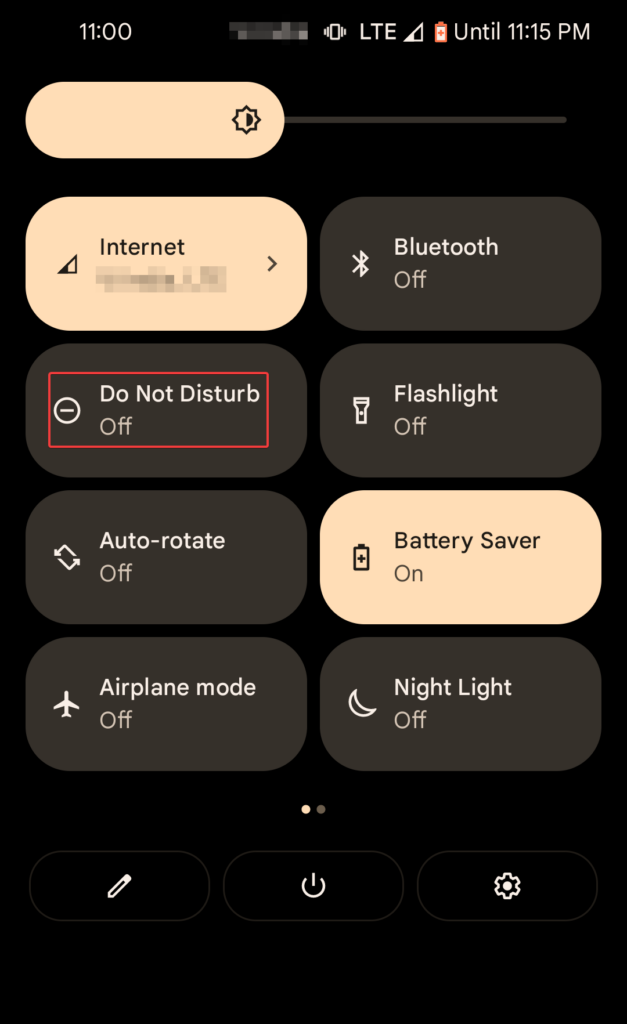
9. Disable Do Not Disturb Mode
If by any chance, the Do Not Disturb Mode is enabled on your PC and Smartphone, you won’t receive any messages and phone call-related notifications even if the co-apps are working flawlessly. So it is recommended to disable the Do Not Disturb mode on your devices to receive notifications from different apps. Below is how you can easily disable the Do Not Disable Mode.
On Android Phone
- Swipe down from the top of the screen to access the Notification Panel.
- Look for the Do Not Disturb tile and see if the setting is enabled. If yes, tap the Do Not Disturb option once again to turn it off.
On PC
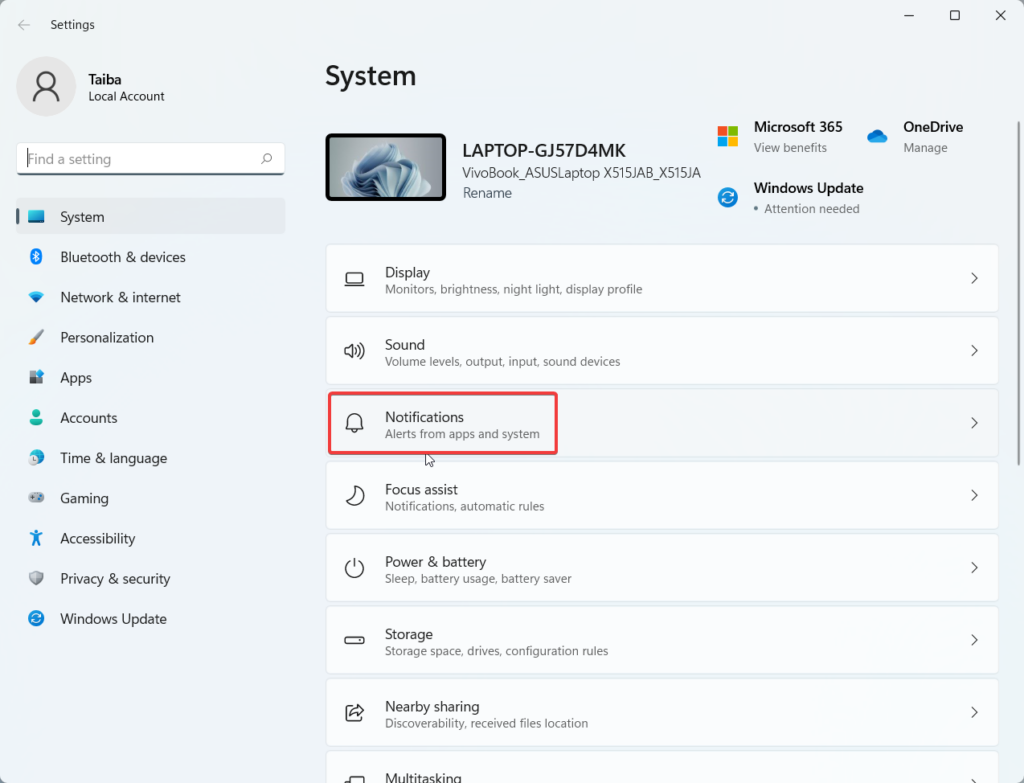
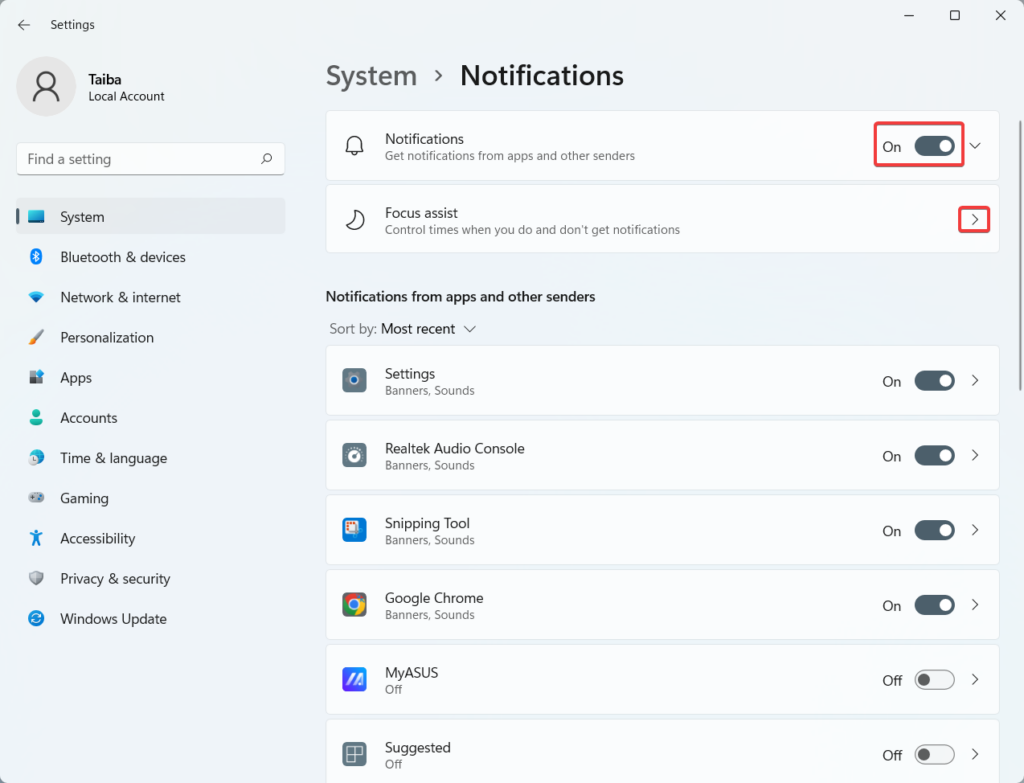
- Launch the Settings app once again, and while in the System tab, choose the Notifications option from the right pane.
- Now ensure that the toggle next to the Notifications option is in the On position. After this, click the Focus assist option to access the settings.
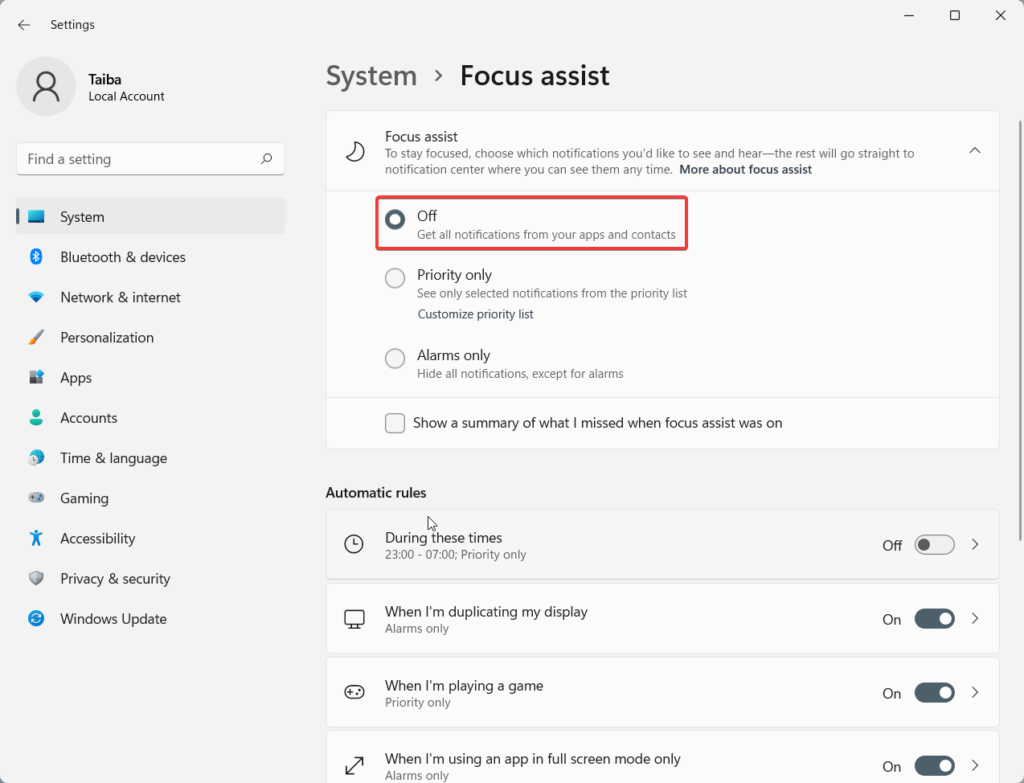
- Here, enable the Off radio button to receive all notifications from apps and contact numbers.
10. Enable Notifications On your Phone
Have you disabled the notifications settings for the different apps to prevent too many notifications from landing on your phone? If yes, this might be the reason why your PC is not notifying you about important emails or text messages. Hence, you should enable the notifications for the apps installed on your Windows 11 PC, especially those for which you wish to be notified. Here are the steps for it.
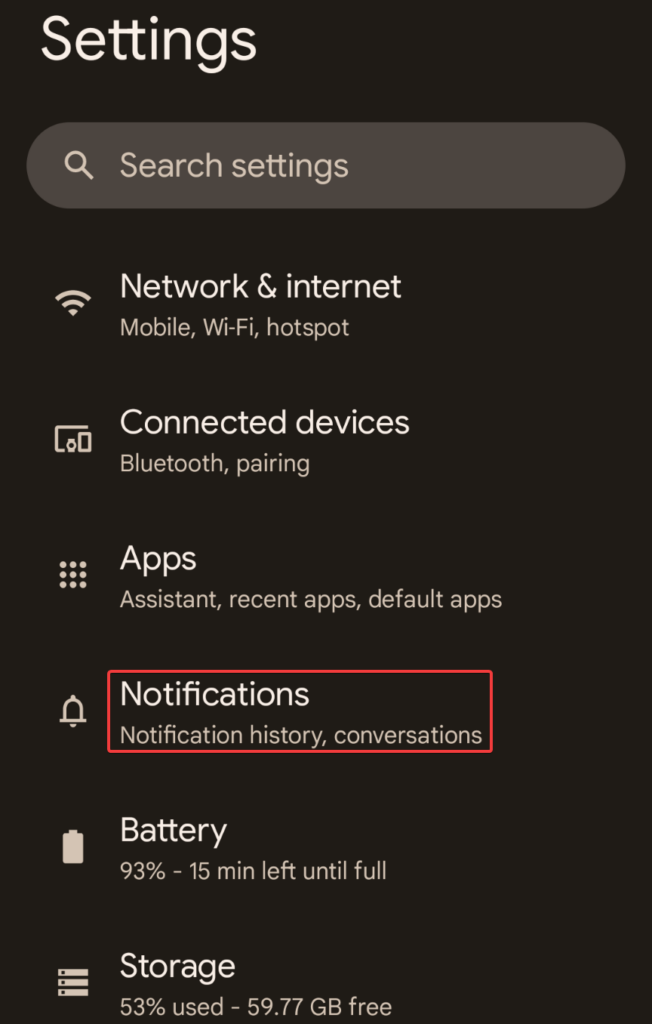
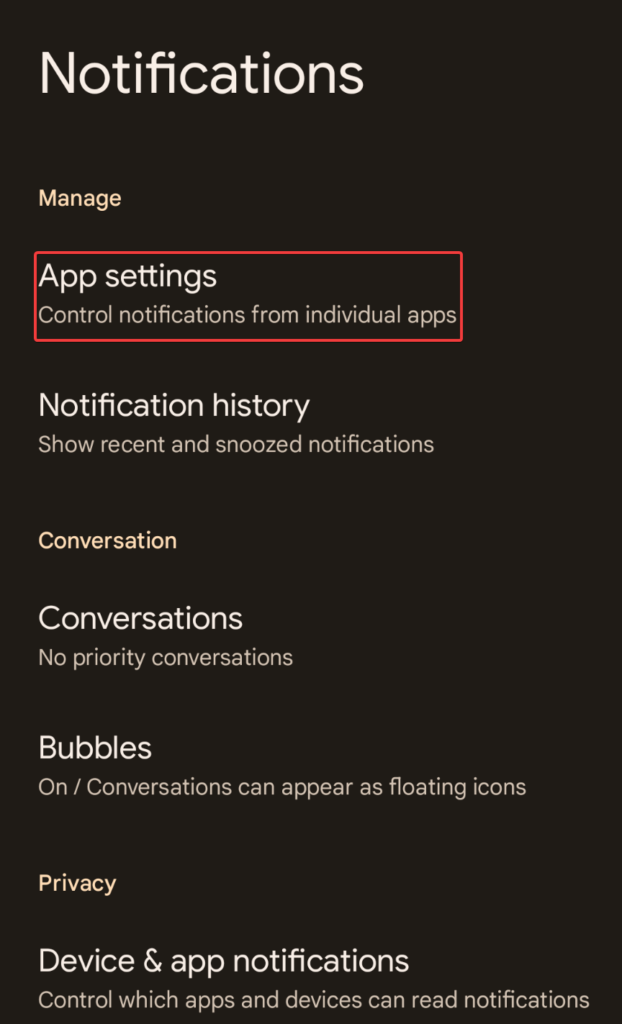
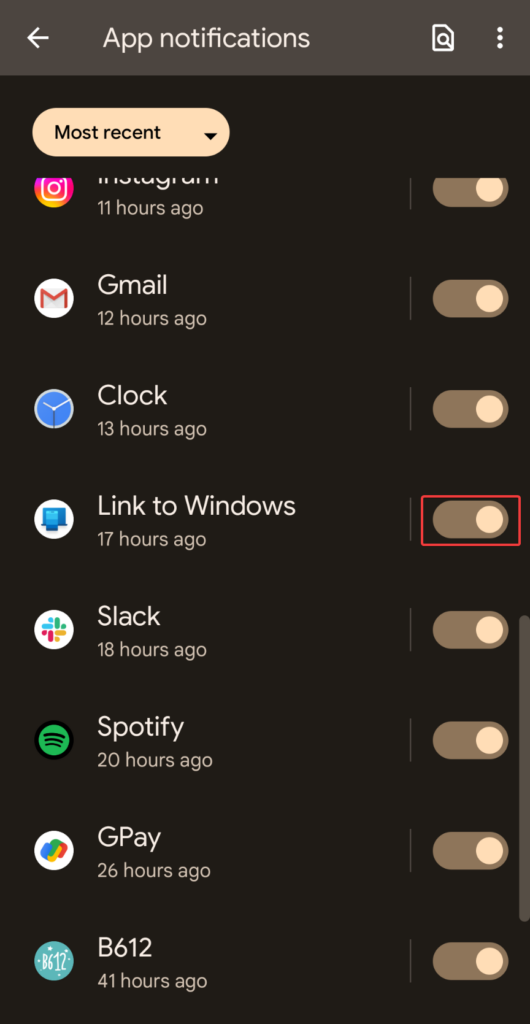
- Head to the Settings app once again and tap Notifications.
- Under the Manage category, choose the App settings option.
- Here enable the toggles for all the apps you wish to receive notifications for, including the Link to Windows app.
Why am I unable to link my smartphone to Windows 11 PC?
Install the Phone Link app from the Microsoft Store on your Windows 11 PC and Link to the Windows app on your android mobile. Now, you need to sign in to both these apps using the same Microsoft account.
What are the requirements for using the Phone Link app on Windows 11?
The phone link app on Windows 11 will only sync with Android smartphones Android 7.0 (Nougat) or above. Additionally, you need to ensure that your smartphone and Windows 11 system are using the same Wi-Fi network at the moment.
Why Phone Link app is unable to access notifications on smartphones?
Go to the Settings app on your smartphone and tap Notifications. Choose Device & App Notifications > Link to Windows app. Now turn on the toggle for the All Notification Access option.
Final Words
The Phone to link app is undoubtedly a useful app that syncs your smartphone with your Windows 11 PC so that you do not have to juggle the devices. But, the glitches in the apps keep degrading the experience from time to time. Hopefully, the above-mentioned methods will fix the underlying issues restoring the functionality of the Phone Link app.
Δ

![]()
![]()

![]()

![]()