However, many users seem to be facing a recent issue where the Fitness app simply refuses to work on their iOS 16 running device. If you’re facing the same issue, then here’s how you can fix it on your device. But first, let’s take a quick look at why you might be facing this issue.
Why is iOS 16 Fitness App Not Working?
This can happen due to a couple of reasons. The most prominent one seems to be a bug in iOS 16. As you know iOS 16 is a new OS that is in the early stages of its release cycle. This means it is bound to encounter bugs and issues that haven’t been documented. Another reason why this issue can occur is due to the devices linked to your Apple ID. Ideally, iOS 16 syncs your health data across all your devices, including Apple Watches, iPhones, and other compatible devices that you might own. This process can sometimes face issues that can cause the empty data recorded on your other devices to be synced with the iPhone you actively use. Lastly, this issue can also occur due to failing hardware components. iOS 16 uses a combination of sensors to record your health data and detect physical activity. If either of these sensors is malfunctioning or not working as intended, it can break the Fitness app. While troubleshooting can help you fix issues caused by sync or an iOS 16 bug, in case of hardware faults, getting in touch with the Apple Support team is your best option. If you recently dropped your device or it suffered liquid damage, it is likely the reason the Fitness app is not recording your data.
Fix iOS 16 Fitness Not Working
Here’s how you can troubleshoot the Fitness app on iOS 16. We recommend you start with the first fix mentioned below and make your way through the list until you manage to fix your issue.
1. Enable Fitness Tracking
Fitness tracking requires certain permissions to be enabled in your privacy settings. If these permissions are disabled, your Fitness app won’t be able to record your data. Follow the steps below to help enable these permissions on your device.
- Open the Settings app and tap Privacy & Security.
- Tap Motion & Fitness from the list on your screen.
- Tap and enable the toggle for Fitness Tracking at the top.
- The health app should now show up on the page. Ensure the toggle is enabled for it. If not, tap and enable the toggle so that the Health as well as Fitness app, can track your steps. If Fitness Tracking was disabled for your device, then it is the reason why the Fitness app was not working on your device. You should now be able to track your fitness as intended.
2. Restart Your Device
We now recommend you try a forced restart on your device running iOS 16. Press and release the Volume Up button, followed by the Volume Down button. Now press and hold down the Sleep/Wake button until you see the Apple Logo. Once visible, let go of the Sleep/Wake button and wait for your device to restart. A forced restart helps re-register your background services and clear the app cache. This can fix major bugs and potentially fix the Fitness app on your device.
3. Update to iOS 16 if you’re Using iOS 15
This is another known bug that affects iOS 16 beta users that roll back to iOS 15. The Fitness app data created by iOS 16 is incompatible with the Fitness app available on iOS 15 and below. This causes conflicts and breaks the fitness app on iOS 15 whether you use an Apple Watch or not. In such cases, you can reset your device to continue using iOS 15 or update to iOS 16 to retain your current data and fix your issue. Follow the steps below to update your device. If you wish to reset your device, you can use the dedicated section in this guide below.
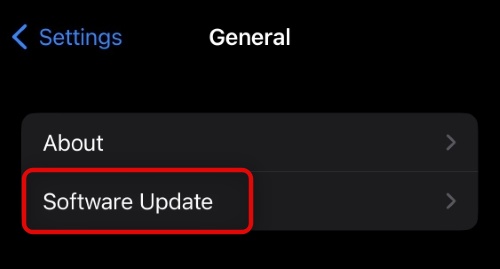
- Open the Settings app and tap General.
- Now tap Software Update.
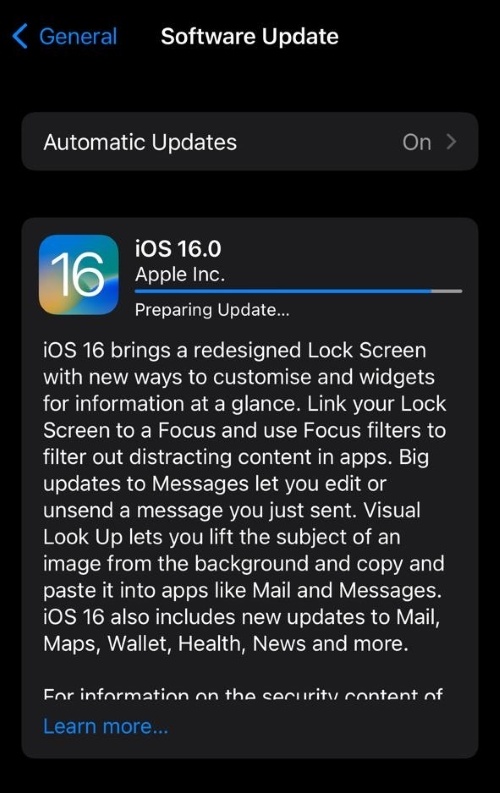
- iOS will now check and display available updates for your device. If an update is available, tap Download and Install. Your device will now download and install the update. This can take some time, depending on your network, and will restart a few times during this process. Once your device restarts, you can try using the Fitness app again. If rolling back was the cause of your issue, then the Fitness app will now be fixed on your device.
4. Delete Your Fitness Data
While a drastic measure, deleting your Fitness data and setting up the app again can help fix most issues with the Fitness app on your device. Follow the steps below to get you started.
- Open the Settings app and tap Health.
- Now tap Data Access & Devices.
- Tap Fitness.
- You will now be shown the fitness data stored on your device. Scroll to the bottom and tap Delete All Data from “Fitness”.
- Tap Delete to confirm your choice.
- Tap Health.
- Tap Delete All Data from “Health” at the bottom.
- Tap Delete again to confirm your choice.
- You will now be taken back to the previous screen. Devices syncing your health data will be shown at the bottom. Tap and select any device that you do not recognize in this list.
- Tap Delete All Data from “DEVICENAME” at the bottom of your screen.
- Tap Delete to confirm your choice. We now recommend you restart your device to ensure that the changes take place and you can start afresh. Once your device restarts, set up your Health and Fitness app again by following the on-screen instructions. In most cases, resetting your data should help fix the Fitness app on your device.
5. Reset All Settings
You could be facing a Settings conflict on your device with conflicting background permissions. Resetting your settings can help fix such issues. Follow the steps below to help you along the way.
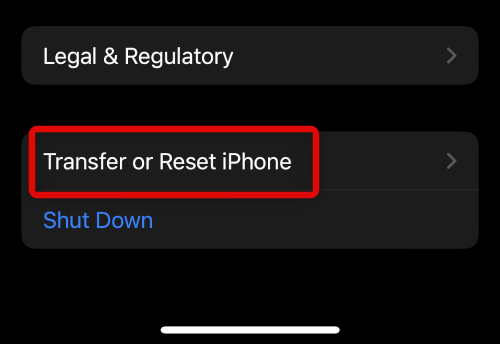
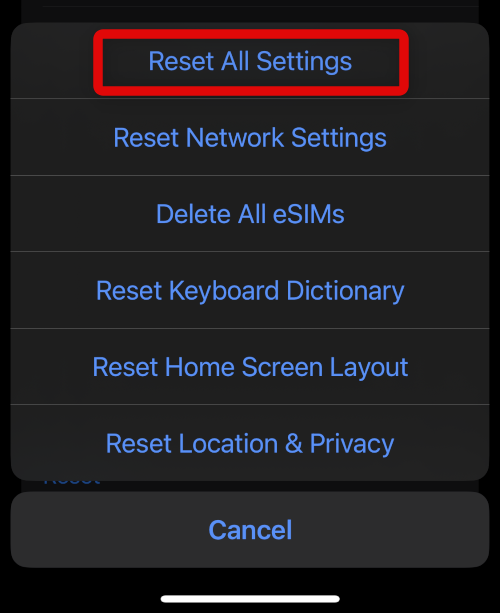
- Open the Settings app and tap General.
- Scroll to the bottom and tap Transfer or Reset iPhone.
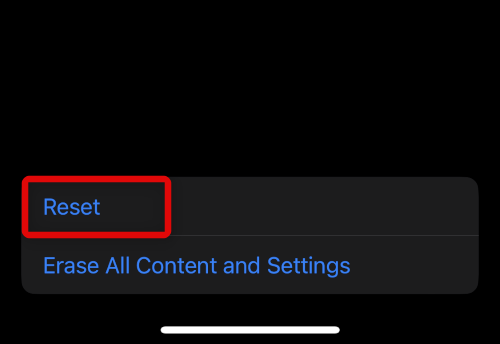
- Tap and select Reset.
- Now select Reset All Settings.
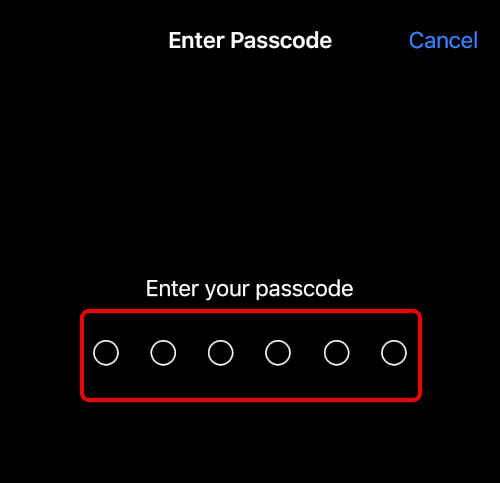
- Enter your passcode to confirm your choice and verify your identity. Your device will now restart and reset all settings in the process. If misconfigured settings were causing issues on your device, then the Fitness app should now be fixed for you.
6. Re-Pair Your Apple Watch
If you use an Apple Watch with your iPhone, we recommend you re-pair the same to try and fix your Fitness app. Use the steps below to help you along the way.
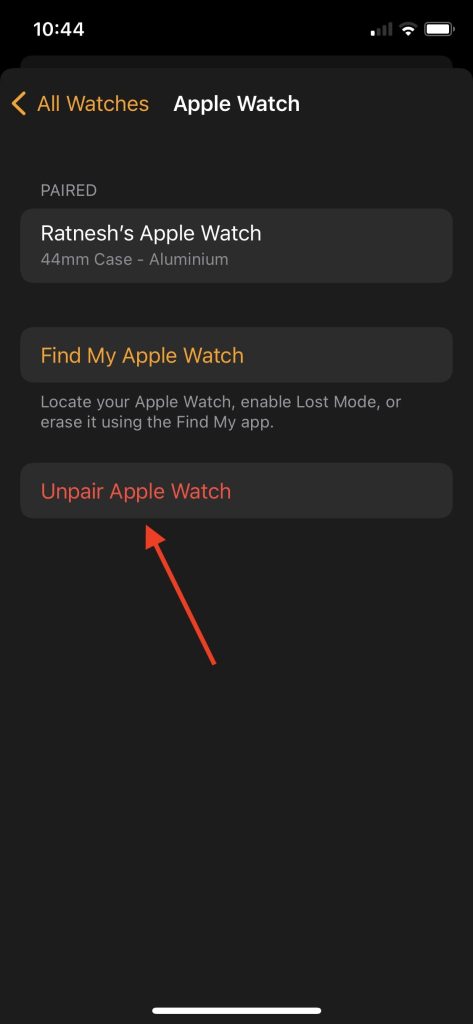
- Place your Apple Watch in the vicinity of your iPhone and open the Apple Watch app.
- Ensure My Watch is selected at the bottom and tap All Watches.
- Tap the i icon beside the watch you wish to unpair.
- Now tap and select Unpair Apple Watch at the bottom of your screen.
- If you have a cellular watch, choose to keep your eSIM plan.
- Tap Unpair again to confirm your choice.
- You will now be asked to enter your Apple ID password if you’re using Activation Lock. Enter your password, and your Watch will be unpaired from your device. We now recommend you restart your iPhone using the dedicated section above before pairing your Watch again. Once you restart your device, follow the steps below to pair your Apple Watch to your iPhone again.
- Turn on your Apple Watch if it is turned off by holding down the side button. Let go of the button once the Apple Logo appears on your Watch Face.
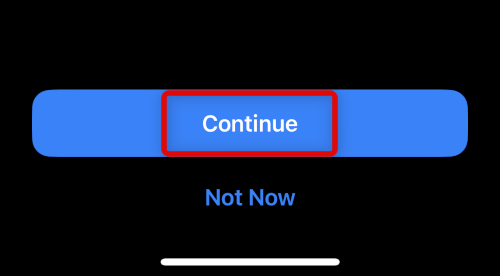
- Hold your Watch close to your iPhone. Tap Continue once the Watch shows up on your device.
- Tap and select Set Up for Myself on the next screen.
- Your camera will now launch on your iPhone. Point the camera to the animation being displayed on your Apple Watch.
- Your Apple Watch should now be paired to your iPhone. Tap Set Up Apple Watch on the next screen. If you wish to restore from a previous backup, tap Restore from Backup.
- Now follow the on-screen instructions to restore your backup or set up your Apple Watch as new. If watch syncing issues were causing problems with the Fitness app on your device, then it should now have been fixed.
7. Reset Your Device
We now recommend you try and reset your device and set it up as new. It is recommended you perform a backup before proceeding with the steps below, as you will lose all data stored on your device during this process. Follow the steps below to help you along the way.
- Open the Settings app and tap General.
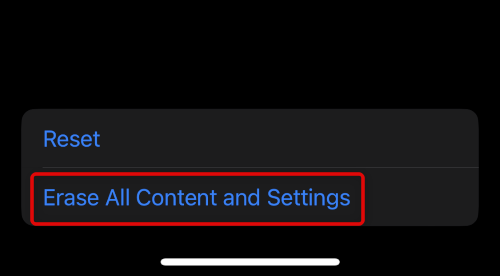
- Now tap Transfer or Reset iPhone at the bottom of your screen.
- Tap Erase All Content and Settings.
- Tap Continue.
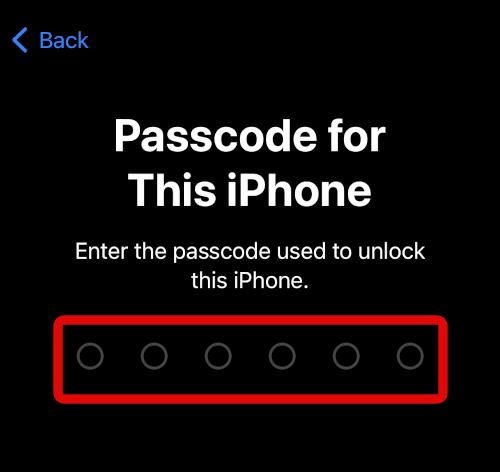
- Now type in your passcode to verify your identity once you’re prompted.
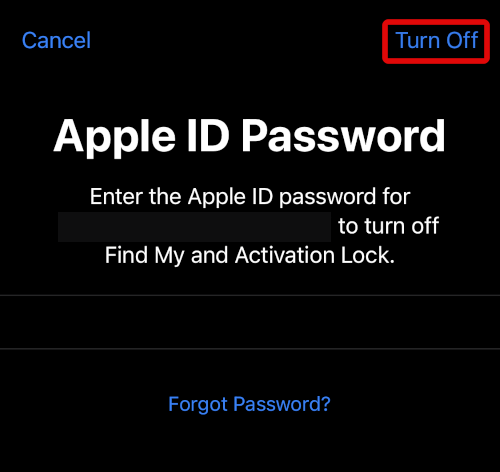
- Subsequently, type in your Apple ID password to disable Find My for your iPhone.
- Finally tap Erase. Your iPhone will now erase all data stored on it and reset itself to factory defaults. Once your device is done resetting itself, we recommend you try using the Fitness app before restoring your backup. If the app seems to be functioning as intended, then the issue was likely caused by leftover conflicting files in your previous setup. In such cases, it is recommended you restore your backup selectively, excluding your Fitness data.
8. Reset Your Device in DFU mode
DFU Mode is iPhone’s recovery mode which completely removes the currently installed version of iOS from your iPhone and installs the latest signed version from scratch. If leftover files or serious background issues are causing problems with the Fitness app, then this should help fix the same. Use the steps below to help you along the way.
- Connect your iPhone to your computer using a lightning cable but do not launch iTunes just yet. We first need to enter recovery mode on your iPhone.
- Quickly press and release the Volume Up button on your iPhone while connected to your computer. Now quickly press and release the Volume Down button. Press and hold down the Sleep/Wake button after this till your device restarts. Continue holding down the Sleep/Wake button until you reach a blank screen.
- Let go of the Sleep/Wake button and launch iTunes on your computer. Now click your device at the top if you’re using a PC. If using a Mac, click your device’s name in the left sidebar in Finder.
- iTunes will now automatically detect your device’s DFU mode and prompt you to restore the same. Click Restore and follow the on-screen instructions to restore your device. Your device will now be restored by iTunes. This can take some time, depending on your current network speed. Additionally, your device will restart a few times during this process. This is completely normal, and we highly recommend you do not disconnect your device from your computer during this process. Once iTunes restore your device, you will be greeted by the welcome screen. Set up your device as new and try using the Fitness app before restoring your backup. If the Fitness app now seems to be working, we recommend you selectively restore your backup without restoring your Fitness app data.
9. Contact Apple Support
If you’re still unable to get the Fitness app to work, then we now recommend you try and get in touch with the Apple Support team. You could be facing an issue with iOS 16 specific to your device or could be looking at failing hardware components. Either way, the Apple support technician can help you diagnose the same easily. Use this link to get in touch with the Apple Support team in your region.
Is the Fitness app accurate without the Apple Watch?
Yes, the Fitness app is quite accurate on iOS 16, even if you do not own an Apple Watch. While you won’t be able to track exclusive information offered by the Watch, you can still use the Fitness app to track your calories, steps, and climbed stairs.
Can I access my Fitness data from the Health app?
You can always access your Fitness data from the Health app. Tap Browse at the bottom of your screen and select Activity to view your Fitness app data.
Can I use the Fitness app without Apple Watch?
Yes, if you’re running iOS 16 on your iPhone, then you can easily track your activity using the Fitness app. However, users running iOS 15 or lower will require an Apple Watch to use the Fitness app.
Final Words
Staying active is an essential part of a healthy lifestyle. The new ability to use the Fitness app without an Apple Watch on iOS 16 helps you do the same by tracking your steps and more. We hope the post above helped you easily fix the Fitness app on your iPhone.
Δ