Fix Google Play Services Battery Drain Issue on MIUI, One UI, Android 11, and More (2021)
Here, I have mentioned seven methods in great detail to help you fix the Google Play Services battery drain issue on your Android smartphone. You can expand the table below and move to the relevant section with just a click.
1. Update Google Play Services
First of all, I would recommend you to update Google Play Services to the latest version. You may have gotten a bad patch which may be wreaking havoc on your smartphone’s battery life.
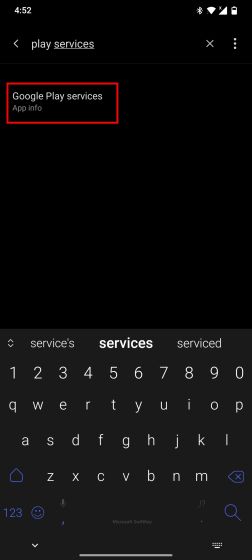
To update Google Play Services, go to Settings and search for “play services” and open it.
You can also manually navigate to Settings -> Apps and Notifications -> See all apps. Here, search for “Google Play services” and open the app info page.
Then, tap on “Advanced” to expand the menu and select “App Details”.
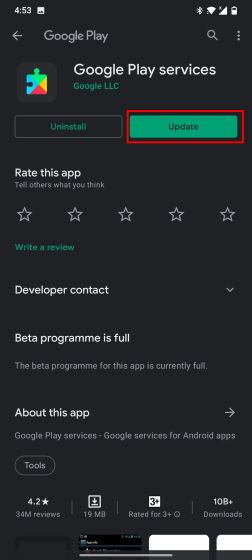
It will directly take you to the Play Store page of Google Play Services. If there is an update pending, tap on the “Update” button to get the latest features and patch your device.
If you are using other Android skins or an older version of Android, you may not see the “App Details” menu on your device. In such cases, you can install the Play Services Info app (Free). It allows you to access the Google Play Services page on the Play Store easily.
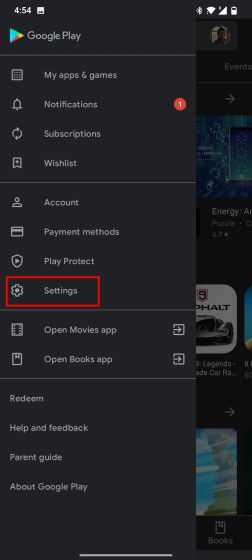
Other than that, I would strongly recommend you to update Google Play Store as well. The Play Store is deeply linked with Google Play Services, and an outdated package may be one of the reasons for the battery drain issue on your Android device. To do so, open Play Store and tap on the hamburger menu, and go to Settings.
Next, scroll down and tap on “Play Store version”. If there is an update available, the app will alert you that “a new version of Google Play Store will be downloaded and installed” on your Android device. After an hour or so, shut down your device and turn it back on. From now on, you will not face the battery drain issue caused due to Google Play Services.
2. Exit Google Play Services Beta
Sometimes, users are not even aware that they are enrolled in the Beta program of Google Play Services. As we all know, beta builds usually have bugs and experimental features that may lead to battery drain issues. So, if you are not into testing new features, moving out of Google Play Services Beta might be the fix. Here is how to go about it.
Open Google Play Store and move to “My apps and games”. After that, switch to the “Beta” tab.
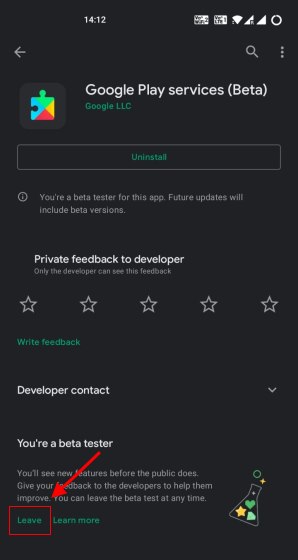
If you are enrolled in the Google Play Services beta program, you will find it in the list here. Open the App Details page and tap on “Leave”. That will uninstall the beta package.
Keep in mind, uninstalling the beta app does not immediately install the stable one. So you need to open the Play Services page on Google Play Store using the instructions from the above method and update it manually.
Also, note that, after making these changes, Google Play Services takes some time to sync everything. So for the next few hours, you might face the battery drain issue again. Post that, it should stabilize, and you should no longer have the battery drain issue.
3. Reboot the Device
It may sound rudimentary, but sometimes rebooting the device fixes the battery drain issue caused by Google Play Services. Several users have reported that by shutting down the smartphone and turning it back on, the battery life sees an improvement. So I would suggest you try the same trick and check if the issue persists.
4. Clear Cache
If none of the above methods resolved the problem, then you need to clear the cache. Fret not, it won’t delete any of your files or remove your Google account. It will just remove all the temporary/outdated files that Play Services has accumulated for its usage. Once you clear the cache, it will make a fresh copy of data, and that should fix the battery drain issue caused by Google Play Services.
Open Settings and search for “Play services“. Now, open the “Google Play Services” app info page.
Alternatively, you can navigate to “Settings -> Apps and Notifications -> See all apps,” and search for “Play services”. Open the app info page.
Now, open “Storage and Cache” and tap on “Clear Cache”. Give it some time, and the battery drain issue should be gone.
5. Turn Off Unnecessary Sync
Users who add multiple Google accounts on their Android smartphone are usually the ones who face this battery drain issue. It’s because too many syncing processes are running in the background, using system resources and draining the battery in the process. Google Play Service handles these processes, which takes a toll on the battery life. So I would suggest you remove the Google account altogether if you don’t use them or turn off sync for accounts you barely use. Here is how you can do it.
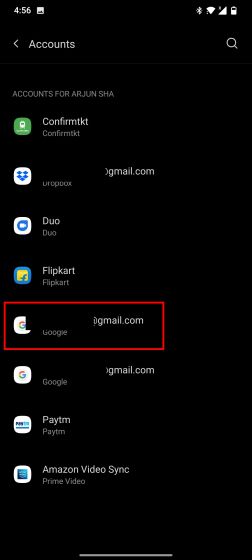
Open Settings and go to Accounts. Here, open the Google account that you don’t use often.
Next, tap the “Remove account” button. That’s it.
If you do use other Google accounts, make sure to turn off unnecessary sync processes. For example, if you use a work account only for Gmail and Calendar, then turn off other sync operations. Just open “Account sync” and disable the toggle for needless syncing profiles. This nifty little tip will help minimize the battery drain caused by Google Play Services.
6. Remove Location Permission
Location permission on Android smartphones is one of the major reasons behind battery drain. You should only grant the location permission to apps that genuinely need it, such as Maps, food delivery apps, etc. Even then, make sure to utilize Android 11’s “Ask Every time” or “Allow only while using the app” privacy features to keep the background location usage in check.
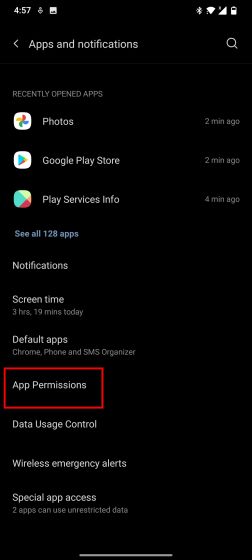
Open Settings and navigate to “Apps and Notifications”. Next, you need to open the “App Permissions” settings page. You can also search for “permissions” in Settings to move to the App Permissions page directly.
Here, tap on “Location” and deny that permission to apps that don’t need it. You can also change the permission to “Ask Every time” or “Allow only while using the app” based on your usage. This small change will see to it that not many apps ask for location in the background, thus, keeping the battery drain issue at bay.
7. Clear All Data
If none of the above methods work for you, you may have to press the red button (not literally) as a final resort. It won’t delete any of your files or do anything like that but will remove your Google account, and you will have to sign in again with your Google account. Apart from that, you will have to set up Play Store, Google Pay, and other Google apps on your Android device. Initially, notifications may also arrive late, so do keep that in mind before moving ahead with this fix.
Open Settings and search for “Play services” and open it.
Next, open “Storage and Cache”. Here, tap on “Clear Storage” instead of “Clear Cache” like we did in one of the methods above.
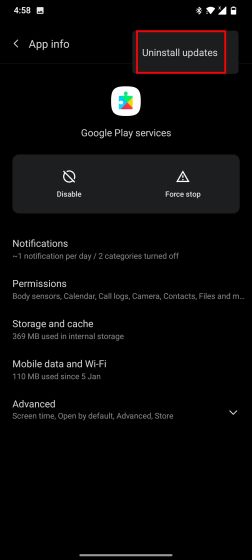
After that, tap on the 3-dot menu on the top-right corner and tap on “Uninstall updates” to reset Google Play Services.
Next, follow the first method of this article and open the Play Store page of Google Play Services. Now, go ahead and update Google Play Services. That will download a fresh version of Google Play Services and see you start anew, fixing the battery drain issue in the process.
Battery Drain Due to Google Play Services? Find the Solution Here
So these are the seven best ways to fix the battery drain issue caused by Google Play Services. You should now see a substantial 5-6% dip in Play Services usage. Other than that, I would suggest you keep patience after trying every method. Play Services takes a few hours to configure and stabilize itself. Anyway, that is all from us. If you are faced with another Android 11 issue, say the Verification Failure error, then click on the linked guide to resolve it instantly. And if you have any questions, do let us know in the comment section below.
