If you’ve had these problems with Google’s browser on your Windows 11 computer, you’re at the right place. In this article, we will look at all the possible factors that could lead to Chrome issues on Windows 11 and guide you through fixes for those issues. Carefully follow each guide step-by-step until the problem is gone.
Fix Google Chrome Not Opening in Windows 11
Anything from a temporary system error and outdated Chrome version to corrupted cache files and missing system files could be preventing Google Chrome from opening or working properly on your Windows 11 computer. We will start with basic troubleshooting methods and proceed to more intricate ones.
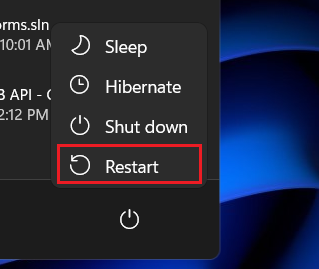
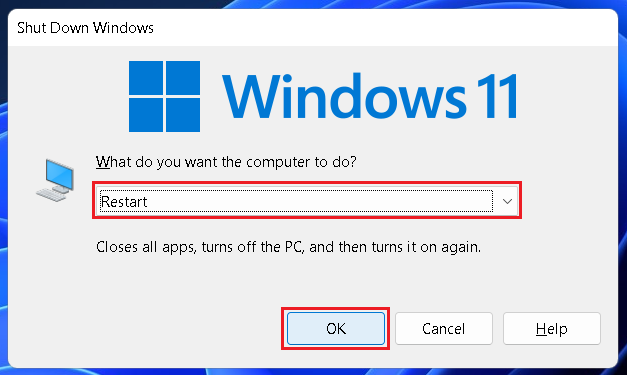
1. Restart Your Computer
As basic as it may sound, restarting your computer may often fix temporary system errors that could interfere with the normal functioning of Google Chrome. Simply press the Windows key on the keyboard to bring up the Start menu and then click on the Power button at the bottom right corner of the start menu. Now click on the Restart button and wait for your PC to reboot. Alternatively, you can use the keyboard shortcut Alt+F4 to bring up power options. Now select Restart from the dropdown menu and then click OK.
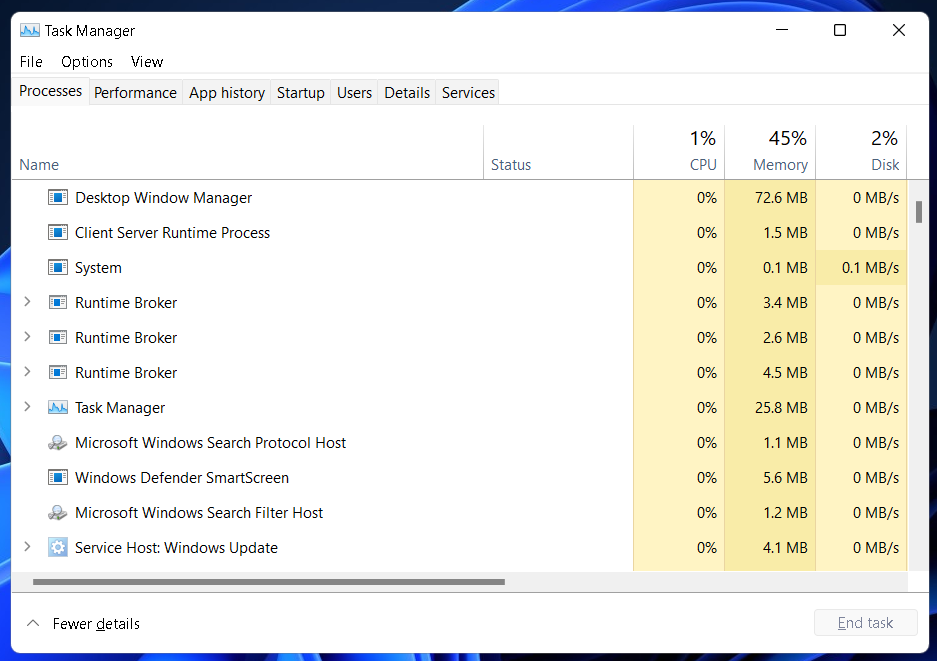
2. End Google Chrome Processes
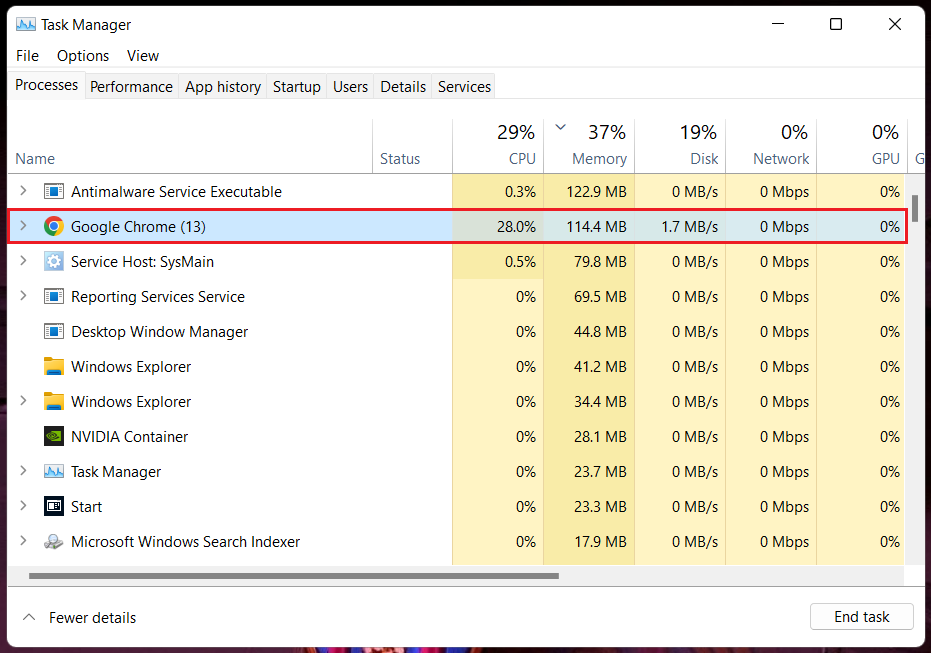
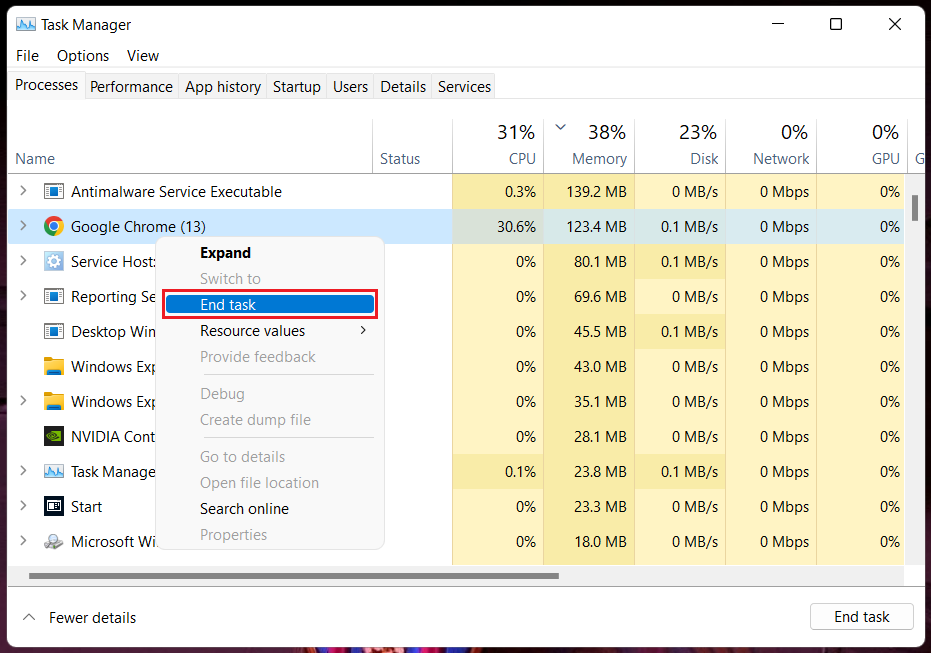
Google Chrome may not be opening or crashing frequently on your Windows 11 computer because it is already open. This may sound odd, but the app may sometime be running in the background, affecting its foreground functioning. Check if Chrome is already open and close all the active processes from Task Manager. Here’s how you can do that.
- Use the keyboard shortcut Ctrl+Shift+Esc to launch Task manager.
- Look for “Google Chrome” or “chrome.exe” under the Processes tab.
- When located, right-click on these processes and select the End task option. Repeat this for all “Google Chrome” or “chrome.exe” processes until you stop seeing any.
3. Run Compatibility Troubleshooter
Windows 11 offers built-in troubleshooters to detect any problems with system apps and peripherals. You can run the Google Chrome troubleshooter to detect and fix the issue on your computer. Below are the steps.
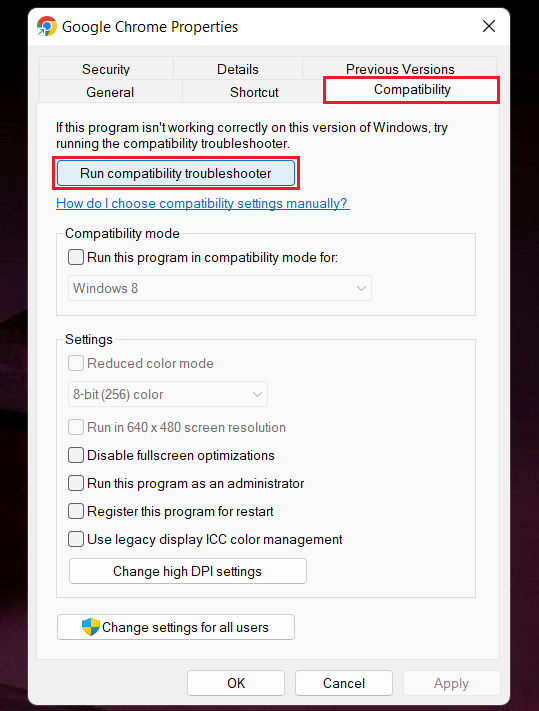
- Right-click on the Google Chrome desktop shortcut and select Properties.
- A new window will open. Go to the Compatibility tab and click on the Run compatibility troubleshooter button.
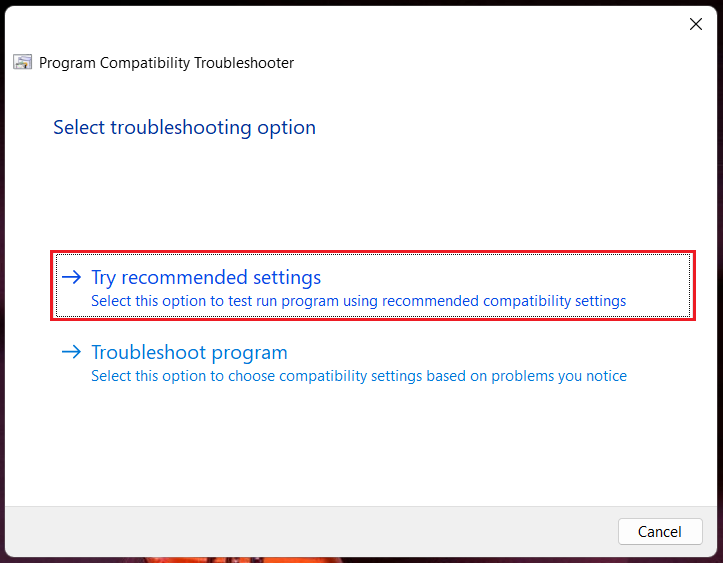
- You may be asked to select troubleshooting options. Click on Try recommended settings and follow the on-screen instructions to complete the process. Once completed, check if Chrome is working on your Windows 11 computer. If the problem exists, move on to step 4 below.
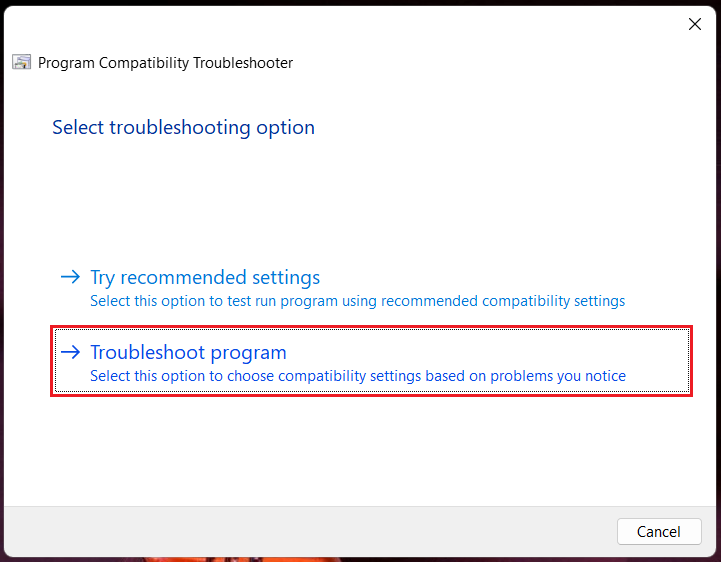
- Close the troubleshooter window and repeat step 2 (click on the Run compatibility troubleshooter button in Google Chrome Properties). Then select Troubleshoot program.
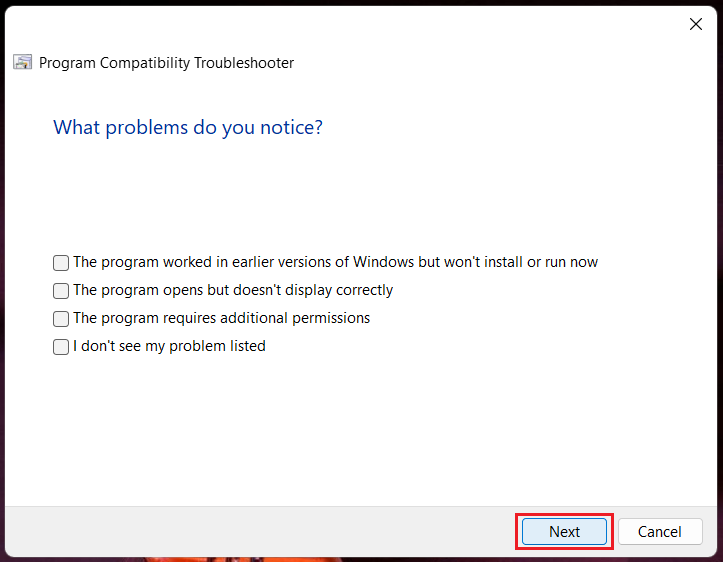
- Select your problem with Google Chrome and click on Next. If your problem is listed, you can mark that in this window. Now follow the on-screen instructions to complete the process. Once completed, check if the problem is gone. If it still exists, try the below fix.
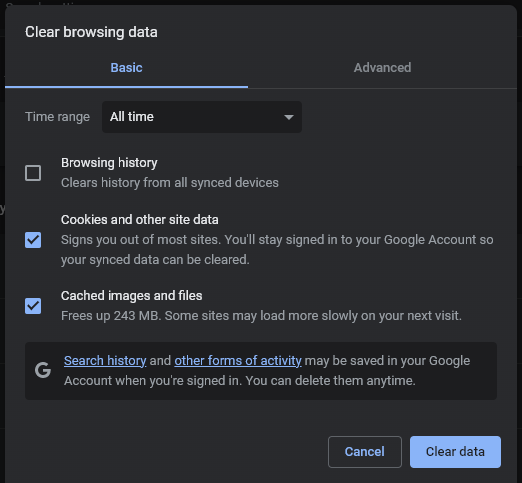
4. Clear Google Chrome Cache And Cookies
If Google Chrome is opening on your Windows 11 computer but not working properly or some functions are breaking, corrupted cache files and outdated cookies may be the culprit. Deleting these files may restore the normal functioning of the browser. It will also help free up some storage space. Check out the steps below.
- Open Google Chrome. Use the keyboard shortcut Ctrl+Shift+Delete to launch the Clear browsing data dialog box.
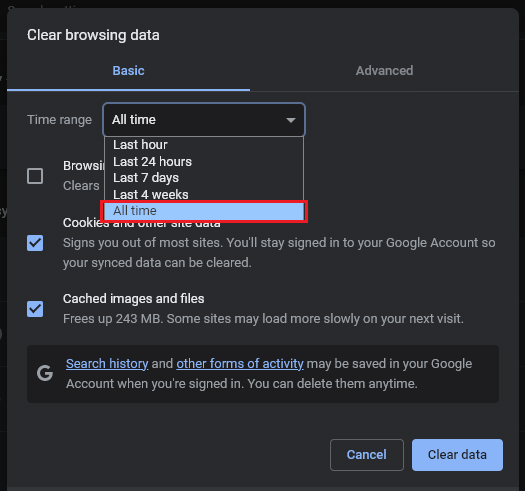
- Check if the Time range is set to All time. If not, select the All time option from the drop-down menu.
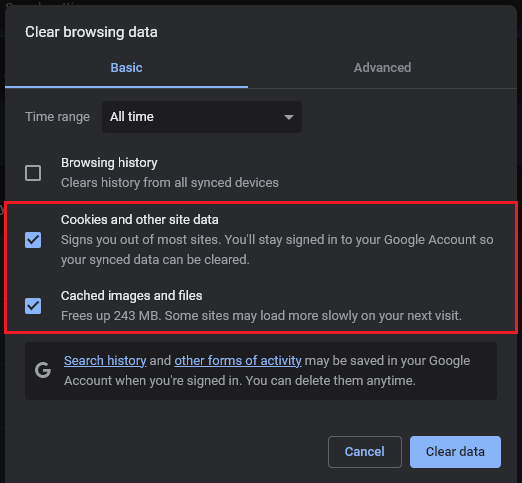
- The Cookies and other site data and Cached images and files options should be selected by default. If not, select those and unselect all other options.
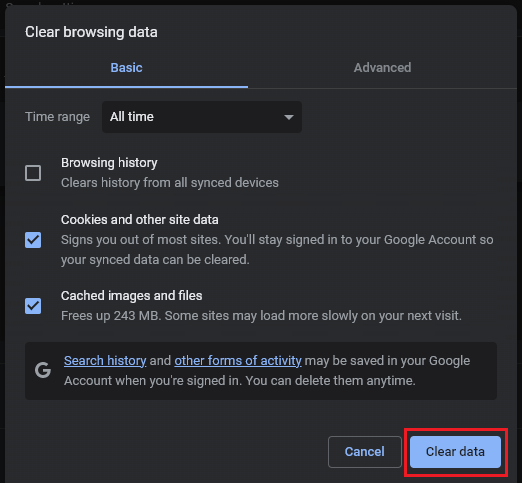
- Click on Clear data.
5. Flush DNS
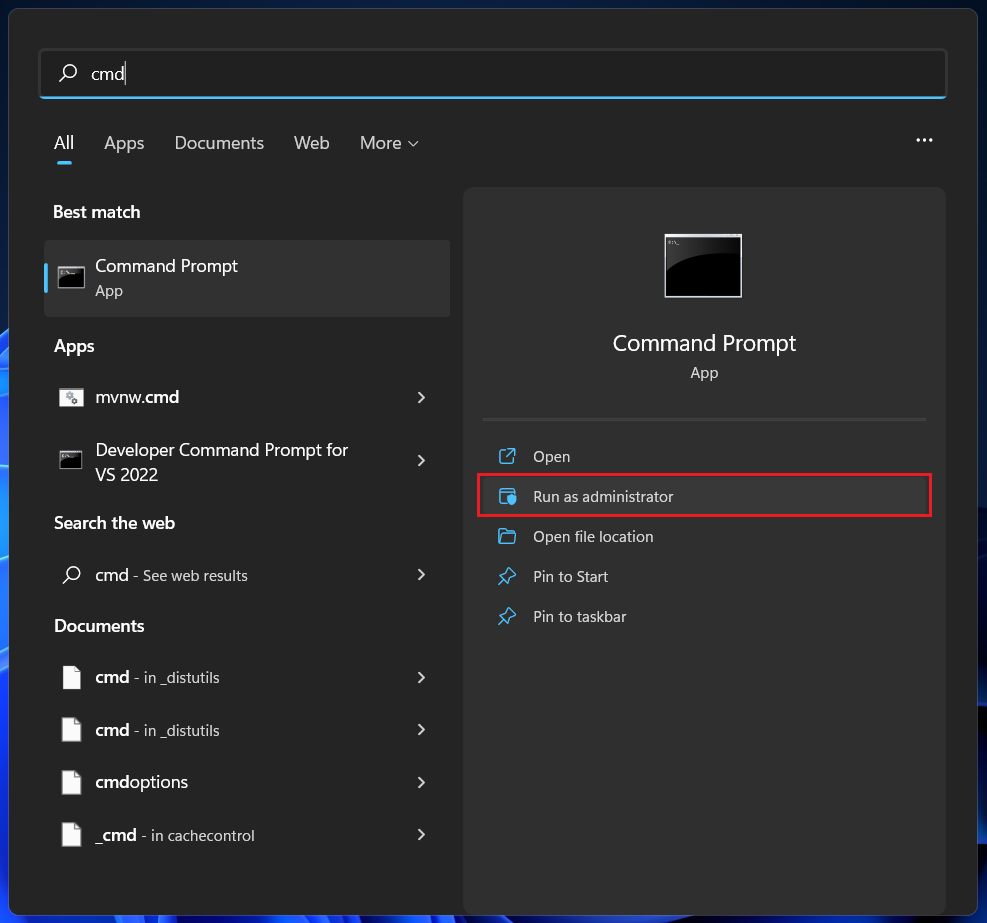
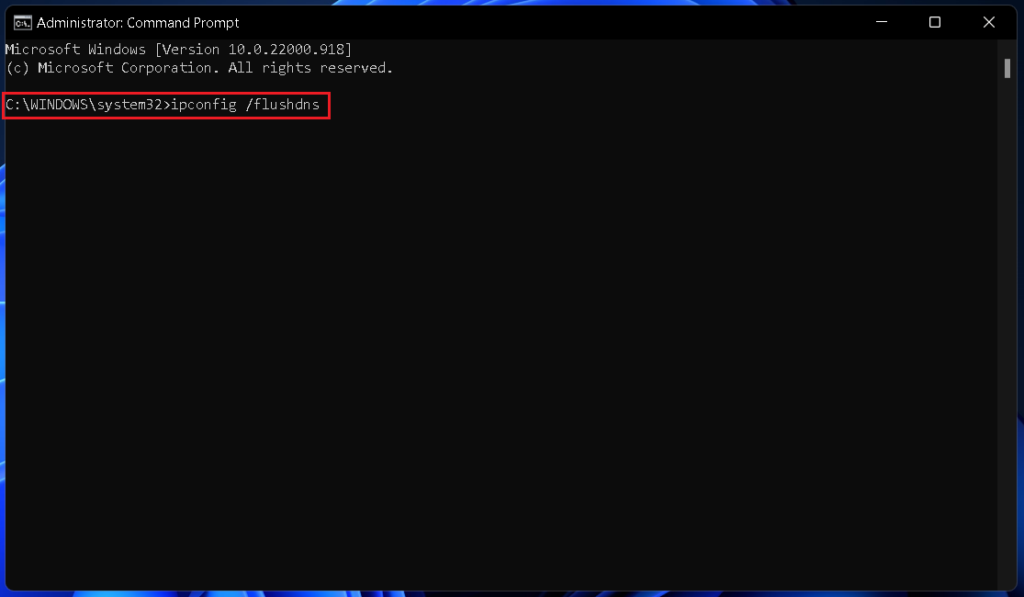
DNS, or Domain Name System, enables your computer to quickly load web pages on subsequent visits by storing caches. But corrupted cache files may cause problems with Google Chrome on your Windows 11 computer. You can resolve this problem by deleting the DNS caches. Check out the steps below. 1. Press the Windows key and type cmd or Command Prompt in the search bar. 2. Select the Run as administrator option. When prompted, select Yes. 3. Copy and paste the following command on the Command Prompt window and press the Enter key. DNS cache files have been deleted from your computer. Close the Command Prompt window and restart the computer. Once restarted, check if Google Chrome is working. If the problem still exists, try the below fix.
6. Disable Antivirus
It’s not unusual for your antivirus applications to interfere with some system apps, including Google Chrome. It may block some functions or in the worst case, prevent Chrome from opening on your Windows 11 computer. Disable the antivirus and check if that fixes the Chrome issue. If it does, whitelist Chrome in your antivirus settings and enable the antivirus again. But if the problem doesn’t go away, move on to the next potential solution.
7. Disable Extensions
Like antivirus apps, extensions have also been found to cause problems with Chrome. Disabling extensions may help get rid of your problem too. If you have multiple extensions installed, disable all of them and enabled them one by one to determine the culprit. Check out the steps below.
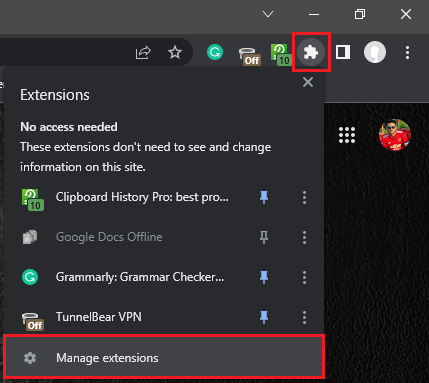
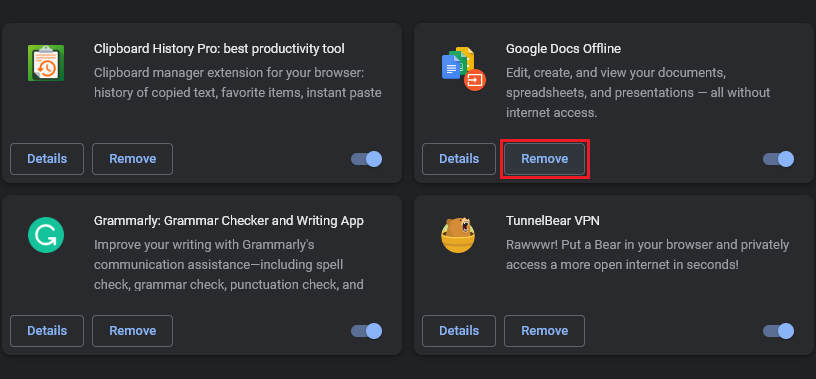
- Open Google Chrome. Click on the Extensions button towards the right end of the top toolbar. Select Manage extensions from the menu.
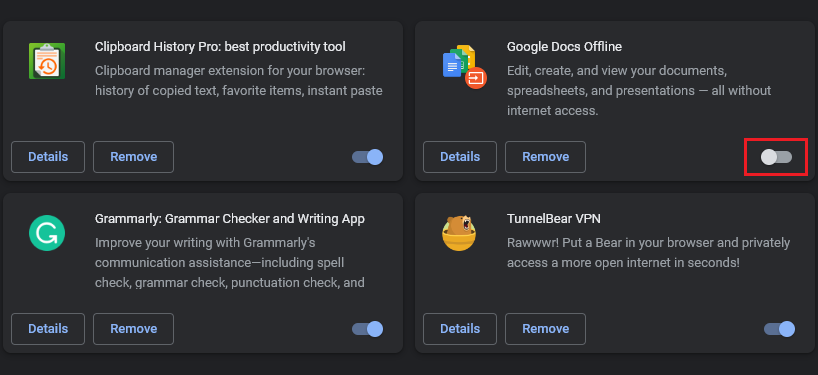
- You’ll find a grid of all installed extensions. Manually disable all of them using the toggle switch. The toggle will glow blue when the extension is enabled and turn monochrome when disabled. See the screenshot below for reference. Google Docs Offline is disabled while the rest are enabled.
- Once you have disabled all extensions, close Google Chrome and open it again. Now check if the problem is gone. If it exists, none of the installed extensions is your culprit. You can proceed to enable them all again. But if the problem has been resolved, enable one extension at a time, restart Google Chrome, and check if it resurfaces. Repeat this for all extensions until the problem is recreated. This confirms that the last extension you enabled is causing the problem. Remove the problematic extension and you should be good to go.
8. Update Google Chrome
An outdated version of Google Chrome can cause problems and may not work properly. You should regularly update the browser to ensure that you aren’t missing out on the latest features. Updates also help keep your online activities secure. Here’s how you can update Google Chrome on your Windows 11 computer.
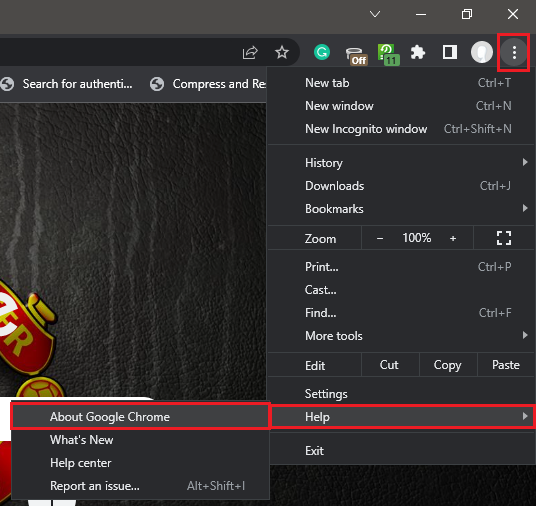
- Open Google Chrome. Click on the vertical three-dot button on the extreme right end of the top toolbar. On the menu that appears, click on Help and then on About Google Chrome.
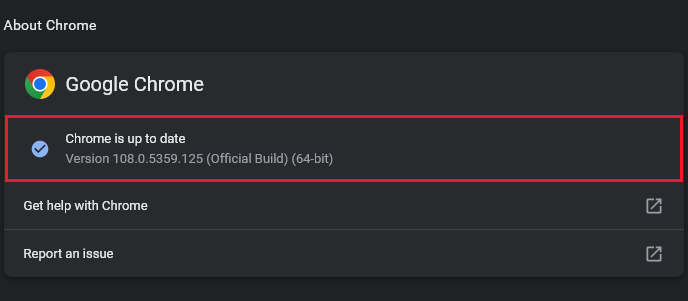
- A new window will open. Here you can see if an update is available. If you already have the latest version installed and Google Chrome is still not working properly on your Windows 11 computer, something else is causing the problem. You can continue below.
9. Delete Your Google Chrome User Profile
Google Chrome may be refusing to open on your GoogWindows 11 computer because of a corrupted user profile. You can try deleting your Chrome user profile following these steps.
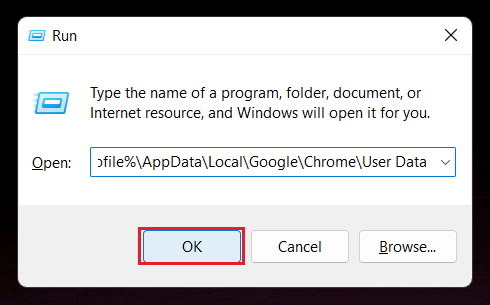
- Use the keyboard shortcut Windows key+R to launch the Run dialog box.
- Copy and paste the following command on the Run dialog box and press Enter or click on OK.
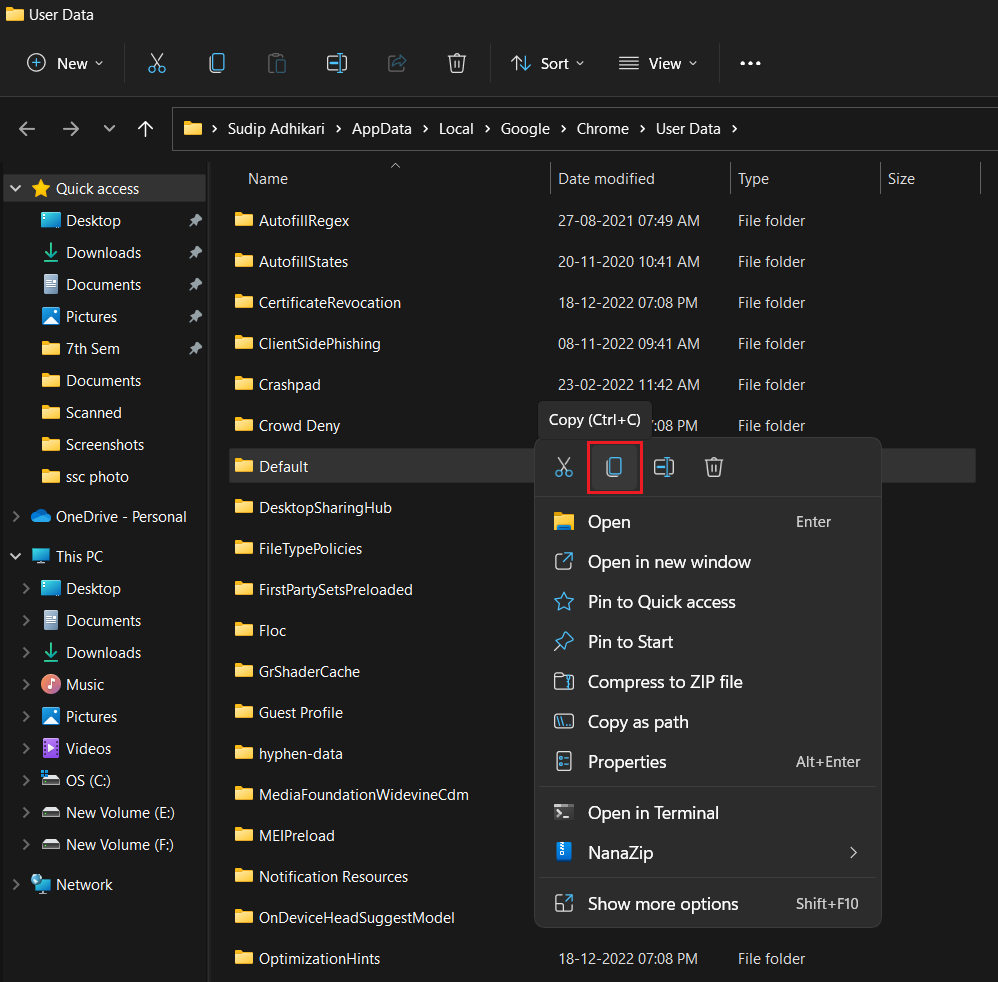
- A new window will open. Locate the Default folder in this window and copy it. You can use the keyboard shortcut Ctrl+C to copy or right-click on the folder and select the Copy button from the context menu.
- Minimize the window and paste the Default folder on the desktop. This is for backup purposes. You can use the keyboard shortcut Ctrl+V to paste or right-click on the folder and select the Paste button from the context menu.
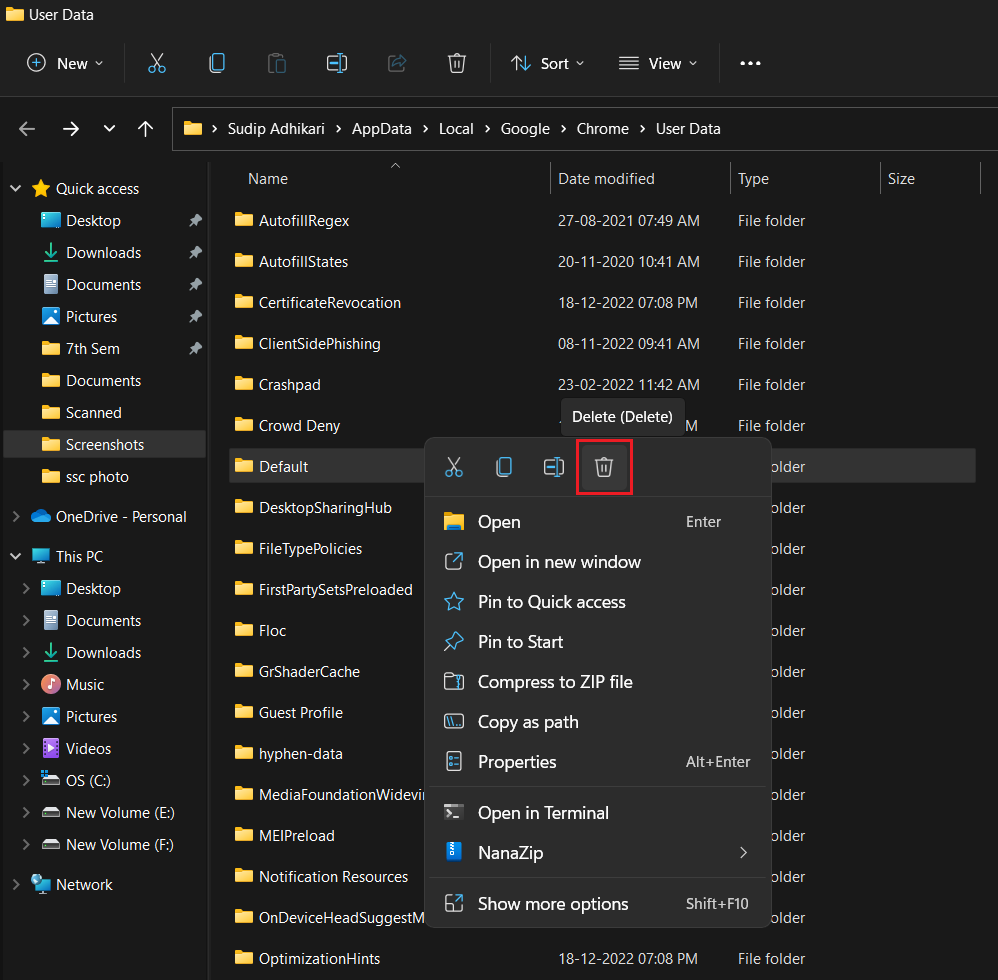
- Go back to the previous window and delete the Default folder. You can click on the Delete button on the top ribbon to delete. You can also right-click on the folder and select the Delete button from the context menu. If prompted, click on Yes.
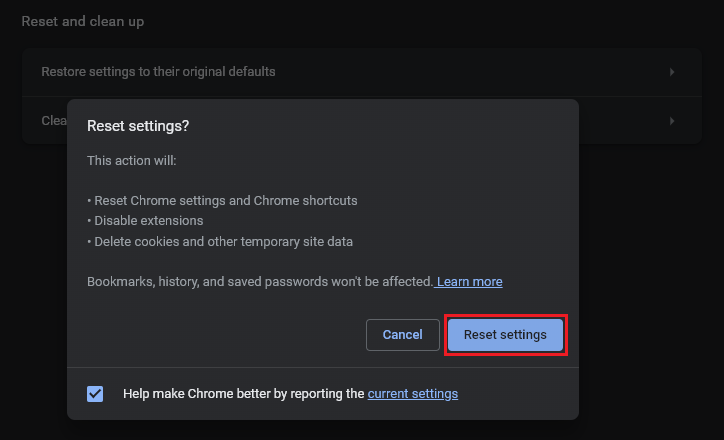
- Now open Google Chrome and see if the problem is gone. If it has, type chrome://settings/reset in the URL bar and press Enter.
- Click on Restore settings to their original defaults and then on Reset settings. But if the problem still exists, move the Default folder you copied to the desktop in step 4 back to its original location and continue to the below fixes.
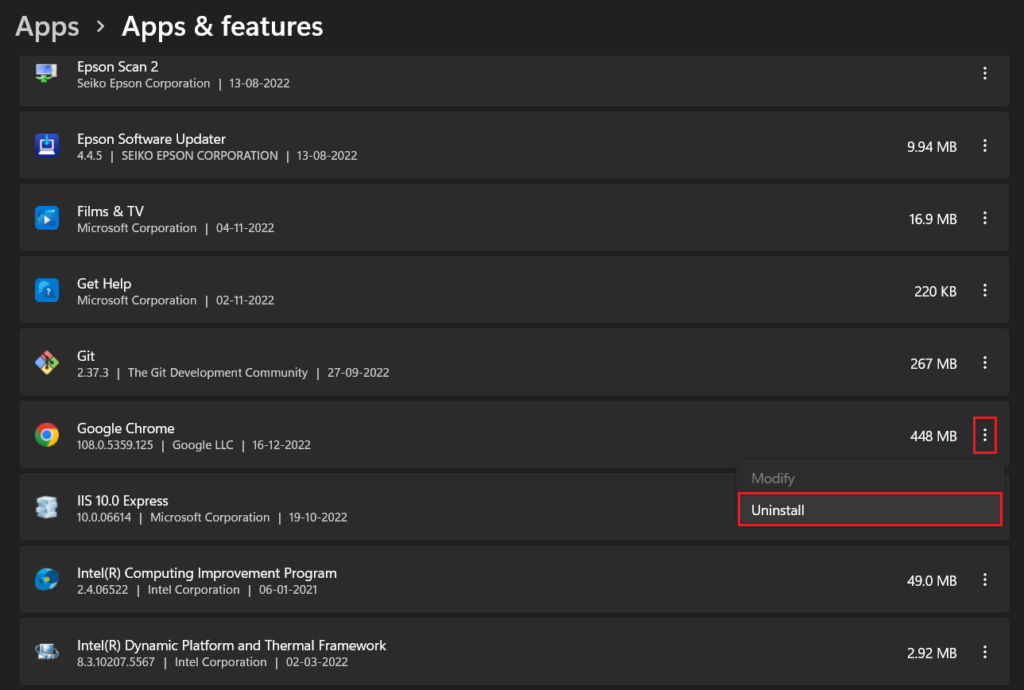
10. Uninstall And Reinstall Google Chrome
If none of the above fixes help you get rid of the Google Chrome problem on your Windows 11 computer, you might need a fresh install of the app. Follow the steps below to uninstall and reinstall Google Chrome.
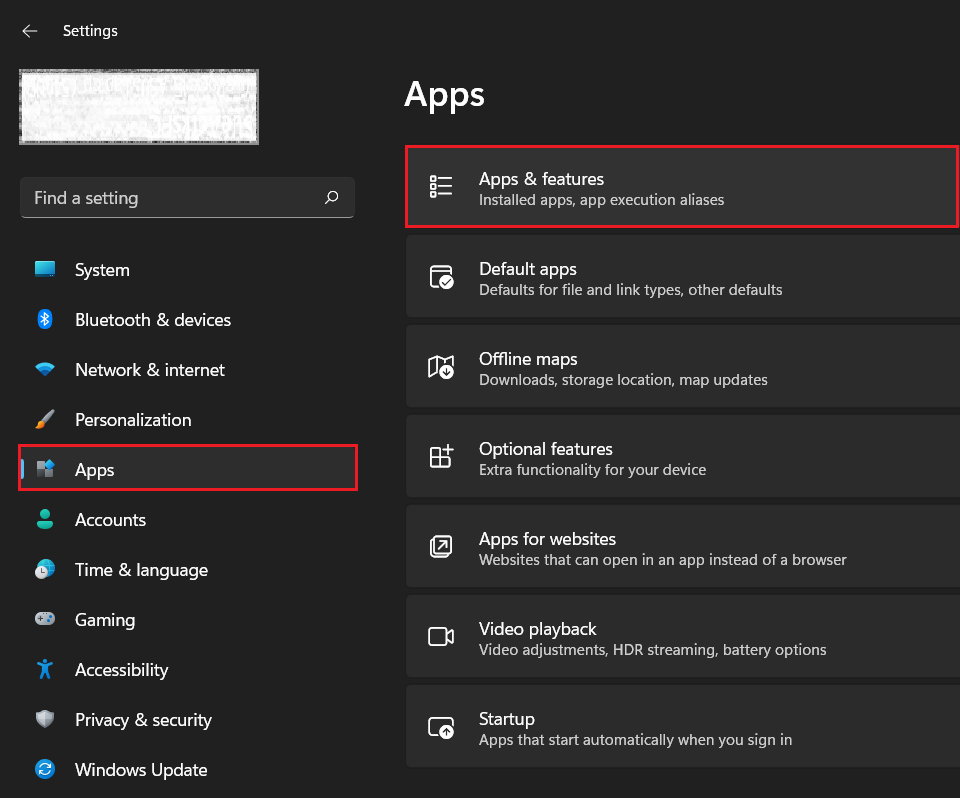
- Use the keyboard shortcut Windows key+I to open Settings.
- Go to the Apps section and click on Apps & features.
- You’ll see a list of installed apps on your computer. Locate Google Chrome and click on the vertical three-dot button next to it.
- Select the Uninstall option and confirm your choice to remove the app.
- Follow this link to download the latest version of Google Chrome for your Windows 11 computer.
Does Windows 11 support Google Chrome?
Yes, Windows 11 supports Google Chrome. You can use it as the default browser on your computer. If you’re facing any problems with Chrome, you can try these fixes.
How do I fix Google Chrome not opening?
If Google Chrome is not opening on your Windows 11 computer, these fixes will help you solve the problem. Depending on the root cause of your problem, you may have to try one or more fixes before the problem goes away.
Final Words
Google Chrome not opening or working properly could make for a pretty annoying experience if it is the default web browser on your Windows 11 computer. While you can always switch to another browser, we understand that everyone has their preferences. We hope one of these fixes worked for you and Google Chrome is working normally again. If you have any queries, you can tell us in the comments box below.
Δ
![]()