However, according to recent reports, many users around the world have been unable to use this new feature. Some users report tabs won’t show up in File Explorer, while others report that tabs will simply not work as claimed by Microsoft. If you, too, have been facing a similar issue, then you can fix this issue by using the fixes listed below.
Fix File Explorer Tabs Not Working in Windows 11
You can fix tabs easily in File Explorer by either troubleshooting the File Explorer or by ensuring you’re running the correct version of Windows on your system. If you still end up facing issues, you can then try troubleshooting your Windows installation to fix any issues with your system. Use the fixes below to troubleshoot tabs until you manage to fix the issue on your Windows 11 PC.
1. Ensure You’re Using Windows 11 22H2 With The Cumilative Update
First, let’s ensure you’re running Windows 11 22H2 on your system. Use the steps below to check the current Windows version installed on your PC.
- Open Run by pressing Windows + R on your keyboard.
- Now type in winver and press Enter on your keyboard.
- You can now check the Windows version as well as the build number at the top. If you’re not running Windows 11 22H2, then you will need to update Windows on your system to get File Explorer tabs. Use the steps below to update your operating system and install Windows 11 22H2 on your system.
- Launch the Windows settings app using the Windows + I keyboard shortcut.
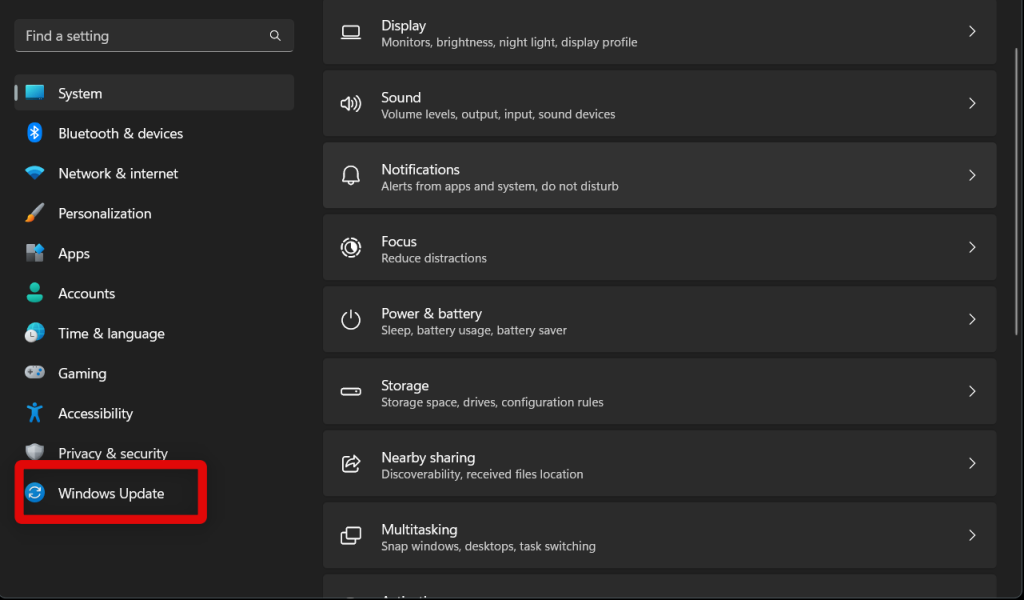
- Now click Windows Update in the left sidebar.
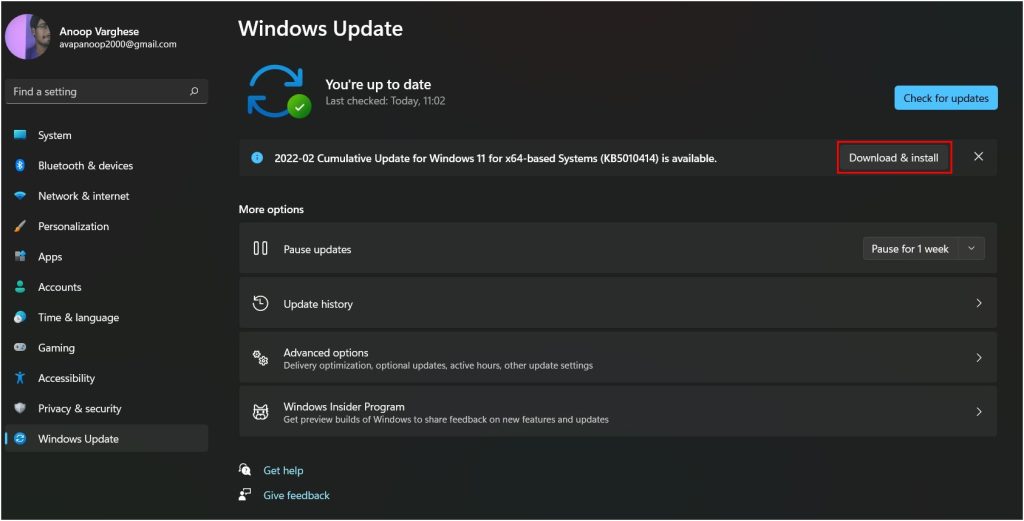
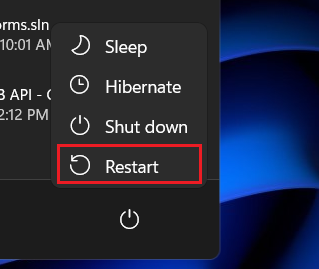
- Click Check for updates. Windows will now check and install pending updates on your PC. Windows 11 22H2 will show up and get installed during this process. Your PC will then restart, upon which tabs should be enabled and working in your File Explorer.
2. Install Update package KB5019509
There were a few misconceptions when Windows 11 22H2 was first released. While tabs were announced as a new feature with this release, they were to be released to users worldwide with a future cumulative update to Windows 11 22H2. This update package had the build number KB5019509. It has been some time since both these updates were released, and ideally, this cumulative update should have been installed on your PC when you updated your Windows installation in the fix above. However, if tabs are still missing from your PC, then you can try installing the update package KB5019509 manually on your PC to enable and use tabs in the File Explorer.
- Visit this link to view the download options for update package KB5019509. Click Download beside the update package relevant to your CPU’s architecture.
- A new tab will now open with a valid download link. Click the link to download the package to your PC.
- Download and save the file to a preferred location on your PC. Double-click the package once the download finishes.
- Now you can simply follow the on-screen instructions to install the update on your PC. Once installed, restart your PC if you aren’t prompted. File Explorer tabs should now show up and work on your Windows 11 22H2 PC.
3. Restart File Explorer
If file explorer tabs aren’t working for you on Windows 11 22H2, then you can first try to restart File Explorer. This will restart the program, re-register background services, and help refresh the File Explorer cache. Restarting the File Explorer should help get tabs working back again on your PC in most cases. Use the steps below to restart File Explorer on your Windows 11 22H2 PC.
- Launch the Task Manager on your PC.
- Click and select Windows Explorer from the app list on your screen.
- Now click Restart task in the top right corner. Windows Explorer will now restart. Your screen will glitch, and the taskbar will vanish for a few seconds during this process. File Explorer tabs should now be available on your Windows 11 22H2 PC if you were facing a Windows Explorer bug on your PC.
4. Clear File Explorer History
You can now try clearing the File Explorer history. While unrelated, many Windows 11 22H2 users have managed to fix tabs on their PC by clearing the history. Here’s how you can clear the File Explorer history on your PC.
- Open any folder on your PC or open the Quick Access section by using the Windows + E keyboard shortcut.
- Now click the More options icon in the ribbon menu.
- Select Options.
- Click Clear beside Clear File Explorer history.
- Click OK to close File Explorer options.
- Now restart your PC to apply the changes. File Explorer tabs should now be available on your Windows 11 22H2 PC if you were facing bugs with File Explorer history.
5. Run an SFC and DISM Scan
If File Explorer tabs are still not working on your Windows 11 22H2 PC, then you could be facing issues with your system files. You could be looking at corrupted system files or a broken Windows image. These issues can occur over time as you install numerous Windows updates and third-party programs. An SFC and DISM scan can help fix all these issues in a single go. Use the steps below to run an SFC and DISM scan on your PC.
- Open the Run app by pressing Windows + R.
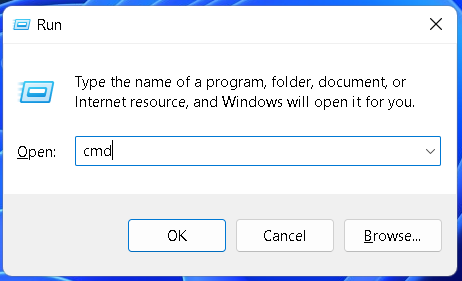
- Now type cmd in the dedicated text box. Press Ctrl + Shift + Enter on your keyboard once you’re done.
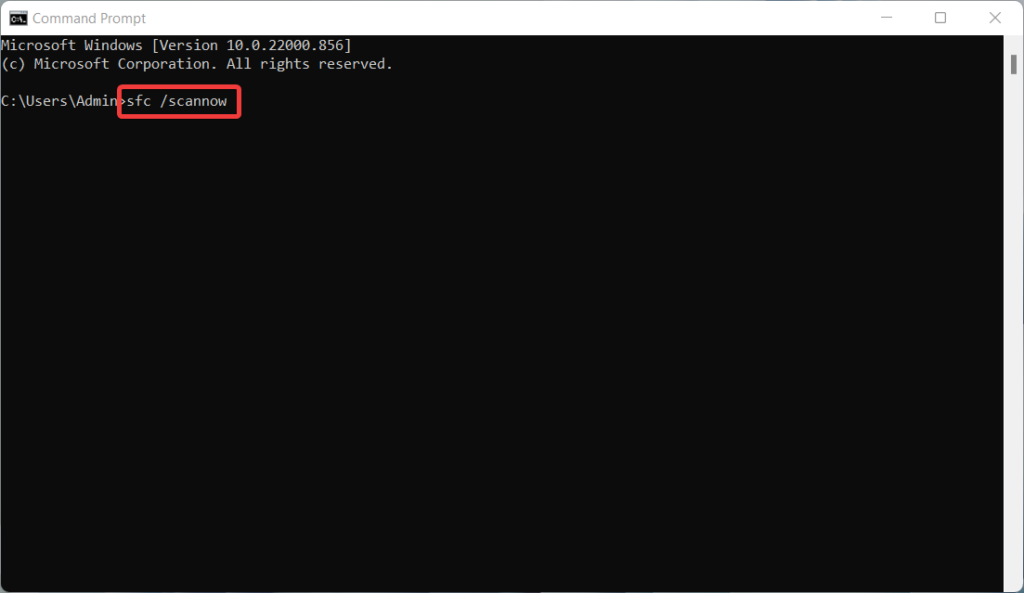
- Command Prompt will now be launched as an administrator. Use this command to run an SFC scan on your PC.
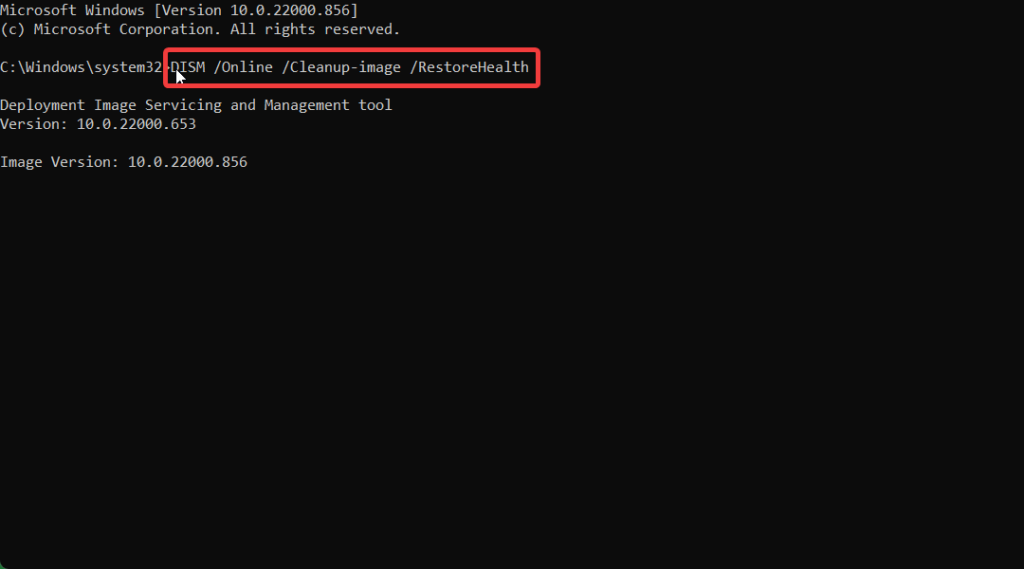
- Once done, use this command to run a DISM scan on your Windows 11 PC.
- Use the exit command to close Command Prompt once you’re done.
- Now restart your PC to ensure changes are applied. File Explorer tabs should now be restored and working if you were facing issues due to missing system files or a corrupted Windows image.
6. Run The System Maintenance Troubleshooter
You can now try running the System Maintenance Troubleshooter to automatically detect and fix issues with your PC. Use the steps below to help you with the process.
- Open the Run app as we did before using the Windows + R keyboard shortcut.
- Now use this command to launch the System Maintenance Troubleshooter on your PC. – %systemroot%system32msdt.exe -id MaintenanceDiagnostic
- Click Advanced.
- Now click Run as administrator. This will relaunch the troubleshooter on your PC.
- Click Next and follow the on-screen instructions to run the troubleshooter. Apply any fixes suggested by the troubleshooter to fix issues with your system.
- Click Close once the process completes.
- Restart your PC to apply the changes made by the troubleshooter. File Explorer tabs should now be restored if you were facing issues with system files, settings, and configs on your Windows 11 PC.
7. Enable File Explorer Tabs Manually Using ViveTool
You can now choose to enable tabs manually using the ViveTool as a last resort. ViveTool is an open-source tool hosted on GitHub that allows you to enable experimental features in Windows 11 22H2 and Windows 11. We can use this to our advantage to manually enable File Explorer tabs on your PC.
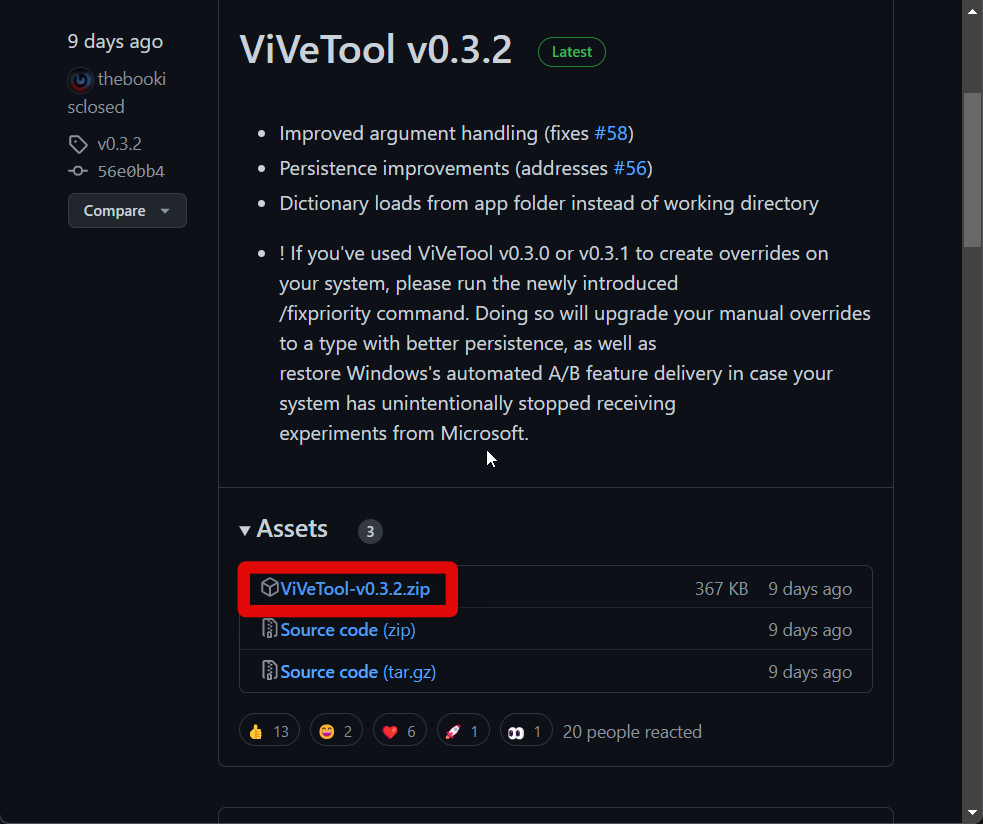
- Visit this link and download the latest release of ViveTool using the link under Releases.
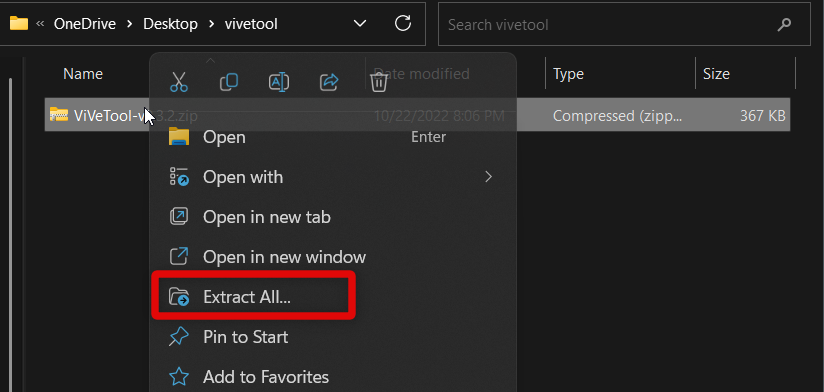
- Now right-click the downloaded archive and select Extract all.
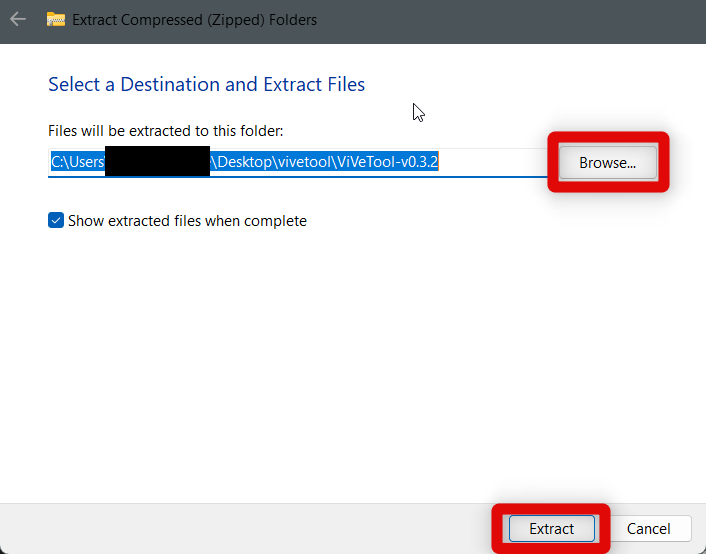
- Click Browse and choose the location where you wish to extract ViveTool. Click Extract once you’ve made your choice.
- Now visit the extracted contents of the folder and click on the address bar. Now press Ctrl + C to copy the path to your clipboard.
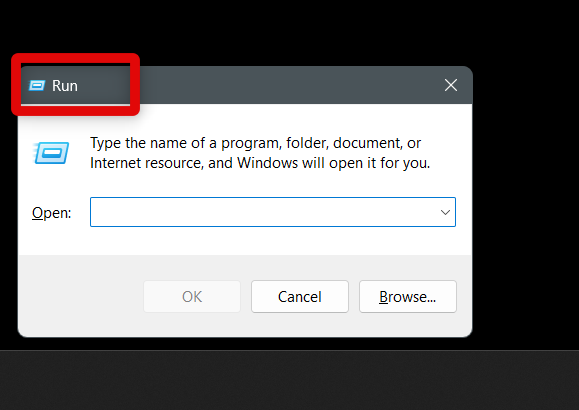
- Press Windows + R on your keyboard. This will launch the Run app on your Windows 11 PC.
- Now type cmd and press Ctrl + Shift + Enter on your keyboard. This will launch Command Prompt as an administrator on your PC.
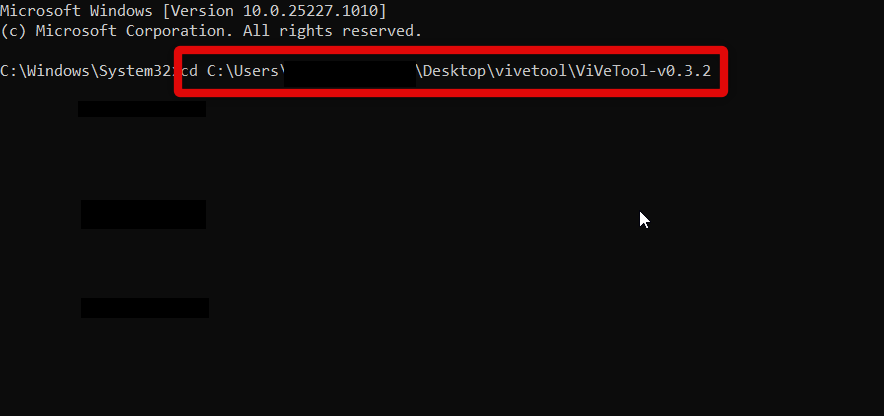
- Type cd in Command Prompt and paste the path we had copied to your clipboard. Hit Enter on your keyboard to execute the command.
- Command Prompt will now open in the ViveTool folder. You can now use these commands to enable tabs in File Explorer. Copy and paste each path one by one and then press Enter on your keyboard to enable tabs.
vivetool /enable /id:37634385 vivetool /enable /id:39145991
- Now type exit to close Command Prompt on your PC.
- Finally, restart your PC to apply the changes. You will now have manually enabled File Explorer tabs on your PC.
8. Use A Third-party Alternative
As a last resort, you can now try using a third-party alternative instead of the native Windows File Explorer to use tabs. We recommend checking out the Files app, which is easily available through the Microsoft Store. The Files app is quite comprehensive and sports numerous features, including tabs, tags for files, a more streamlined column layout, cloud services support, file previews, and more. You can download and use the Files app on your PC using the link below.
Why won’t tabs work in File Explorer?
Tabs can fail to work due to bugs and issues with the File Explorer. Issues with tabs can also occur from corrupted system files and general Windows bugs that prevent services and background tasks from working as intended.
Is it safe to use ViveTool?
Yes, ViveTooll is freely hosted and open source on GitHub. You can always check out its official page at this link to assess and discern its safety at your discretion.
Final Words
Tabs are a great new way to multitask in Windows 11 22H2. You can open multiple folders in the same window, drag and drop files between tabs, use keyboard shortcuts to navigate between tabs, and much more. Tabs not showing or being broken can be disappointing and hinder your workflow, especially if you have been looking forward to this feature since it was first teased in the insider builds. We hope the post above helped you easily fix and restore tabs in File Explorer on your Windows 11 PC.
Δ


![]()
