Apple has also released iOS 16, which is the latest iteration of iOS that brings along numerous new features and changes. However, as iOS 16 is in its early stages of release, there are bound to be a few bugs. And according to recent reports, many users are unable to use eSIMs on their mobile devices. If you, too, have been facing this issue, then the fixes and checks listed below will help you fix the same on your device. Let’s diagnose and fix your eSIM on iOS 16.
If You Recently Activated Your eSIM
We recommend you start by performing a few checks, especially if you recently installed your eSIM on iOS 16. If your device passes these checks, you can try the subsequent fixes listed below to try and fix your issue. Follow the relevant section to help you along with the process. If you’ve recently activated your eSIM, we recommend you try the following on your device. eSIM is a fairly new technology, and depending on your region, you might require further assistance to set it up on your new device. We recommend you start with the suggestions listed below to try and get your eSIM working again.
Patience: eSIMs are not supported in all regions and by all carriers as this is a new technology. Many carriers are still in the transitioning process, and depending on your carrier and region, eSIM activation can take some time. The time required to activate your eSIM can range from a few hours to a day or two. We recommend you wait a while and contact your carrier for an ETA. The activation process is likely ongoing, and your eSIM will be activated after some time.
Restart device: New SIMs whether eSIM or physical SIM usually require a device restart once they have been activated. We recommend you restart your device once you receive a successful activation message from your carrier. This will allow the eSIM to register itself on the respective cellular network, which should get everything working again.
Contact your carrier: If waiting and restarting did not help with your new eSIM then we recommend you contact your carrier. As your eSIM is fairly new, you could be facing issues from your network provider. It could also be that eSIM setup requires additional steps from your carrier in your region. Contacting your carrier will help you learn more about eSIM activation in your region and troubleshoot your connection accordingly.
Fix eSIM Not Working on iPhone
We now recommend you try the following fixes to get eSIM working on your iPhone running iOS 16. You can start with the first fix mentioned below and make your way through the list until you manage to fix your issue.
1. Toggle eSIM Off and On
Let’s start by toggling your eSIM off and on. This will help re-register the eSIM on your cellular network, which might get it working again on your device. Follow the steps below to toggle your eSIM.
- Open the Settings app and tap Cellular.
- Scroll down to find your eSIM and turn off the toggle for Turn On This Line.
- Wait around 5 minutes, and then turn the toggle back on. You will now have toggled your eSIM on and off. If cellular network registration issues were preventing you from using your eSIM, then the issue should now have been fixed on your device.
2. Toggle Airplane Mode On and Off
Airplane mode turns off all connectivity options on your device. This can help fix background issues with your cellular network and Wi-Fi network that might be causing issues with your eSIM, especially if you’re using your eSIM along with a physical SIM.
- Swipe down from the top right corner of your screen to access the Control Center. Now tap and turn on the toggle for Airplane Mode.
- Wait around a few minutes, and then tap the icon again to turn off Airplane Mode. If your eSIM was facing issues due to conflicting background connectivity services, then the issue will now have been fixed on your device.
3. Install Pending Carrier Updates
Carriers change their configurations on a regular basis to help support changes in the network. These changes can include bug fixes, configuration updates, an updated list of towers, and more. While iOS is designed to download and install the latest carrier updates automatically, it can sometimes face issues in certain regions. In such cases, you can manually download carrier updates by visiting the About page on your device. Follow the steps below to help you along the way.
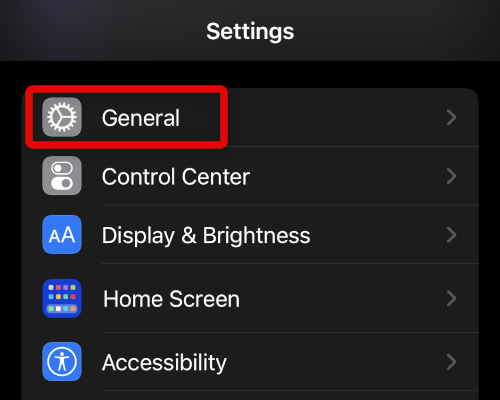
- Open the Settings app and tap General.
- Now tap About. Leave your device plugged into the wall and idle on the About page for a few minutes. This will trigger iOS to check for pending carrier updates from your network provider. If any are available, iOS 16 will download and install them automatically. We recommend you restart your device after a few minutes have passed just to be safe. You can restart your iOS 16 device by pressing the Volume Up button followed by the Volume Down button. Then quickly press and hold the Sleep/Wake button until you see the Apple Logo. This will hard restart your device, which should help fix any issues with your eSIM once carrier configs have been updated.
4. Check For Pending iOS Updates
It could be that you’re facing issues with your installation of iOS 16 or the current update. iOS 16 is the first iteration of its kind, and thus a few bugs are to be expected. We recommend you check for updates available for your device. iOS updates bring along security patches and bug fixes that can get your eSIM working again. Use the steps below to help you along with the process.
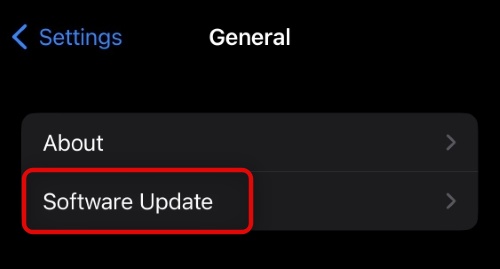
- Open the Settings app and tap General.
- Tap Software Update.
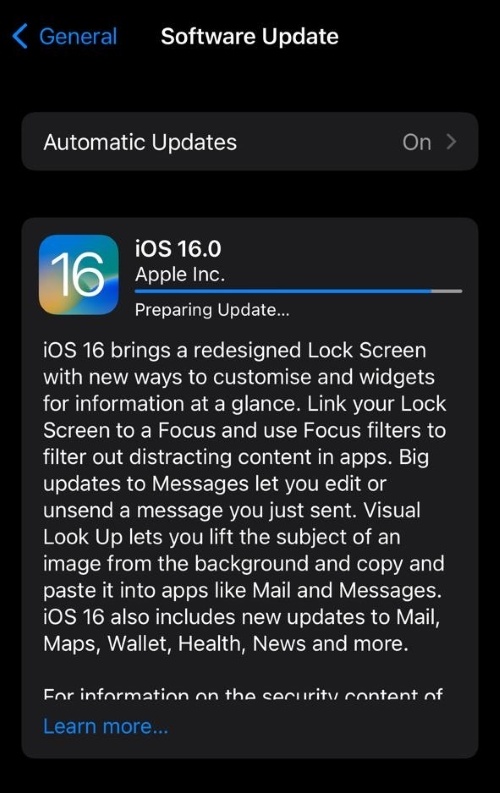
- iOS 16 will now automatically check for updates available for your device. If any are found tap Download and Install. Once your updates have been downloaded, your device will automatically restart itself and initiate the update process. Upon completion, you should have your eSIM working again.
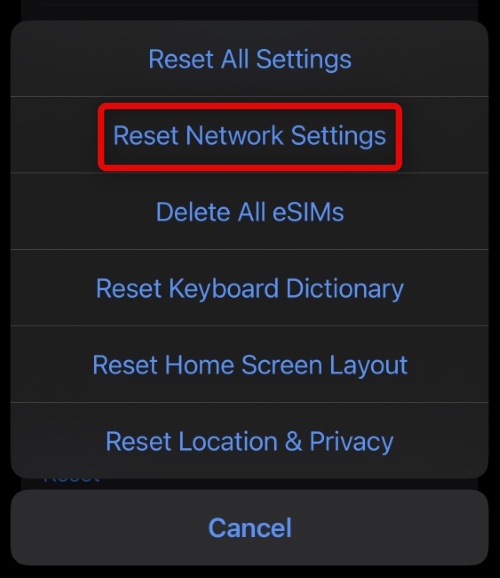
5. Reset Network Settings
You can now try to reset your Network Settings. iOS 16 allows you to selectively perform a reset on your device. We can use this to our advantage and reset all your network settings to their factory defaults. This helps fix cache and config update issues that could be preventing you from using eSIM. Follow the steps below to get you started.
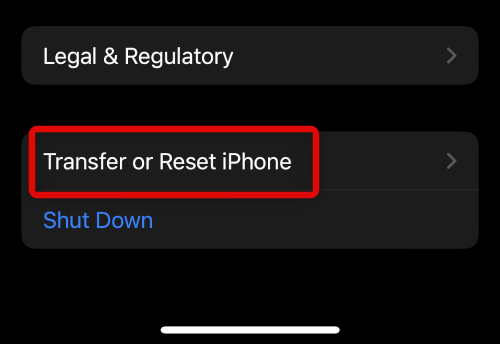
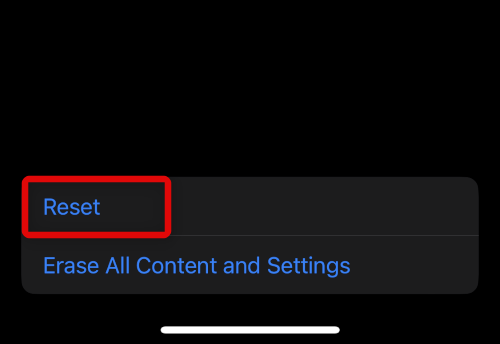
- Open the Settings app and tap General.
- Now tap Transfer or Reset iPhone.
- Tap Reset at the bottom of your screen.
- Tap Reset Network Settings.
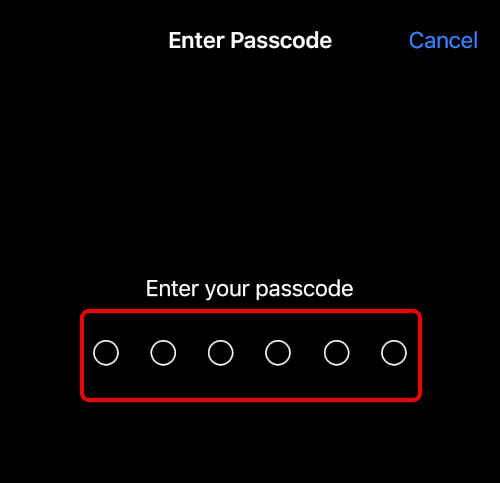
- Enter your passcode to verify your choice. Your device will now reset its network settings and restart itself. If misconfigured settings or cache issues were causing problems with your eSIM, then it should now be fixed on your iPhone.
6. Enable Roaming for your eSIM
You could be in a region which requires roaming to be enabled on your eSIM. Roaming could have additional charges depending on your carrier. We recommend you check your current mobile plan for information. You can then enable roaming for your eSIM using the steps below at your discretion.
- Open the Settings app and tap Cellular.
- Now tap Cellular Data Options.
- Tap and turn on the toggle for Data Roaming at the top. If Roaming was needed in your current region, then your eSIM should be back up and running again. We recommend you toggle Airplane mode to verify its functionality in case your eSIM does not start functioning immediately.
7. Turn Off Limit I.P. Address Tracking
Limiting I.P. Address Tracking is a new feature introduced by Apple that allows you to limit trackers by hiding your I.P. address in certain scenarios. This helps increase privacy. However, it can cause issues with carriers in certain regions. It could be that your current eSIM carrier does not support this feature. Follow the steps below to disable the same on your device.
- Open the Settings app and tap Cellular at the top.
- Tap and select Cellular Data Options.
- Tap and turn off the toggle for Limit IP Address Tracking at the bottom.
8. Deactivate Private DNS or VPN on Your Device
Some regions restrict users from using Private DNS providers or VPNs on their cellular networks. If you’re using the same, we recommend you try disabling your DNS or VPN. You could be in a region where your carrier actively blocks such services. If you’re unaware of any VPN or DNS provider on your device, we recommend you check the VPN section in your Settings app and delete any VPN configurations you find. Follow the steps below to help you along with the process.
- Open the Settings app and tap VPN.
- Now tap i beside any VPN/DNS configuration installed on your device.
- Tap Delete VPN at the bottom.
- Tap Delete to confirm your choice. Repeat the steps above to delete all VPN configurations installed on your device. Your eSIM should now work as intended if your current carrier does not support custom DNS or VPNs.
9. Manually Select A Network
We now recommend you try to manually select a network for your eSIM. You could be in a region with low reception or could be facing issues with your current eSIM installation. Manually selecting a network should help you get everything working again. Use the steps below to guide you through the process.
- Open the Settings app and tap on Cellular.
- Now tap and select Network Selection.
- Tap and turn off the toggle for Automatic at the top of your screen.
- Your eSIM will now search and display available networks in your current region. Tap and select your carrier from the list on your screen. Your eSIM will now manually register itself on your carrier’s network, which should help fix your issue.
10. Switch to a Physical Sim
At this point, it’s time for some serious measures, as losing out on connectivity due to eSIM issues is not ideal in any scenario. You can switch to a physical SIM from an eSIM to restore connectivity on your device. This will require you to get in touch with your network provider and migrate your eSIM back to a physical SIM accordingly. If, however, you’re an iPhone 14 user in the U.S., then this might not be an option for you. You can skip this fix and try using the ones mentioned below instead.
11. Re-install Your eSIM
We now recommend you try installing your eSIM again. In most cases, you will require another Q.R. code from your carrier to reinstall your eSIM. Some regions might require further assistance and verification to install your eSIM again. While not ideal, your earlier eSIM setup could have been botched by network or background service issues. Reinstalling can help fix and get everything working on your device again. We recommend you get in touch with your carrier or check their support site for more information.
12. Reset Your Device As New
If nothing seems to be working for you, then you can try resetting your iPhone as a last resort. This process will delete all data stored on your device but give you the option to retain or delete your eSIM. If you’re comfortable, we recommend deleting your eSIM during this process and setting up your device as new once it has been reset. However, you can also choose to retain your current eSIM config and reset the device itself. We recommend you back up your device before proceeding with the steps below, as all data from your iPhone will be deleted during this process.
- Open the Settings app and tap General.
- Now tap Transfer or Reset iPhone at the bottom of your screen.
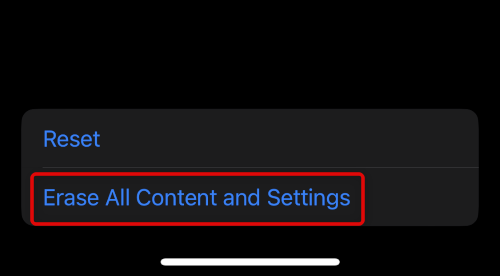
- Tap and select Erase All Content and Settings.
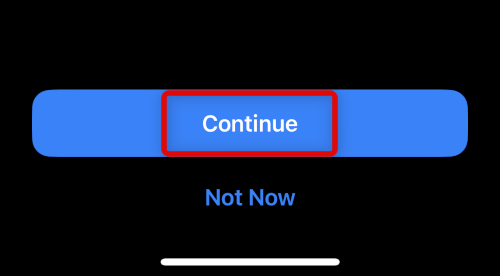
- Now tap Continue.
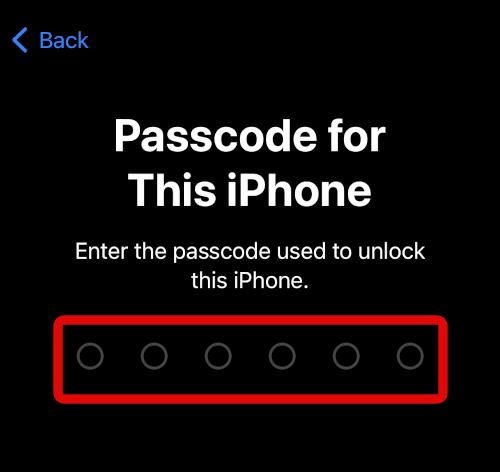
- Enter your passcode to verify your identity.
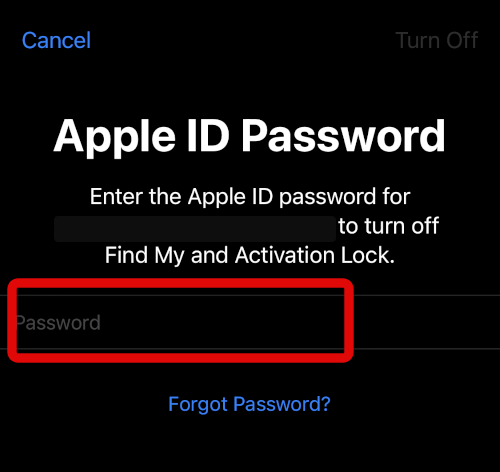
- Now type in your Apple ID password to turn off Find My on your iPhone.
- Choose whether you wish to retain yoru eSIM or not and tap Erase. Your device will now reset itself and restart a couple of times. This is completely normal, and we recommend you do not interrupt this process until you see the welcome screen. Once you set up your device as new, you should be able to use your eSIM if you were facing issues due to a botched installation of iOS 16.
13. Contact Apple Support
We now recommend you contact Apple Support to further diagnose and fix your issue. You could be facing an issue specific to your device that could be hardware or software related. An Apple Support technician will help you diagnose and fix the same on your device. Use the guide below to help you contact Apple Support.
Apple Support Link
What causes issues with eSIM?
eSIM issues can be caused by a number of variables, including hardware issues, software issues, network issues, and configuration issues. In most cases, however, these issues usually stem from your carrier and not your device.
How to verify eSIM functionality?
You can verify your eSIM functionality like any other SIM card by making calls, trying to access the internet, and by trying to send a text. You can also try calling your carrier’s support team, as these calls are usually allowed on unactivated eSIMs.
Is Roaming free for eSIM?
No, Roaming is a carrier-specific service and will be chargeable depending on your current mobile plan.
Final Words
Losing connectivity is never an ideal scenario. We hope the post above helped you easily troubleshoot and fix issues with eSIM on your iPhone running iOS 16.
Δ


![]()