What does Zsh: permission denied on Mac mean?
When a Terminal prompt displays a message like Permission denied, it means something went wrong when you issued a command. There could be an issue with the file you’re trying to access or other factors. There are a few ways in which the “permission denied” error can occur. One way is when you try to open the file via the terminal; another is when you drag the file onto the terminal window, and the error pops up. However, this can happen with any file or program.
Why are you getting the permission denied error in Terminal?
Zsh permission denied errors on Mac can be caused by many factors. Here are some of the most common ones.
Your file is locked
One of the reasons you’re getting this error is the file or program you’re trying to run is locked by the owner using chmod. The file settings cannot be modified or changed by you since you don’t have administrator rights. The permission denied error is an indication that there is something wrong with your permission settings, and this can occur because you have insufficient privileges or because some of your files are locked by the owner.
The chmod X command or the system command is incorrect
This error often happens when the user tries to use an irrelevant system command. If you’re having trouble running a program, make sure that it is using the command of the program you’re trying to run. A wrong command entered may also lead to a permission denied error.
There are insufficient permissions for the file
If you’re trying to open or modify a file, you can check your permissions by using the terminal with the command ls -l file.ext. If you need administrator permission, you can use sudo to force that command.
How to solve the “Zsh: permission denied” error?
Before you try your hands on the below-mentioned fixes to solve the error, try opening the file in normal mode using Finder. Still, if the issue persists, consider looking into one of the following solutions. Before using a fix, you should back up your data first. Take a copy of any files that are relevant. It might not always go as planned, but you can always rely on backups to get you through. There are times when fixes don’t work, so it’s best to prepare beforehand.
Check Disk Permissions
There is a possibility of receiving the permission denied error if you don’t have permission to modify the file. In that case, it’s best to check the disk permissions first. To do so,
- Open the Terminal app using Command + Space or Launchpad.
- Now, paste the code for the command ls -l in the shell.
- Then, put a space after the command and do not hit Enter.
- Next, select the file you want to open in the Terminal using Finder.
- Drag it into Terminal and press Enter. In the result string, if you see “rwxr” before your username, that means you have access to read, write, and execute the file. The file is read-only if there is only one sign, like “r”. There is another way to check the disk permission for a particular file.
- Launch Finder and select the file you want to modify
- Now, press command + I to get the file info.
- Scroll down on the window and click “Sharing & Permissions.” If it shows “Read & Write”, the error may be occurring due to some other reason. If it shows “Read” only, you may not have permission to write the file.
Change the ownership of the directory
It is possible to change the ownership of the directory using a chown command. To do this, Use this command in Terminal “chown -R $USER:$USER /path/to/directory” and hit enter. Just make sure to replace $USER with your current Mac username and /path/to/directory with the location you want to write it to.
Grant Access to the Disk to Terminal if it has No Full Access
If there’s an issue with Terminal, zsh permission denied error may occur. Usually, it occurs when Terminal doesn’t have complete access to the disk. Here’s how you can give full access.
- Click the Apple logo in the top left corner and open System Settings.
- In System Settings, go to Privacy & Security.
- Click Full Disk Access in the right pane.
- Click on the Terminal to give it complete access.
- If Terminal is not in the list on your Mac you will need to add it manually. To do this, click the “+“ button, and type Terminal in the search bar to add it.
- After adding it, quit the Terminal window and reopen it to activate the changes.
Use a Sudo Command
Sudo is short for “super user do” or “substitute user do”. It is a command that instantly elevates your current user account to root status. When you use a Sudo command, you gain superuser privileges and can execute almost any command in Terminal. Below-listed are two Sudo commands you might want to use. sudo chmod 755 /dvtcolorconvert.rb sudo chmod 755 ~/Themes/ObsidianCode.xccolortheme Use these commands before the original command that you want to run. Also, the Sudo command requires a password when used for the first time.
Other Ways to Fix the Zsh Permission Denied Error in Mac
If you’re still having the same error after trying all the above solutions, you should try two more fixes.
Configure the .zshrc File
Let’s configure .zshrc. A new Zsh shell can be launched by running this script. So in order to modify the file, a new shell must be started. Open Terminal and enter this command in the shell “open ~/.zshrc”. The .zshrc file will open in the root directory of your system. However, this command doesn’t work for macOS Catalina and subsequent operating systems. So if your Mac is running on any latest operating systems, you’ll have to configure permissions using the command “chmod +x ~/.zshrc”.
Change the Theme of the Terminal App
To change the theme of the Terminal app, you need to first download and install Oh My Zsh. Oh My Zsh is an open-source and intuitive framework that simplifies the management and configuration of Z shell. The framework is ready-made with different functions, plugins, themes, and other useful things to configure Zsh on your mac.
- Here is how you can download it. Visit the ohmyz.sh website and download the script file. Once it has been downloaded, enter this command in Terminal. sh -c “$(curl -fsSL https://raw.github.com/ohmyzsh/ohmyzsh/master/tools/install.sh)”
- Once the Oh My Zsh framework is installed, choose a new theme by using the ZSH_THEME=”theme_name” command.
How to Avoid Permission Denied Error on Your Mac?
The permissions on your Mac files can be configured to avoid permission denied errors in Terminal. Here are some possible ways to do so.
Assign Permissions to Users and Groups
One way to ensure that this error does not occur is to give permissions to various groups and users.
- Launch Finder and select the file or folder you want to configure.
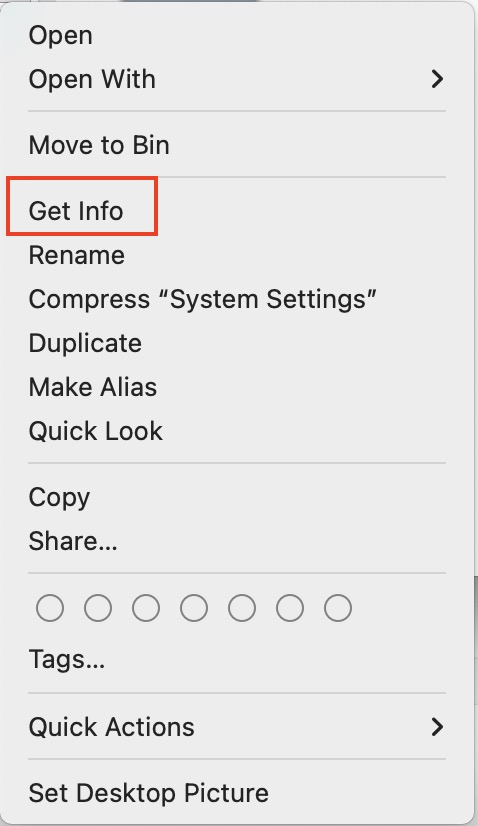
- Double-click the file and choose Get Info.
- Click on the arrow before Sharing & Permissions.
- Click the padlock at the bottom left corner of the window.
- Enter username and password if prompted.
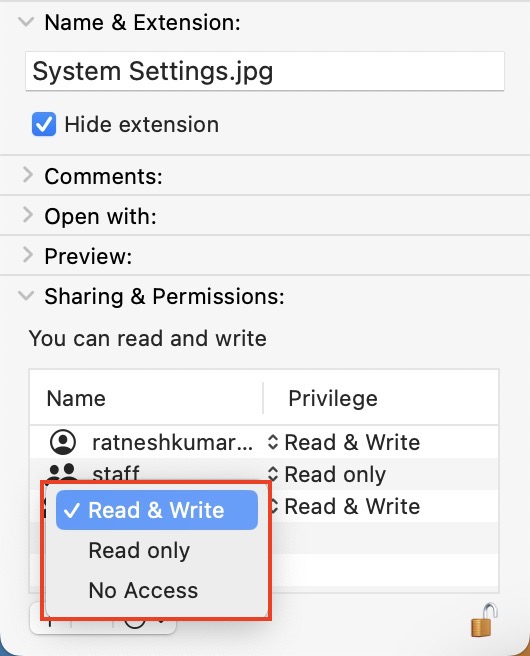
- Under the Privilege tab, change permission for different users and groups. How does each of these permissions work?
Read Only: The file can be accessed but not modified. Read & Write: allows both configuration and access to files. Write Only: user can copy items to a folder, and then move them to a DropBox without opening them.
Apply Permissions to All Items in a Folder or a Disk
Another way to avoid such an error is to give access to all the items within the specific folder or disk. To do so,
- Choose a folder or disk in Finder.
- Double-click and select Get Info.
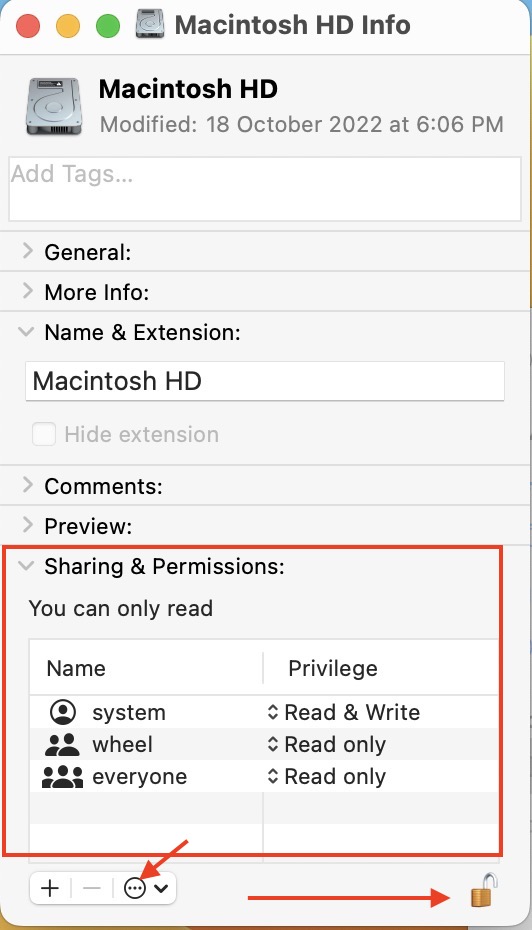
- Click on the padlock and enter your Mac password.
- Click on the three-dots action menu at the bottom and select Apply to enclosed items…
- Press OK to save the changes.
Add or Remove a User or Group in Sharing & Permissions
You can add multiple users and assign them different rights to read or write the specific file or folder.
- Double-click on a file or folder and select Get Info.
- Choose Sharing & Permissions.
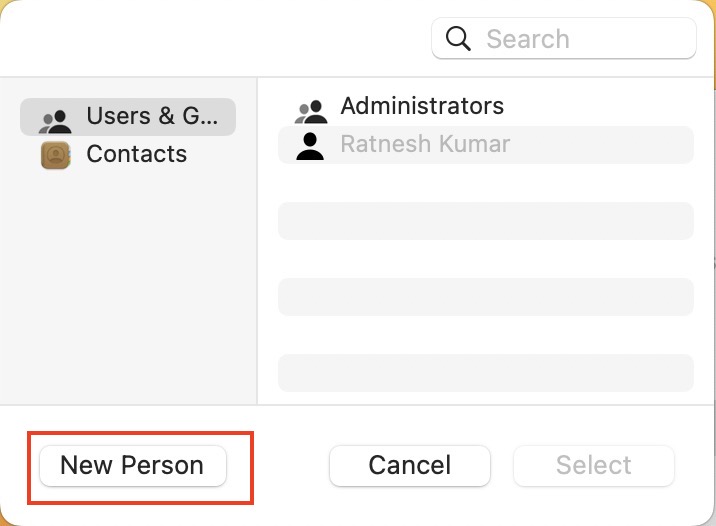
- Click on the + button in the bottom left corner.
- Add a user from Users & Groups or Contacts.
- In the same way, select the user in the Name column and click the – button to remove a user.
Final Thoughts
Using Terminal to open or modify a file and discovering an error can be confusing. It may be easier to open a file using Finder than through Terminal. The permission error means you do not have enough privileges. Therefore, before running a command, make sure you have the right to read and write the file. The steps mentioned above will help you solve the problem and prevent it from occurring again. To resolve the Zsh Permission Denied error on your Mac, you have to check your file’s permissions first. The file may not be accessible if your current user account does not have the proper permissions. In that case, using a Sudo command is the best option to grant superuser or root privileges to change or modify a file.
Δ

![]()