Change Power Mode Settings in Windows 11 (Guide)
By default, Windows 11 uses a ‘balanced’ power mode that optimizes performance with power consumption. However, you can change that to either save energy at the cost of raw performance or get the best performance with increased battery usage. Windows 10 offered at least three ways to change your device’s power mode settings, including the option to quickly switch between power modes right from the battery icon in the System Tray on the Taskbar. In Windows 11, you can only do it from the Control Panel or the Settings menu. So let’s check out how it works.
Method 1: Change Power Mode via Settings on Windows 11
The easiest way to switch power modes on Windows 11 is through the Settings app. And this is how you go about it:
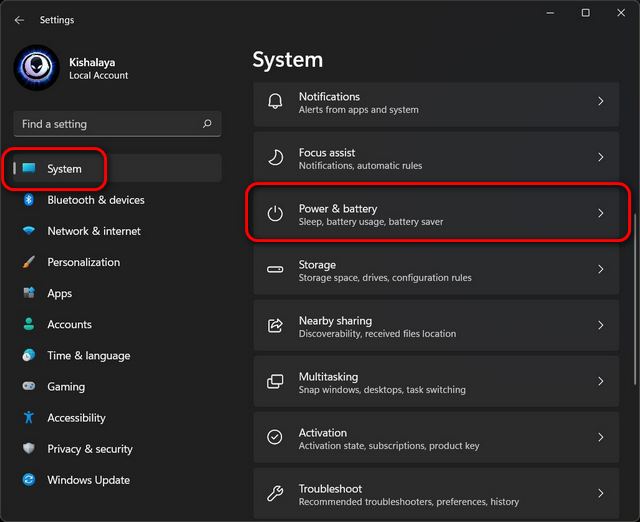
Open Settings via the Windows 11 keyboard shortcut Win + I. Then, click “System” on the left sidebar and select “Power” (“Power and Battery” on laptops) from the right pane.
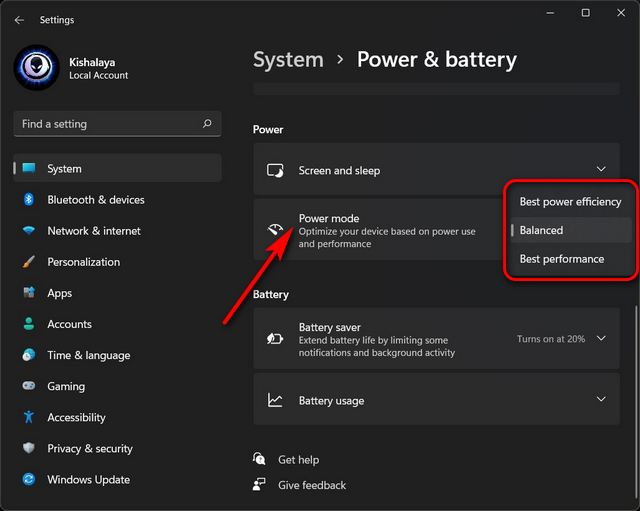
Now, scroll down to “Power mode” and use the drop-down menu (shows Balanced by default) to choose between three available modes: Best power efficiency, Balanced and Best performance.
Any change you make will be auto-saved. Based on the mode you select, Windows 11 will now either offer improved performance at the expense of battery consumption or better battery life at the cost of performance. Of course, the default “Balanced” option will continue to be the middle ground between performance and battery life.
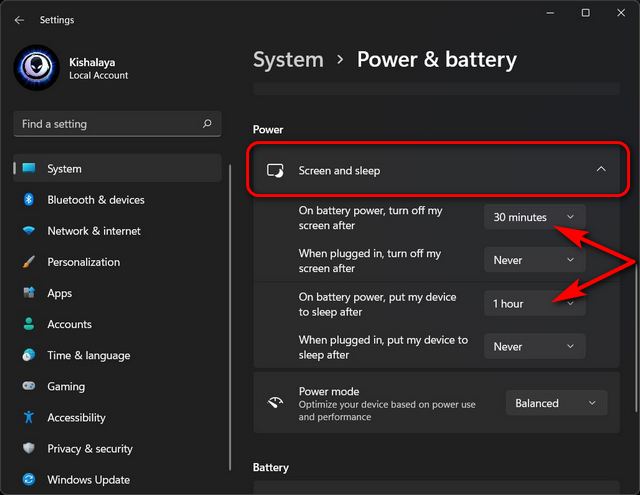
You can also customize the settings for how long your Windows 11 PC will remain inactive before it turns off the screen or goes to sleep. To do that, expand the “Screen and Sleep” option, and select your preferred durations from each drop-down menu. You can see my personalized settings in the screenshot below.
That’s it. You have now successfully changed the power mode via the Setting menu on your Windows 11 computer.
Method 2: Change Power Mode via Control Panel on Windows 11
Another way to change the power mode settings on Windows 11 is through the Control Panel. This method looks similar to Windows 10 power mode settings, and many of you might already be familiar with it. Just follow the instructions below:
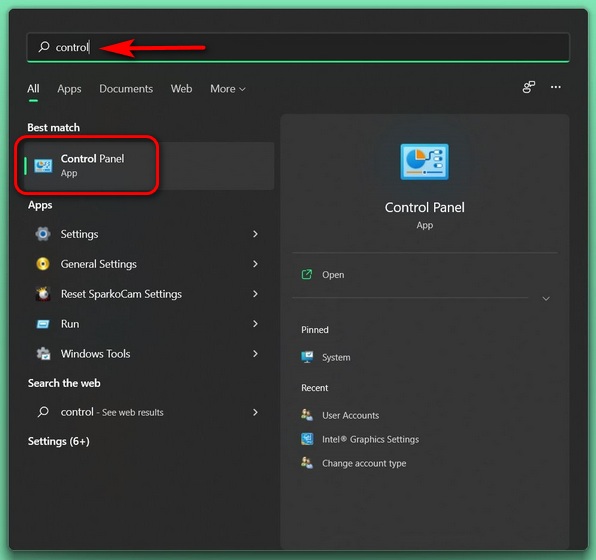
Open Control Panel on your Windows 11 computer. To do that, search for “control” (without quotes) in the Windows search bar and select “Control Panel” from the results.
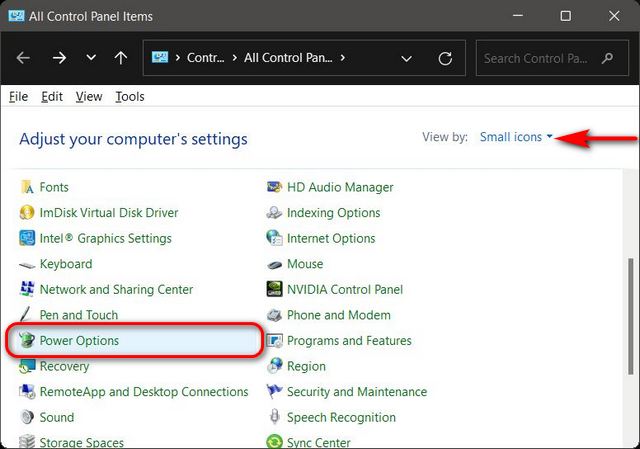
In the Control Panel, make sure you are using the “Icons” view (small or large) and select “Power Options“.
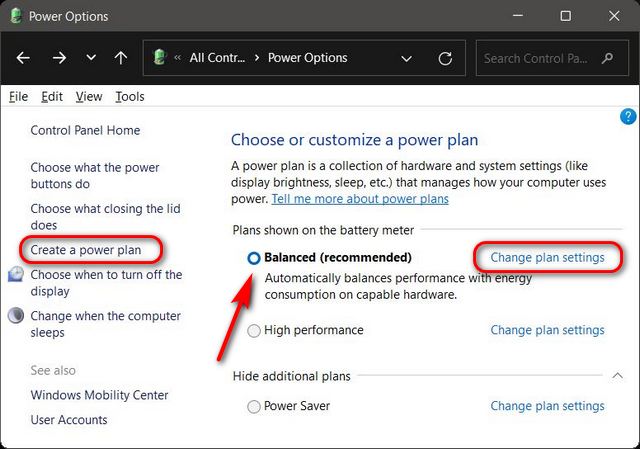
Next, select your preferred power mode for Windows 11. The available options will include Balanced (recommended), Power Saver, and High Performance. You can either select one of the three plans and retain its default settings or click on the “Change Plan Settings” option next to your preferred plan and tailor it to your needs. Moreover, you can also create a power plan from scratch. To do that, click “Create a power plan” on the left sidebar.
Note: If any of the three plans are not visible on your device, click on “Show additional plans” at the bottom to see all the available plans.
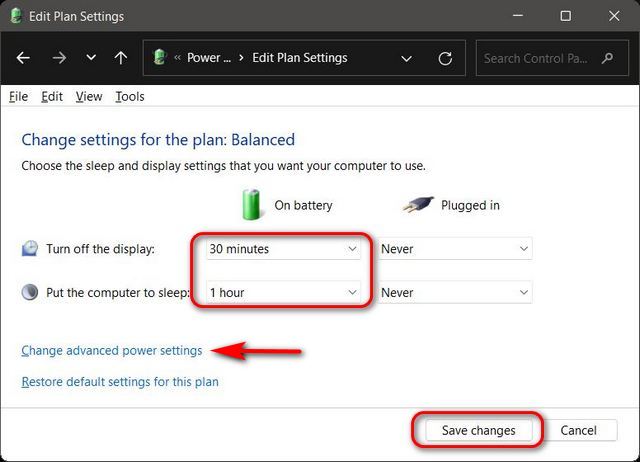
Once you click on “Change Plan Settings“, you will be able to tweak the power plan to decide how long your computer will remain idle before it goes to sleep or the screen is turned off. You can even hit the “Change Advanced Power Settings” option to make other changes to the power plan. Click on “Save Changes” once you are done.
That’s it. You have now successfully changed the power mode via the Control Panel on your Windows 11 computer.
Easily Change Battery Settings on Your Computer
As you can see, changing power mode settings on Windows 11 is easy, and you can do that using two separate ways in Windows 11. Now that you know how it works, you should also check out how you can improve battery life in your Windows laptop and how you can check the screen-on time in Windows 11. Both of these articles will help you better optimize the battery life and performance of your Windows 11 laptop. Meanwhile, if you are an Android user, check out how you can get the battery level of Bluetooth accessories on Android devices.
