iPhones use your Apple ID to perform backups to iCloud, sync Photos, Contacts, and even dedicated app files using iCloud Drive. Losing all your files can be devastating and sometimes irreversible. If you’re worried about losing your data, then you have come to the perfect place. Use the steps shown below to change your Apple ID on your iPhone without losing your data.
Change Apple ID on Your iPhone Without Losing Your Data Using iCloud
This process can be a bit tricky and relies on you having access to an iCloud subscription for extra storage space, depending on the files on your iPhone. This is because you can’t restore manual backups from one Apple ID to the other using iTunes. Thus when using iCloud, you can keep data from one of your Apple IDs on your iPhone and then merge it with the second Apple ID’s data. Sadly you only get 5GB of storage space with a free iCloud account which won’t be enough to save all your data. You can thus choose to either get a paid subscription or backup only important files and transfer them to your new Apple ID. Use these steps to now change your Apple ID on your iPhone without losing your data.
Backup Your Files
First, start by backing up and syncing all the necessary files to your current Apple ID’s iCloud. This will help make sure that you don’t lose any data during this process. Follow these steps to back up your data and sync necessary items to the iCloud.
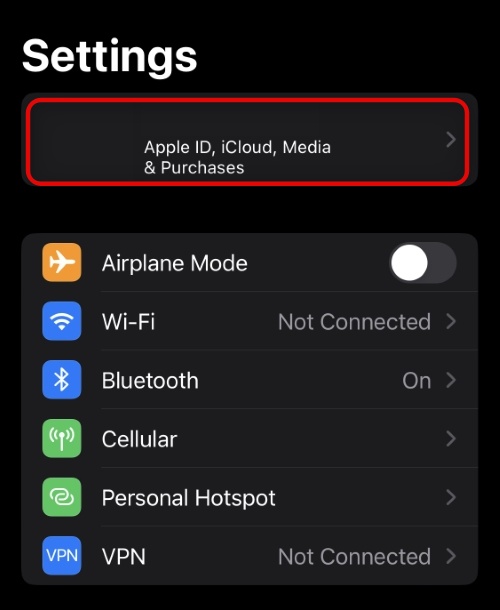
- Open the Settings app and tap your Apple ID at the top of your screen.
- Now tap and select iCloud. This section will allow you to back up your data and sync items to your iCloud account.
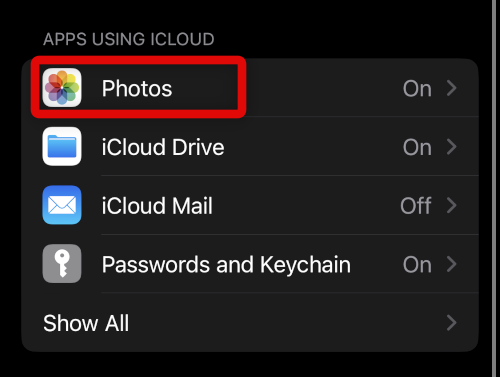
- Tap and select Photos. This will allow us to sync our photos to iCloud.
- Tap and turn on the toggle for Sync this iPhone at the top of your screen.
- Go back to the last page by tapping <iCloud.
- Now tap Show All to view all items that you can sync to your iCloud.
- Tap Notes to sync your notes to iCloud.
- Turn on the toggle for Sync this iPhone as we did for Photos.
- Go back to the last screen and tap Messages.
- Turn on the toggle for Sync this iPhone again.
- Go back and tap Health if you wish to sync your Health data to the cloud.
- Tap and enable the toggle for Sync this iPhone.
- Now turn on the toggle for the following stock apps to sync their data to iCloud. You can also turn on other apps in this list, but unfortunately, you won’t be able to transfer their data to your new Apple ID.
ContactsCalendarsSafariStoclsHomeWallet
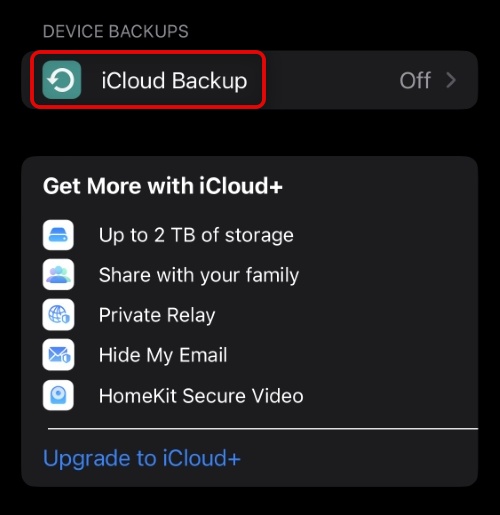
- Now tap < iCloud in the top left corner of your iPhone’s screen.
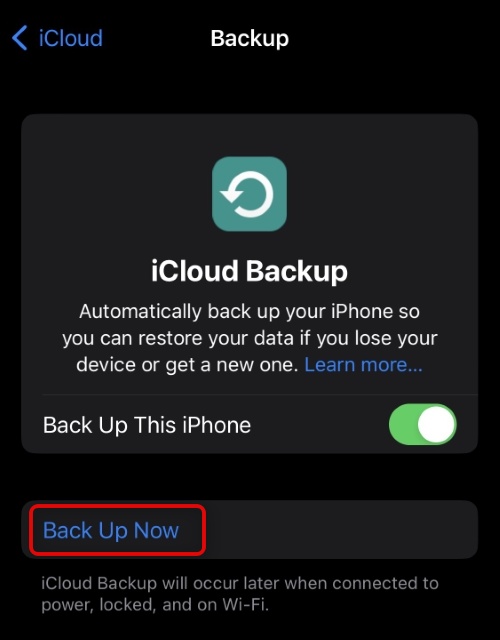
- Tap and select iCloud backup. This will allow us to back up your data to your current Apple ID so you can access any important files that don’t get carried to your new Apple ID.
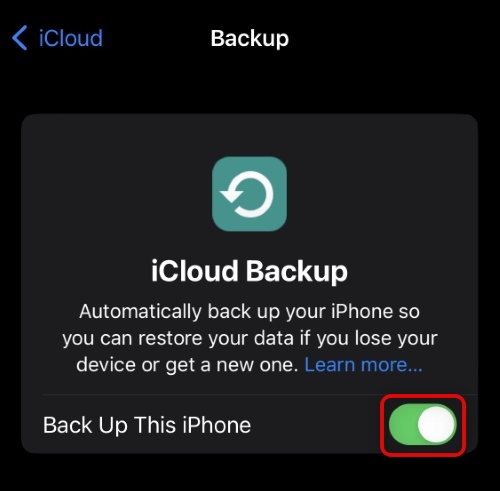
- Turn on the toggle for Back Up This iPhone at the top.
- Tap and select Back Up Now to back up your iPhone immediately. Wait for the iCloud backup to finish. Once done, you will have backed up and synced the necessary files to your iCloud account.
Sign Out of Your Current Apple ID
You can now sign out of your current Apple ID and choose to keep your data when signing out. Use the steps below to help you sign out of your current Apple ID on your iPhone.
- Open the Settings app using the Gear icon on your iPhone. Tap and select your Apple ID at the top of your screen.
- Scroll to the bottom and tap Sign Out.
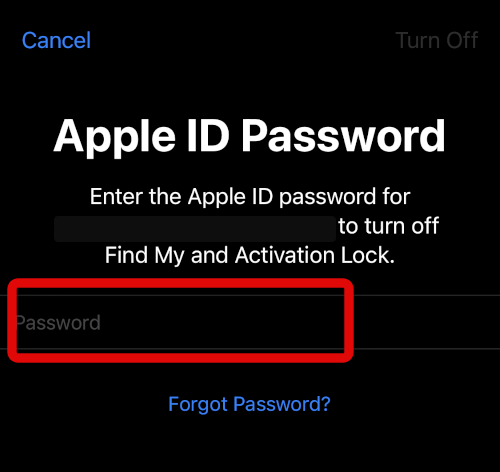
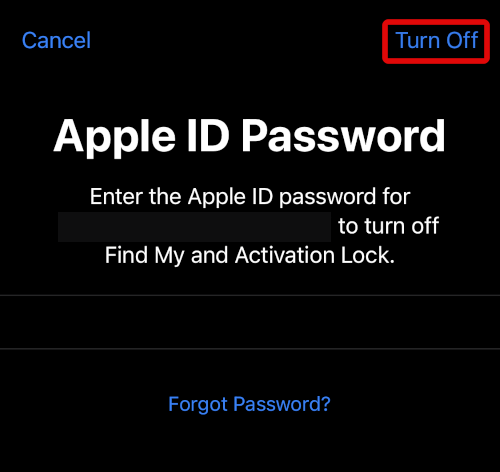
- Enter your Apple ID password when asked by your iPhone to turn off Find My.
- Now tap Turn Off in the top right corner once you’ve typed your Apple ID password.
- You will now be given the option to retain your Apple ID data on the current iPhone. Your Photos and other items won’t be removed from your iPhone when you sign out. Tap and turn on the toggle for the data you wish to retain on your iPhone.
- Once you’ve selected the data you wish to retain, tap Sign Out in the top right corner of your screen.
- Tap Sign Out again to sign out of your Apple ID once prompted. You will now be signed out of your Apple ID. Use the next section to sign back in with your new Apple ID.
Sign In With Your New Apple ID
Verify that the data you chose to retain still exists on your iPhone by checking the necessary apps. You can then use the steps below to sign in with your new Apple ID on your iPhone.
- Open the Settings app and tap Sign in to your iPhone.
- Enter your Apple ID and Password in the text fields available on your screen.
- Tap Next in the top right corner of your screen once you’ve entered your new Apple ID credentials.
- Verify your identity by successfully completing the two-factor authentication prompt.
- Now type in your iPhone’s passcode to sign in with your new Apple ID.
- Finally, tap Merge when prompted at the bottom of your screen. This will Merge your device’s retained data with the iCloud account of your new Apple ID. You will now have signed in with your new Apple ID without losing your data on your iPhone.
Retrieve Missing Data From iCloud
If you find certain files or synced items are missing from your iPhone after signing in with your new Apple ID, you can use iCloud for the web to retrieve this data. Here’s how you can do that on your computer.
- Visit iCloud.com in your favorite browser on your computer.
- Type in your Apple ID and press Enter on your keyboard. You can also click the right arrow once you’ve entered your Apple ID.
- Type in your password and hit Enter on your keyboard again.
- Verify your identity using two-factor authentication at the next step.
- You will now be shown your iCloud data. Click and select the app from where you wish to retrieve your data. Let’s download a missing photo for this example. Click and select Photos on your computer.
- Click and select the photo you wish to download.
- Now click the download icon in the top right corner. The image will now be downloaded to your computer. After signing in with your new Apple ID, you can now repeat the steps above and retrieve other missing files and data missing from your iPhone.
How to Change Apple ID Details Without Losing Your Data
If you want to change your Apple ID details like the email ID, phone number, and more, you can easily do so without losing any data. As you will be making changes to your current Apple ID, no data will be lost during this process, nor will you need to sync or back up files to iCloud. Here’s how you can change your Apple ID details without losing your data.
- Open the Settings app and tap your Apple ID at the top.
- Now tap Name, Phone Numbers, Email to edit the same for your Apple ID.
- Tap your name at the top if you wish to edit your name.
- Type in your preferred First name beside First and Last name beside Last.
- Now go back and tap Edit beside CONTACTABLE AT to change where you receive emails and two factor authentication codes from Apple.
- Tap the – Minus icon to remove an added contact info.
- Tap Add email or phone number to add a new contact info for your Apple ID.
- Tap Date of Birth to edit your date of birth.
- Tap and select the preferred date from the Calendar shown on your screen.
- Tap Done in the top right corner once you’ve finished editing your personal details. You will now have edited your personal details for your Apple ID on your iPhone. If you want to change your email used by your Apple ID, you can use the next section to help you along the way.
How to Change Apple ID Email
You will need a computer to change the email used by your Apple ID. Use the steps below to help you do the same for your Apple ID.
- Open your computer’s browser and visit this link.
- Click Sign In in the top right corner to sign in with your Apple ID.
- Use your Apple ID email and password to sign into your account.
- When you’re signed in, click Apple ID. This will allow you to change the email address used by your Apple ID.
- Type in your new email address under Change your Apple ID.
- A verification code will be sent to your email address. Type in the given code on your computer.
- Follow the instructions to complete the process. You will now have changed the email address used by your Apple ID.
Is all data saved when backing up to iCloud?
Most data stored on your iPhone is backed up to iCloud, including your Settings and other important information. Data that is not included with backups that are already synced to iCloud using iCloud sync.
Will apps be transferred to the new Apple ID?
No, app data will not be transferred to your new Apple ID; however, you will have access to all apps installed on your iPhone. You will just need to log into each one of them again.
Will photos be lost when changing Apple ID?
No, photos on your iPhone’s local storage will remain intact except for the photos in your iCloud Shared Library unless you decide to share them with your new Apple ID.
Final Words
Changing your Apple ID can seem daunting, especially if you have a lot of important data and files stored on your iPhone. Modern-day cloud sync services like iCloud offer a lot of flexibility when it comes to backing up your data; however, transferring this data comes with its own set of restrictions. I hope the post above helped you easily get familiar with these restrictions and change the Apple ID on your iPhone based on your requirements.
Δ